4.4. Jobs
Overview
The Jobs page manages every Job held on the MCM control plane in one place. A Job is the workload that creates one or more pods and runs them until the work given to them completes successfully.
What it is for:
- Managing multi-cluster Jobs together
- Running and monitoring one-off batch work
- Tracking whether a Job completed or failed
- Checking the PropagationPolicy and OverridePolicy
Where Jobs are used:
- Database migrations
- Batch data processing
- Backup and restore work
- Running a one-off script
- ETL (extract, transform, load) work
How the Screen Is Laid Out
The Jobs page shows the Job list as a table.
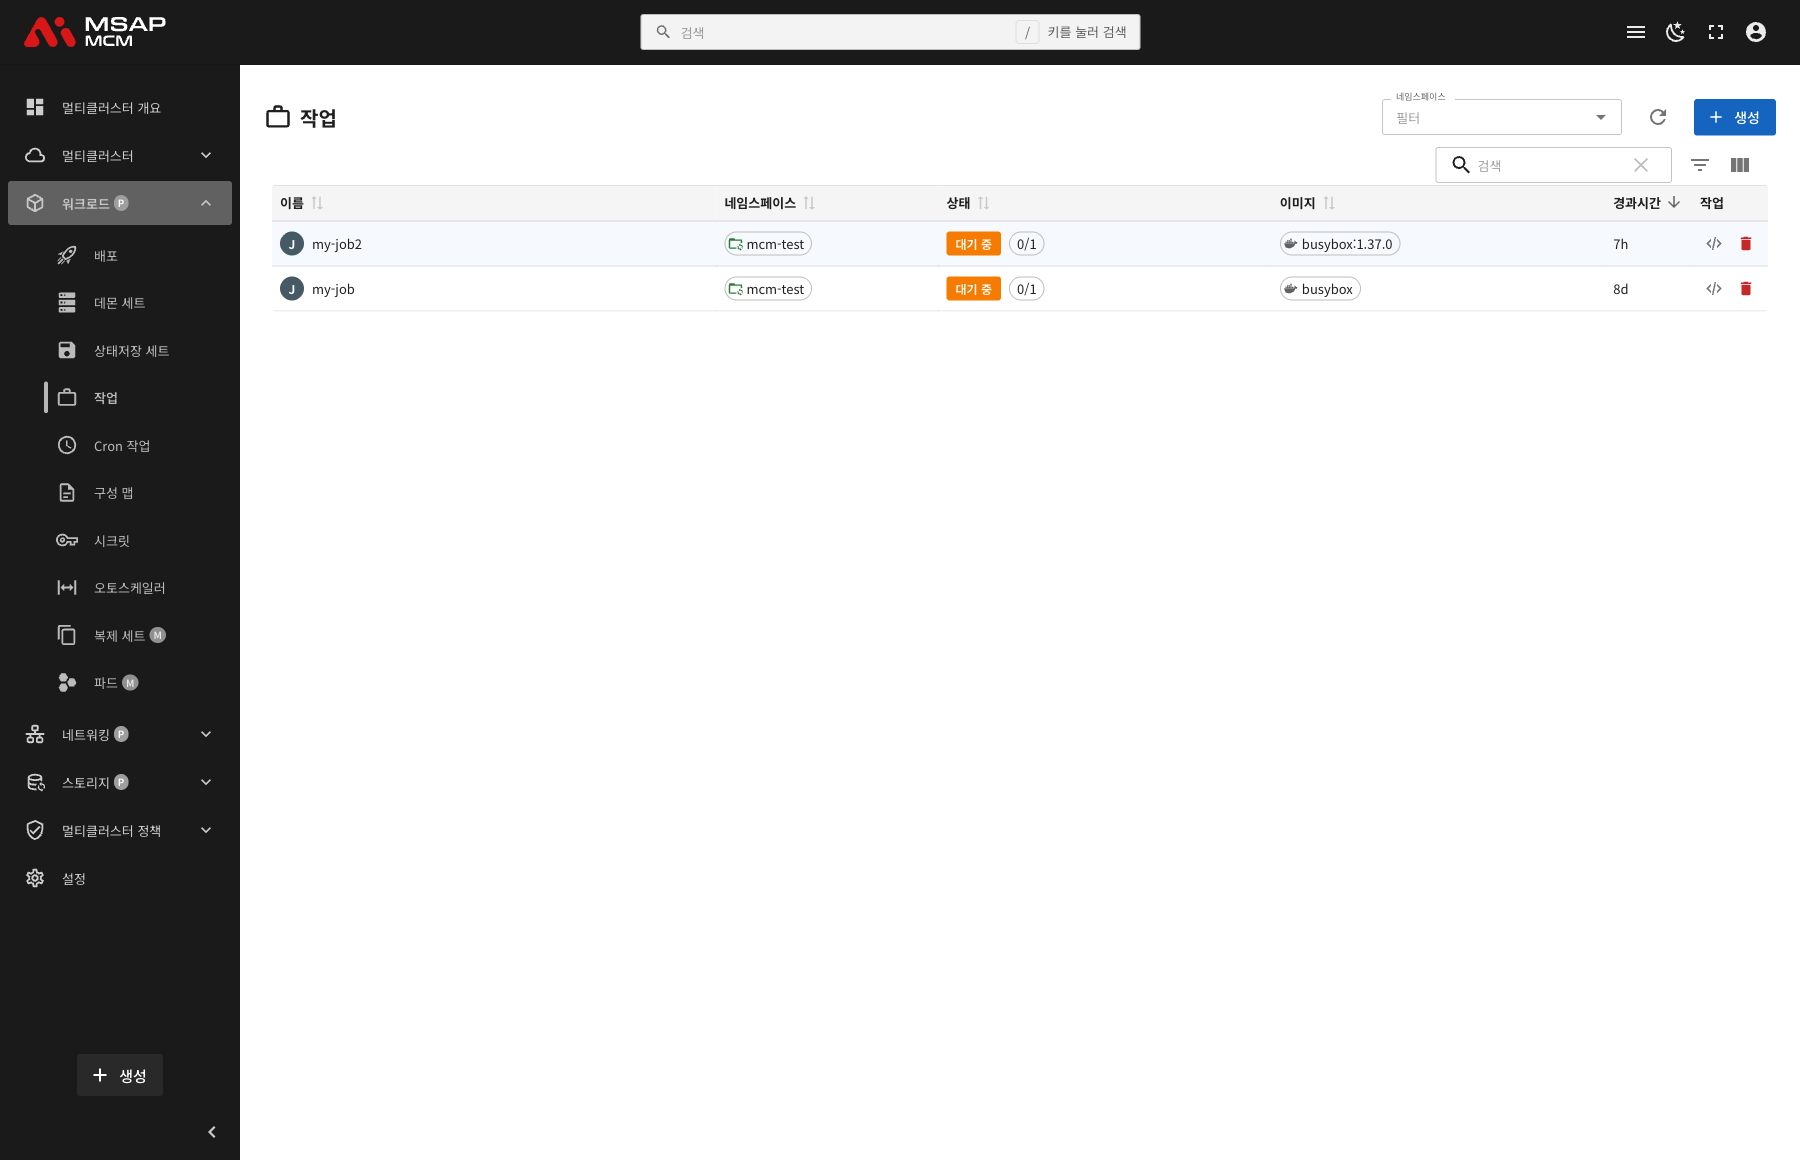
The Elements at the Top of the Page
| Element | Description |
|---|---|
| Namespace filter | Shows only the Jobs of a particular namespace |
| Refresh button | Refreshes the Job list |
| Create button | Opens the dialog for creating a new Job |
| Search box | Searches by Job name |
Table Columns
| Column | Description | Sortable |
|---|---|---|
| Name | The Job name | ✅ |
| Namespace | The namespace the Job belongs to | ✅ |
| Status | The Job state and how far it has got (succeeded / total) | ✅ |
| Image | The container image name | ✅ |
| Age | The time since the Job was created | ✅ |
| Actions | The edit and delete buttons | - |
How Status Is Shown
The Status column shows the Job's current state and how far it has got:
| Status | Description | How it is shown |
|---|---|---|
| Complete | Every pod completed successfully | A green badge with N/N |
| Running | Pods are running | A blue badge with N/N |
| Pending | Pods are waiting to be scheduled | A yellow badge with 0/N |
| Failed | The Job failed | A red badge |
For example Pending 0/1 -- 0 of 1 target completions done, waiting.
Job Detail
Clicking a Job row opens the detail panel.
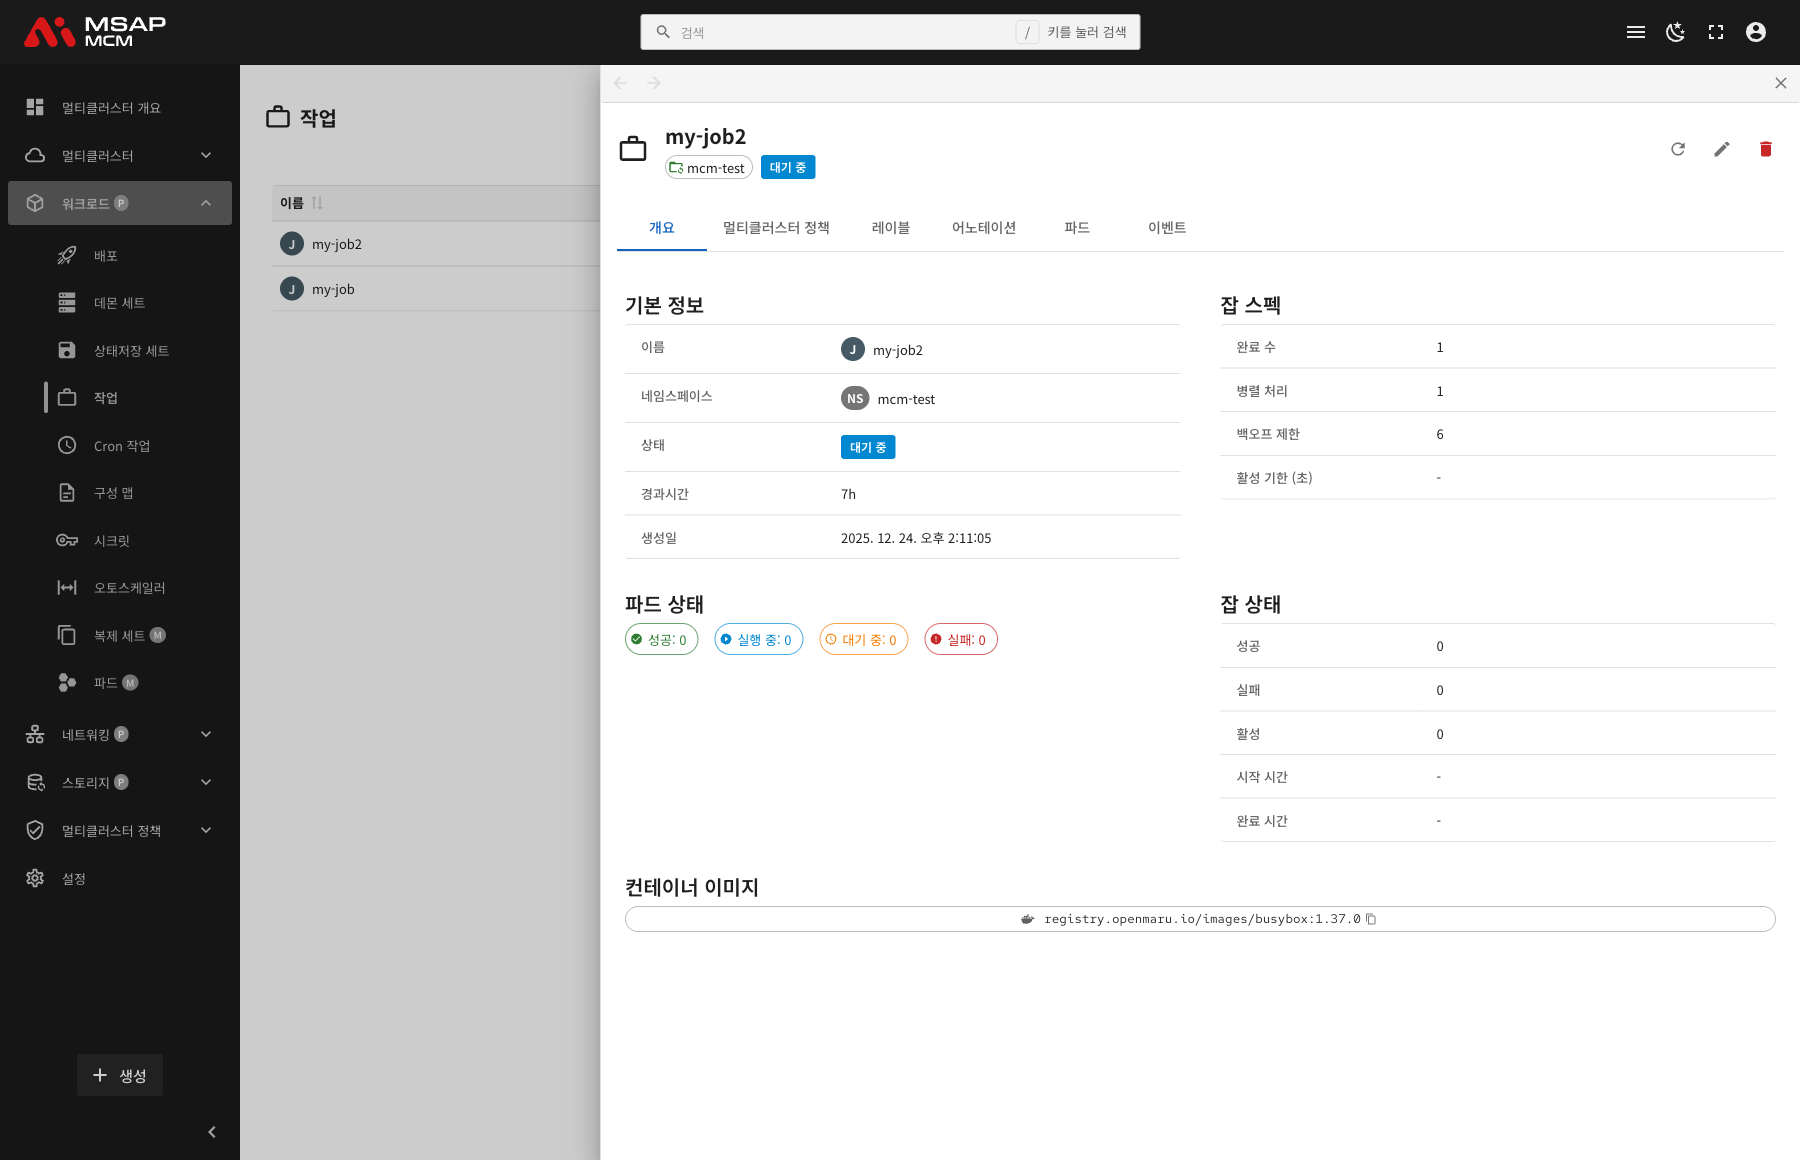
The Detail Panel Header
| Element | Description |
|---|---|
| Job name | The name of the chosen Job |
| Namespace | The namespace the Job belongs to |
| Status | Pending / Running / Complete / Failed |
The Action Buttons
| Button | What it does |
|---|---|
| Refresh | Refreshes the Job information |
| Edit | Opens the YAML edit mode |
| Delete | Deletes the Job |
The Tabs
The Overview Tab
Shows the Job's basic information, specification, and status.
Basic information:
| Item | Description |
|---|---|
| Name | The Job name |
| Namespace | The namespace the Job belongs to |
| Status | Pending / Running / Complete / Failed |
| Age | The time since creation |
| Created | When the Job was created |
Job Specification:
| Item | Description |
|---|---|
| Completions | The number of pods that must complete successfully |
| Parallelism | The number of pods that may run at once |
| Backoff Limit | The retry limit on failure |
| Active Deadline (s) | The time limit on the Job's run, in seconds |
Pod state:
Shows the Job's pods visually:
- Succeeded: pods that completed successfully
- Running: pods running now
- Pending: pods waiting to be scheduled
- Failed: pods that failed
Job Status:
| Item | Description |
|---|---|
| Succeeded | The number of pods that completed successfully |
| Failed | The number of pods that failed |
| Active | The number of pods running now |
| Start Time | When the Job started |
| Completion Time | When the Job completed |
Container images:
Shows the container images defined on the Job.
The Multi-Cluster Policies Tab
Shows the multi-cluster policies that apply to the Job.
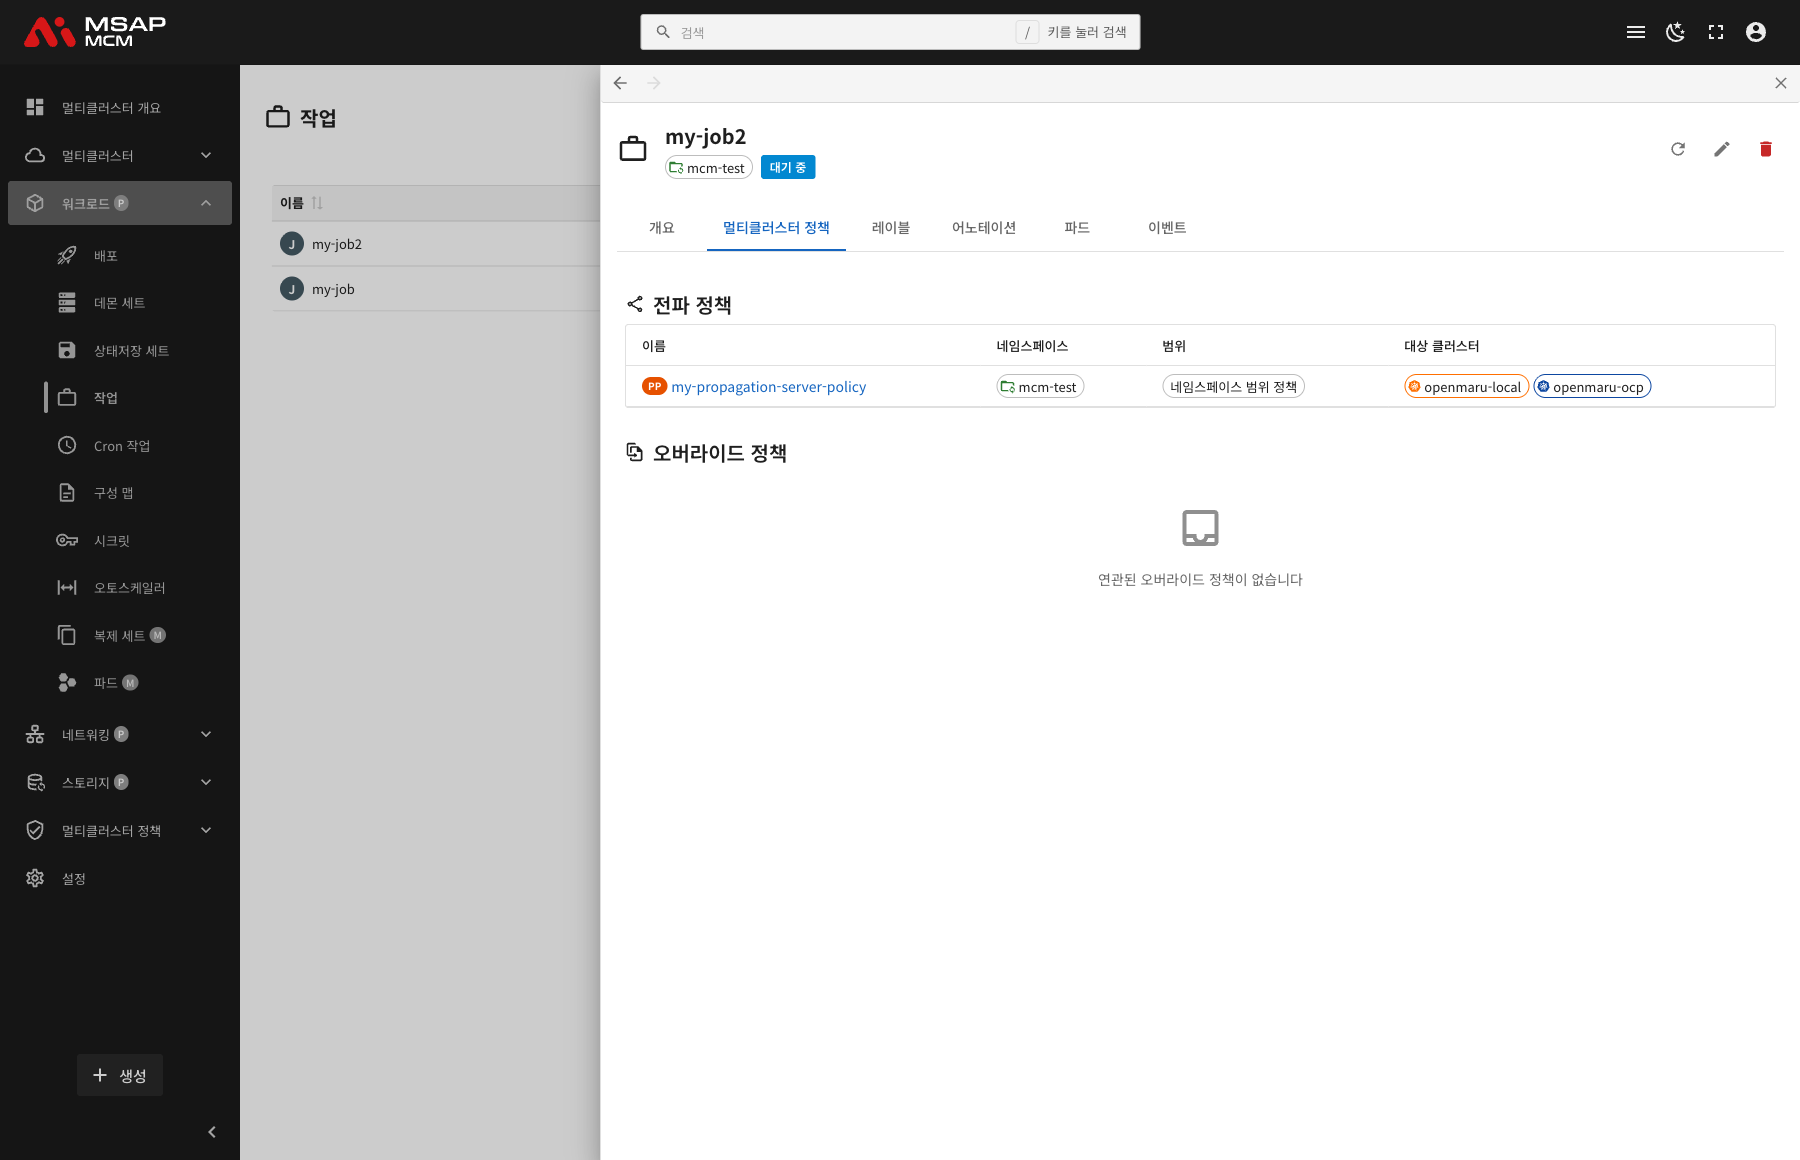
PropagationPolicy:
| Column | Description |
|---|---|
| Name | The PropagationPolicy name |
| Namespace | The namespace the policy belongs to |
| Scope | Namespace-scoped policies / cluster-scoped policies |
| Target Clusters | The list of target clusters |
OverridePolicy:
Shown where there are per-cluster custom settings.
The Labels Tab
Shows the list of Kubernetes labels applied to the Job.
The Annotations Tab
Shows the list of annotations applied to the Job.
The Pods Tab
Shows the list of pods created by that Job.
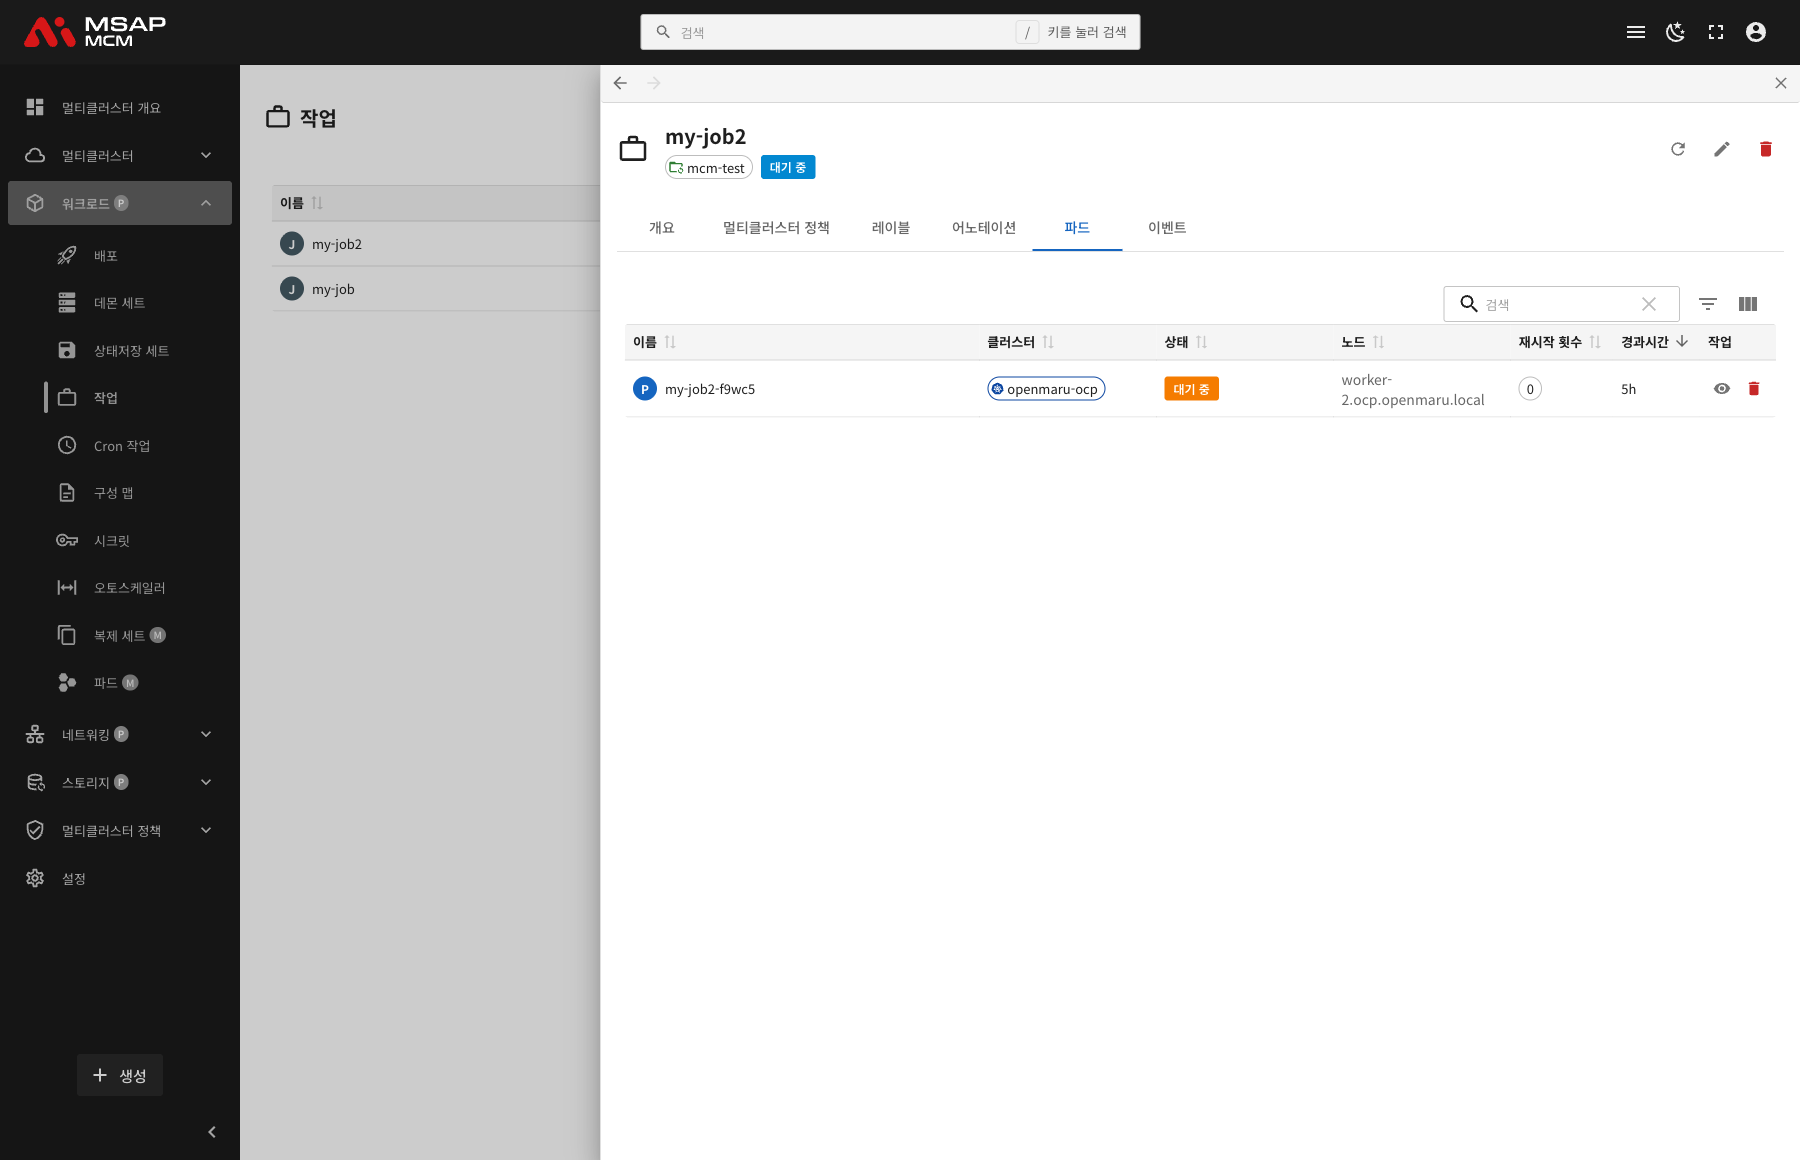
| Column | Description |
|---|---|
| Name | The pod name (my-job2-f9wc5, for example) |
| Cluster | The cluster the pod is running on |
| Status | The pod state (Running / Pending / Succeeded / Failed) |
| Node | The node the pod is scheduled on |
| Restarts | The pod restart count |
| Age | The time since the pod was created |
| Actions | The view and delete buttons |
The Events Tab
Shows the Kubernetes events related to the Job.
Creating a Job
Creates a new Job on the MCM control plane.
Fields
| Field | Required | Description |
|---|---|---|
| Name | ✅ | The Job name |
| Namespace | ✅ | The namespace to deploy into |
| Container image | ✅ | The container image URL |
| Command | - | The container command |
| Completions | - | The number of pods that must complete (default: 1) |
| Parallelism | - | The number of pods running at once (default: 1) |
| Backoff Limit | - | The retry limit (default: 6) |
| Active Deadline | - | The time limit on the run, in seconds |
Editing the YAML
The "Edit YAML" tab lets you write the Job definition directly.
Job Operations
Editing a Job
- Choose the Job
- Press the "Edit" button in the detail panel
- Change the Job definition in the YAML editor
- Press the "Save" button
Note: the specification of a Job already running can be changed only in limited ways.
Deleting a Job
⚠️ Caution: deleting a Job deletes every pod that belongs to it.
- Choose the Job to delete
- Press the "Delete" button in the detail panel
- Type the Job name in the confirmation dialog
- Press the "Delete" button
Worked Examples
Scenario 1: Creating a Database Migration Job
- Press the "Create" button
- Enter the Job details:
- Name:
db-migration - Namespace:
production - Container image:
my-registry/db-migrate:v1.0 - Command:
["./migrate.sh", "--apply"]
- Name:
- Press the "Create" button
- Name the target clusters with a PropagationPolicy
- Monitor the Job to completion
Scenario 2: Checking Job Status
- Click the Job you want to check in the list
- Check the Job Status on the Overview tab:
- The succeeded, failed, and active pod counts
- The start and completion times
- Check individual pod state on the Pods tab
- Check the Job's events on the Events tab
Scenario 3: Parallel Batch Processing
- Press the "Create" button
- Enter the Job details:
- Name:
batch-process - Completions:
10(10 pieces of work must complete) - Parallelism:
3(3 pods run at once)
- Name:
- Press the "Create" button
- Monitor progress on the Overview tab:
- Active: 3 at most
- Succeeded: climbing from 0 to 10
Scenario 4: Checking the Retries of a Failed Job
- Click the failed Job
- Check the Job Specification on the Overview tab:
- Backoff Limit: the retry count
- Find the cause of failure on the Events tab
- Check the failed pod's logs on the Pods tab
- Delete, fix, and recreate the Job if needed
Scenario 5: Running a Job Across Clusters
- Create the Job and apply a PropagationPolicy
- Check the "Multi-Cluster Policies" tab in the detail panel
- Confirm the Job has been shared out to the target clusters
- Check how the pods are running per cluster on the Pods tab
- Monitor until the Job completes on each cluster
Related Concepts
Job against CronJob
| Trait | Job | CronJob |
|---|---|---|
| How it runs | Once | On a periodic schedule |
| Trigger | Runs as soon as it is created | Runs on the cron schedule |
| Where it is used | Migrations, backups | Periodic reports, regular backups |
| Management | Created and deleted by hand | Creates Jobs automatically |
Completions and Parallelism
Completions:
- The number of pods that must complete for the Job to count as successful
- Default: 1
Parallelism:
- The number of pods that may run at once
- Default: 1
- When parallelism is below completions, pods are created in sequence
The Backoff Limit
- The retry limit when a pod fails
- Default: 6
- The Job is marked failed once the backoff limit is reached
- The retry interval grows exponentially (10 seconds, 20 seconds, 40 seconds...)
The TTL Controller
The feature that cleans up completed Jobs automatically:
ttlSecondsAfterFinished: how long to wait after completion before deleting- For example
ttlSecondsAfterFinished: 3600-- deleted an hour after completion
The Active Deadline
activeDeadlineSeconds: the maximum time a Job may run- On timeout the Job and every pod are ended
- Useful for preventing a long-running job
Next Steps
- CronJobs -- managing multi-cluster CronJobs
- Pods -- managing pods in detail
- Propagation Policies -- configuring a PropagationPolicy