4.8. HPA (Horizontal Pod Autoscaler)
Overview
The HPA (Horizontal Pod Autoscaler) page manages every HPA held on the MCM control plane in one place. An HPA is the Kubernetes resource that adjusts the number of pod replicas automatically on a metric such as CPU utilisation or memory usage.
What it is for:
- Managing multi-cluster HPAs together
- Configuring and monitoring autoscaling
- Scaling dynamically on resource usage
- Distributing HPAs through a PropagationPolicy
Where HPAs are used:
- Scaling out automatically when traffic grows
- Optimising capacity against resource utilisation
- Cost-efficient resource management
- Keeping an application available
- Automating the response to peak times
How the Screen Is Laid Out
The HPA page shows the HPA list as a table.
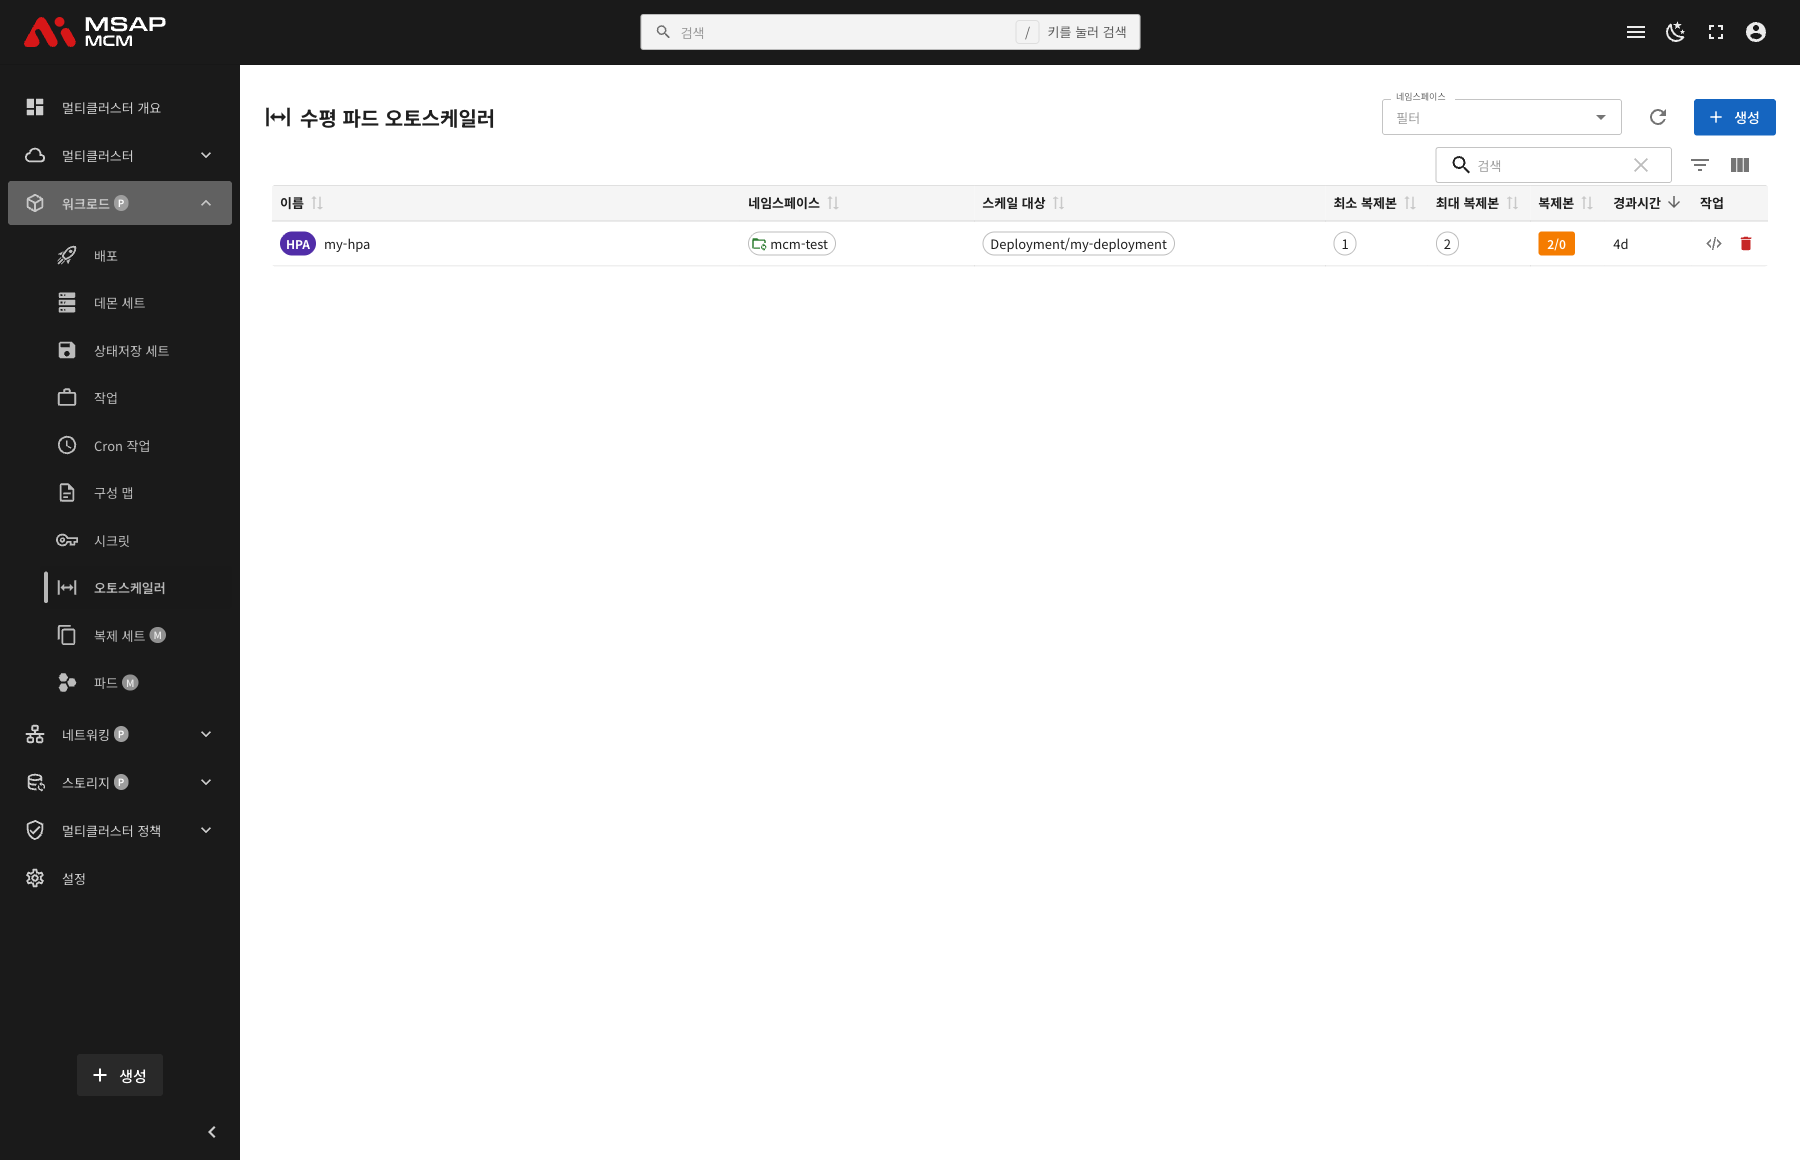
The Elements at the Top of the Page
| Element | Description |
|---|---|
| Namespace filter | Shows only the HPAs of a particular namespace |
| Refresh button | Refreshes the HPA list |
| Create button | Opens the dialog for creating a new HPA |
| Search box | Searches by HPA name |
Table Columns
| Column | Description | Sortable |
|---|---|---|
| Name | The HPA name | ✅ |
| Namespace | The namespace the HPA belongs to | ✅ |
| Scale Target | The resource being scaled (Deployment/my-deployment, for example) | ✅ |
| Min Replicas | The minimum pod count to keep | ✅ |
| Max Replicas | The maximum pod count to grow to | ✅ |
| Replicas | Current replicas / desired replicas | ✅ |
| Age | The time since the HPA was created | ✅ |
| Actions | The edit and delete buttons | - |
How the Replicas Are Shown
The Replicas column shows the HPA's current scaling state:
- Format:
current replicas/desired replicas - For example
2/0-- 2 pods now, 0 desired (waiting to scale down) - For example
3/5-- 3 pods now, scaling up to 5
HPA Detail
Clicking an HPA row opens the detail panel.
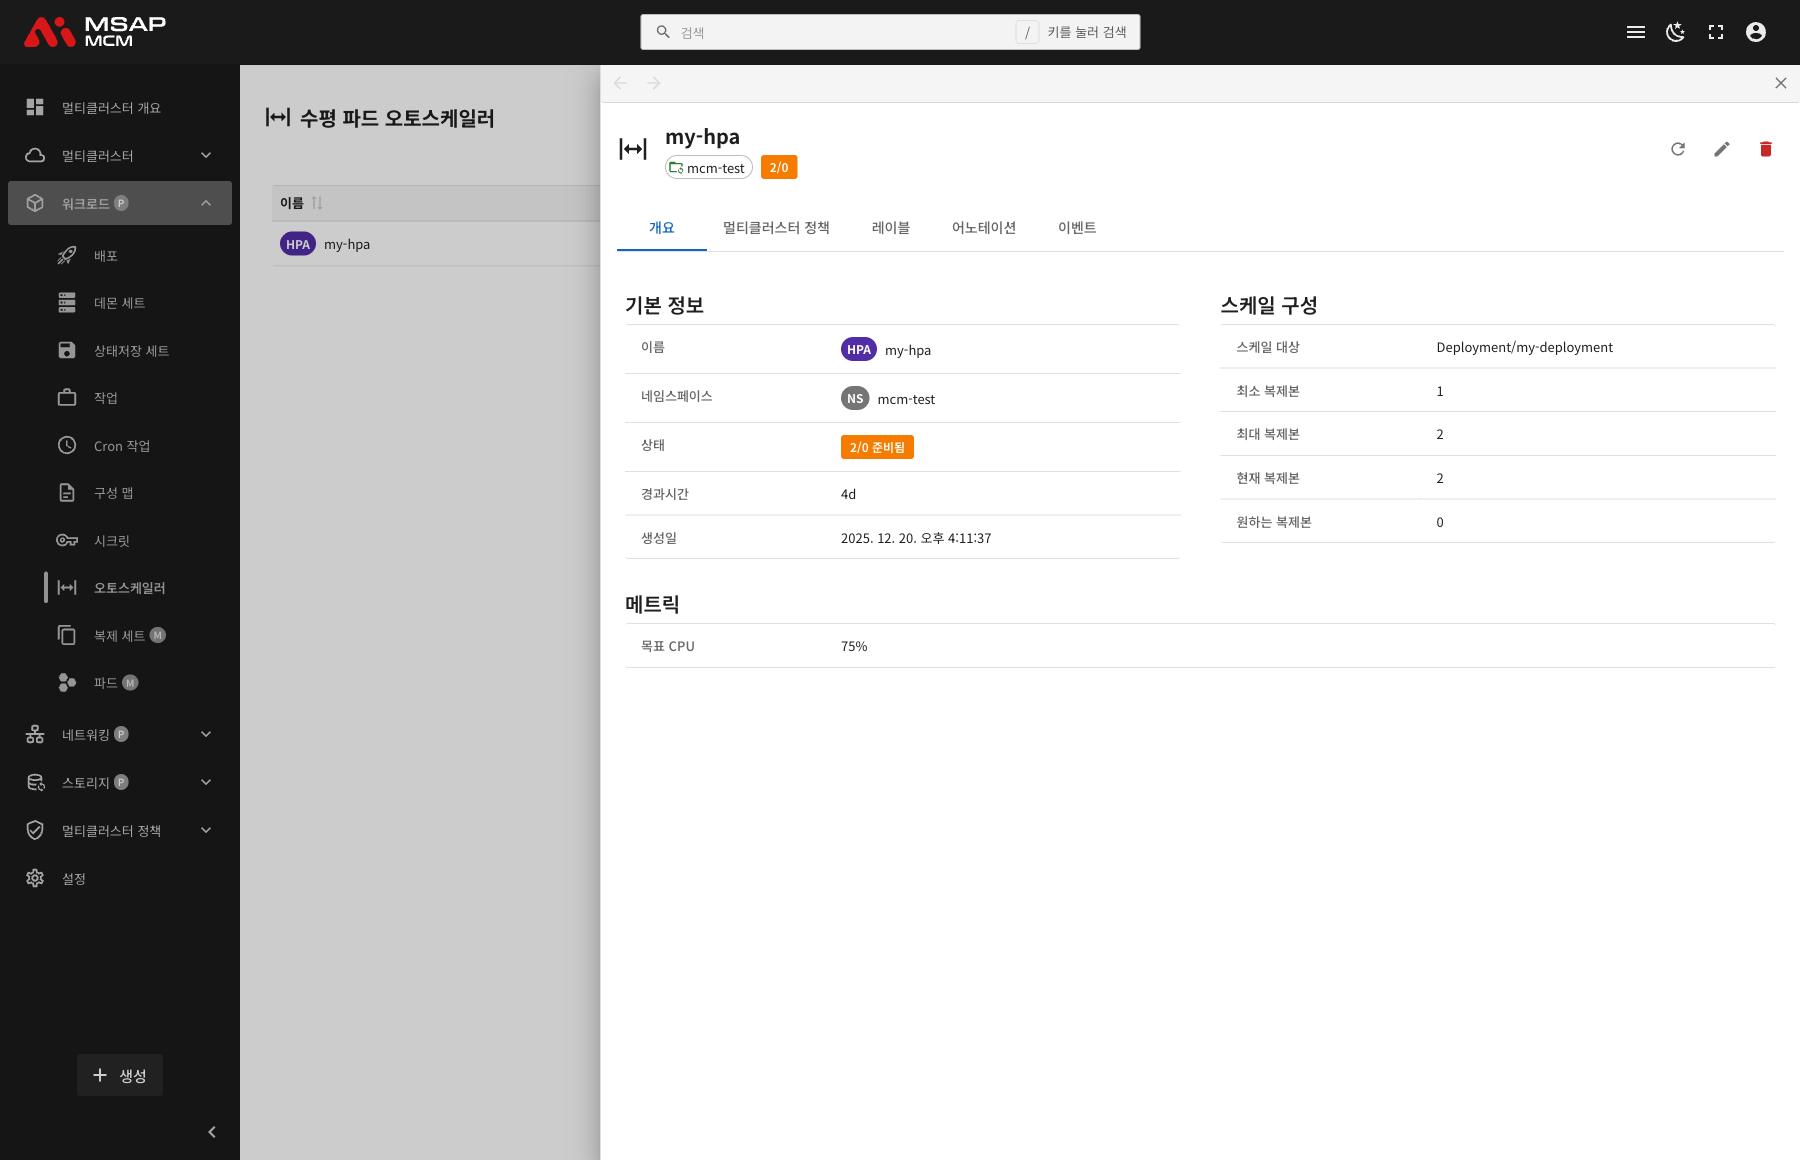
The Detail Panel Header
| Element | Description |
|---|---|
| HPA name | The name of the chosen HPA |
| Namespace | The namespace the HPA belongs to |
| Replica state | Current replicas / desired replicas (2/0, for example) |
The Action Buttons
| Button | What it does |
|---|---|
| Refresh | Refreshes the HPA information |
| Edit | Opens the YAML edit mode |
| Delete | Deletes the HPA |
The Tabs
The Overview Tab
Shows the HPA's basic information, scale configuration, and metrics.
Basic information:
| Item | Description |
|---|---|
| Name | The HPA name |
| Namespace | The namespace the HPA belongs to |
| Status | The replica state (2/0 ready, for example) |
| Age | The time since creation |
| Created | When the HPA was created |
Scale Configuration:
| Item | Description |
|---|---|
| Scale Target | The resource being scaled (Deployment/my-deployment, for example) |
| Min Replicas | The minimum pod count to keep |
| Max Replicas | The maximum pod count to grow to |
| Current Replicas | The number of pods running now |
| Desired Replicas | The pod count the HPA wants |
Metrics:
Shows the metrics the HPA watches:
| Item | Description |
|---|---|
| Target CPU | The target CPU utilisation (75%, for example) |
| Target memory | The target memory utilisation (where it is set) |
| Custom metrics | Custom metrics (where they are set) |
The Multi-Cluster Policies Tab
Shows the multi-cluster policies that apply to the HPA.
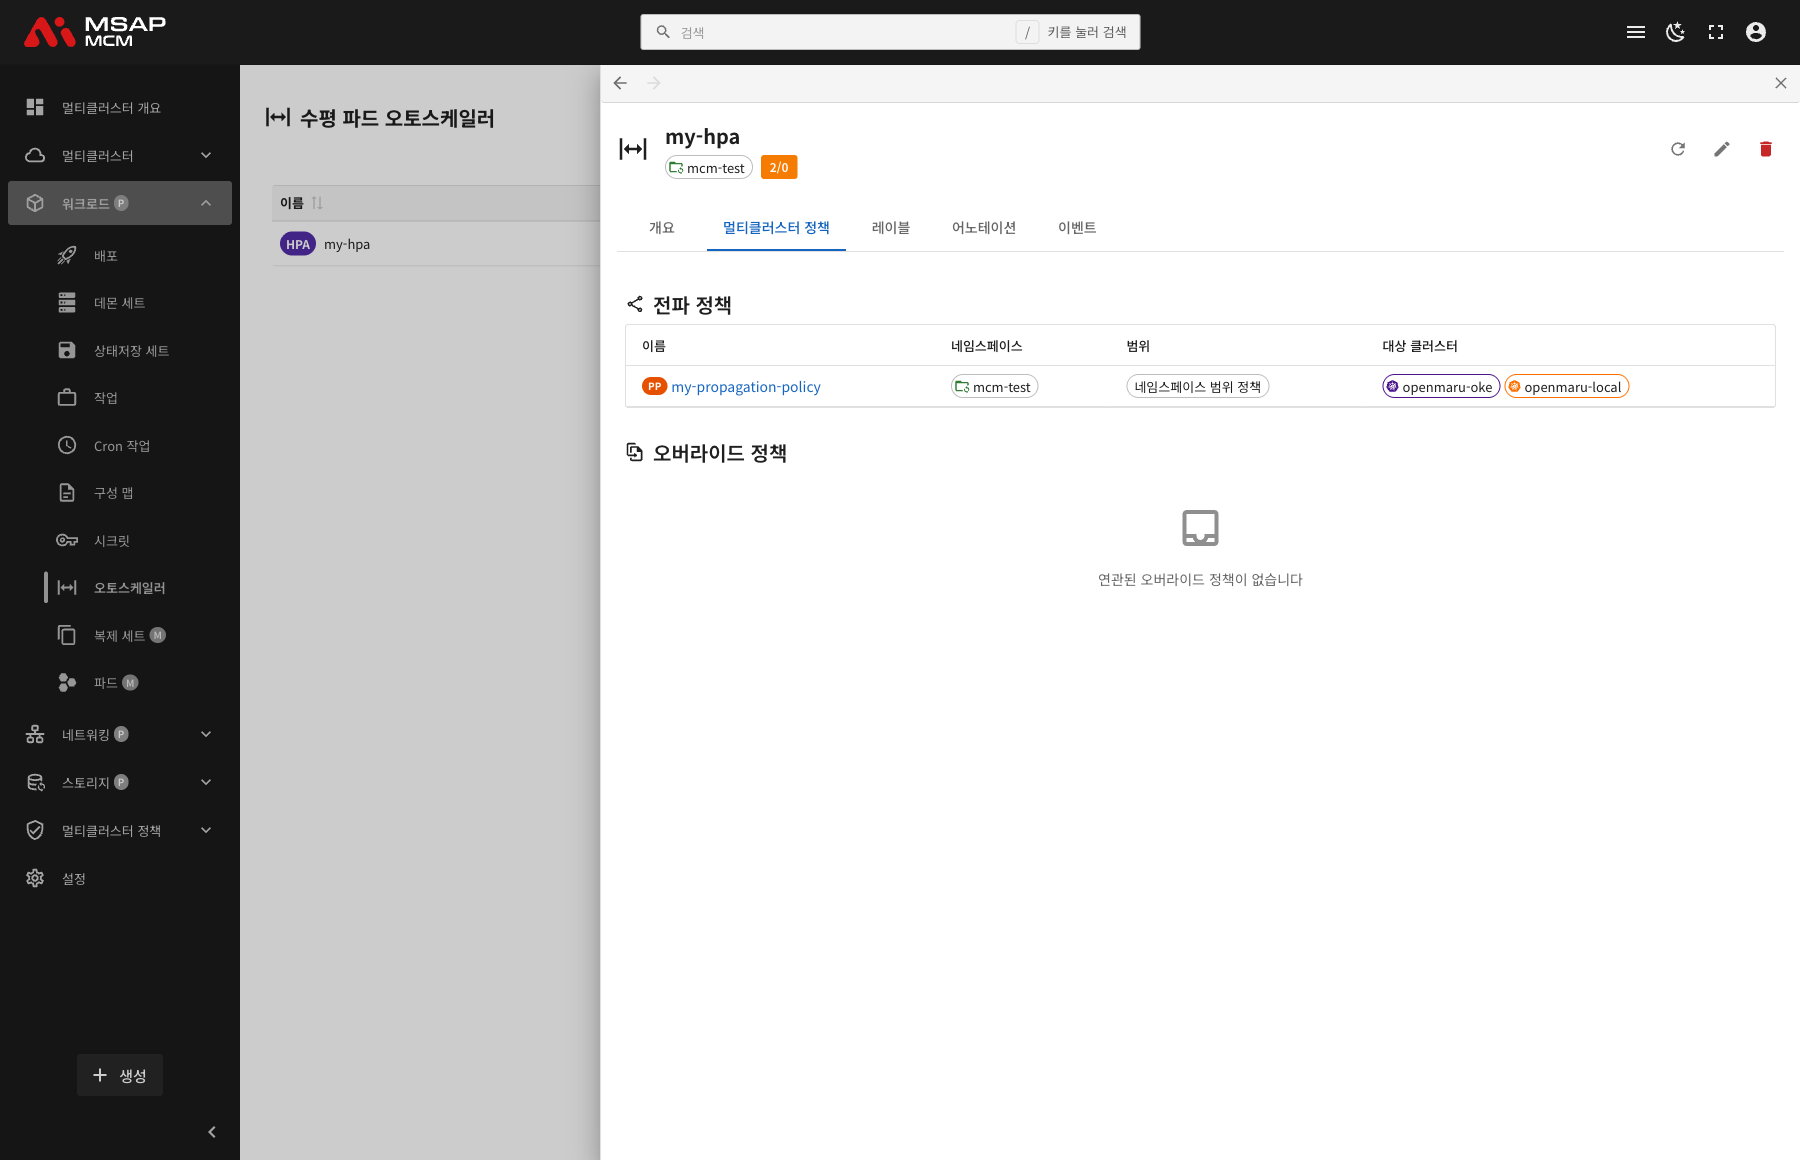
PropagationPolicy:
| Column | Description |
|---|---|
| Name | The PropagationPolicy name |
| Namespace | The namespace the policy belongs to |
| Scope | Namespace-scoped policies / cluster-scoped policies |
| Target Clusters | The list of target clusters |
OverridePolicy:
Shown where there are per-cluster custom settings.
The Labels Tab
Shows the list of Kubernetes labels applied to the HPA.
The Annotations Tab
Shows the list of annotations applied to the HPA.
The Events Tab
Shows the Kubernetes events related to the HPA.
Creating an HPA
Creates a new HPA on the MCM control plane.
Fields
| Field | Required | Description |
|---|---|---|
| Name | ✅ | The HPA name |
| Namespace | ✅ | The namespace to deploy into |
| Scale Target | ✅ | The resource to scale |
| Min Replicas | ✅ | The minimum pod count (default: 1) |
| Max Replicas | ✅ | The maximum pod count |
| Target CPU utilisation | - | The target CPU utilisation (%) |
| Target memory utilisation | - | The target memory utilisation (%) |
Editing the YAML
The "Edit YAML" tab lets you write the HPA definition directly.
apiVersion: autoscaling/v2
kind: HorizontalPodAutoscaler
metadata:
  name: my-hpa
  namespace: default
spec:
  scaleTargetRef:
    apiVersion: apps/v1
    kind: Deployment
    name: my-deployment
  minReplicas: 1
  maxReplicas: 10
  metrics:
    - type: Resource
      resource:
        name: cpu
        target:
          type: Utilization
          averageUtilization: 75
HPA Operations
Editing an HPA
- Choose the HPA
- Press the "Edit" button in the detail panel
- Change the HPA definition in the YAML editor
- Press the "Save" button
Note: changing an HPA affects its scaling behaviour at once. Change it carefully in a production environment.
Deleting an HPA
⚠️ Caution: deleting an HPA stops the automatic scaling. After that the replica count has to be managed by hand.
- Choose the HPA to delete
- Press the "Delete" button in the detail panel
- Type the HPA name in the confirmation dialog
- Press the "Delete" button
Worked Examples
Scenario 1: Creating a CPU-Based HPA
- Press the "Create" button
- Enter the HPA details:
- Name:
web-hpa - Namespace:
production - Scale Target:
Deployment/web-app - Min Replicas:
2 - Max Replicas:
10 - Target CPU utilisation:
70%
- Name:
- Press the "Create" button
- Name the target clusters with a PropagationPolicy
- Monitor how the HPA scales
Scenario 2: Checking an HPA's Scaling State
- Click the HPA you want to check in the list
- Check the Scale Configuration on the Overview tab:
- The current replica count
- The desired replica count
- The min and max replica settings
- Check the target utilisation in the Metrics section
- Check the scaling events on the Events tab
Scenario 3: Creating a Memory-Based HPA
- Press the "Create" button and choose the Edit YAML tab
- Write this YAML:
apiVersion: autoscaling/v2kind: HorizontalPodAutoscalermetadata:name: memory-hpanamespace: productionspec:scaleTargetRef:apiVersion: apps/v1kind: Deploymentname: memory-appminReplicas: 2maxReplicas: 8metrics:- type: Resourceresource:name: memorytarget:type: UtilizationaverageUtilization: 80
- Press the "Create" button
Scenario 4: Creating an HPA on Several Metrics
- Press the "Create" button and choose the Edit YAML tab
- Set both CPU and memory:
apiVersion: autoscaling/v2kind: HorizontalPodAutoscalermetadata:name: multi-metric-hpanamespace: productionspec:scaleTargetRef:apiVersion: apps/v1kind: Deploymentname: appminReplicas: 3maxReplicas: 15metrics:- type: Resourceresource:name: cputarget:type: UtilizationaverageUtilization: 70- type: Resourceresource:name: memorytarget:type: UtilizationaverageUtilization: 80
- Press the "Create" button
Scenario 5: Deploying an HPA Across Clusters
- Create the HPA
- Create a PropagationPolicy:
- Resource selector: name the HPA
- Target clusters: choose the clusters to deploy to
- Check the "Multi-Cluster Policies" tab in the detail panel
- Confirm the HPA is working on each cluster
Related Concepts
How an HPA Works
An HPA runs on this cycle:
- Collect the metric: gathers the named metric (CPU, memory and so on) periodically
- Work out the utilisation: compares the current utilisation against the target
- Work out the replicas: computes the desired replica count
- Scale: adjusts the replica count where needed
The formula:
desired replicas = ceil(current replicas * (current metric value / target metric value))
HPA against VPA
| Trait | HPA | VPA |
|---|---|---|
| Direction of scaling | Horizontal (more pods) | Vertical (more resources) |
| What it adjusts | The replica count | The CPU and memory requests |
| Where it is used | Responding to a rise in traffic | Optimising resources |
| Downtime | None | The pod has to restart |
Scaling Policies
Scaling up:
- Scales up when the metric passes the target
- Scales up quickly by default
- The speed can be controlled with the
scaleUppolicy
Scaling down:
- Scales down when the metric falls below the target
- Scales down after a stabilisation window (5 minutes) by default
- The speed can be controlled with the
scaleDownpolicy
Configuring the Scaling Behaviour
apiVersion: autoscaling/v2
kind: HorizontalPodAutoscaler
metadata:
  name: advanced-hpa
spec:
  scaleTargetRef:
    apiVersion: apps/v1
    kind: Deployment
    name: my-app
  minReplicas: 2
  maxReplicas: 10
  behavior:
    scaleUp:
      stabilizationWindowSeconds: 0
      policies:
        - type: Percent
          value: 100
          periodSeconds: 15
    scaleDown:
      stabilizationWindowSeconds: 300
      policies:
        - type: Percent
          value: 50
          periodSeconds: 60
  metrics:
    - type: Resource
      resource:
        name: cpu
        target:
          type: Utilization
          averageUtilization: 70
Metric Types
| Type | Description | Example |
|---|---|---|
| Resource | A resource metric such as CPU or memory | CPU utilisation 70% |
| Pods | A pod metric (custom) | Requests per second |
| Object | A Kubernetes object metric | The Ingress request count |
| External | An external metric | The queue length |
Points to Watch with Multi-Cluster HPAs
When deploying an HPA to several clusters through MCM:
PropagationPolicy:
- Copies the HPA to several clusters
- Each cluster scales independently
- Each cluster scales itself on its local metrics
OverridePolicy:
- Applies different scaling settings per cluster
- For example, a different maximum replica count per cluster
- For example, a different target utilisation per cluster
Points to watch:
- The HPA works independently on each cluster
- Global scaling at the level of all clusters needs a separate arrangement
- Traffic distribution between clusters is managed at the Ingress or Service level
Good Practice for HPAs
- Set a sensible target utilisation: 50 to 80% is generally recommended
- Set the minimum replicas: 2 or more is recommended for high availability
- Cap the maximum replicas: set an upper bound with resource cost in mind
- Set resource requests: an HPA needs pod resource requests to work correctly
- Scale gradually: set policies to prevent abrupt scaling
- Monitor: keep watching the HPA events and metrics
Next Steps
- ReplicaSets -- managing multi-cluster ReplicaSets
- Deployments -- managing the Deployment an HPA targets
- Propagation Policies -- configuring a PropagationPolicy