4.2. DaemonSets
Overview
The DaemonSets page manages every DaemonSet held on the MCM control plane in one place. A DaemonSet is the workload that guarantees a pod runs on every node of a cluster (or on particular nodes).
What it is for:
- Managing multi-cluster DaemonSets together
- Monitoring the node scheduling state per cluster
- Creating, changing, and deleting DaemonSets
- Managing pod placement by node selector
- Checking the PropagationPolicy and OverridePolicy
Where DaemonSets are used:
- Log collection agents (fluentd, filebeat, and so on)
- Monitoring agents (node-exporter, datadog-agent, and so on)
- Storage daemons (ceph, glusterd, and so on)
- Network plugins (calico, flannel, and so on)
How the Screen Is Laid Out
The DaemonSets page shows the DaemonSet list as a table.
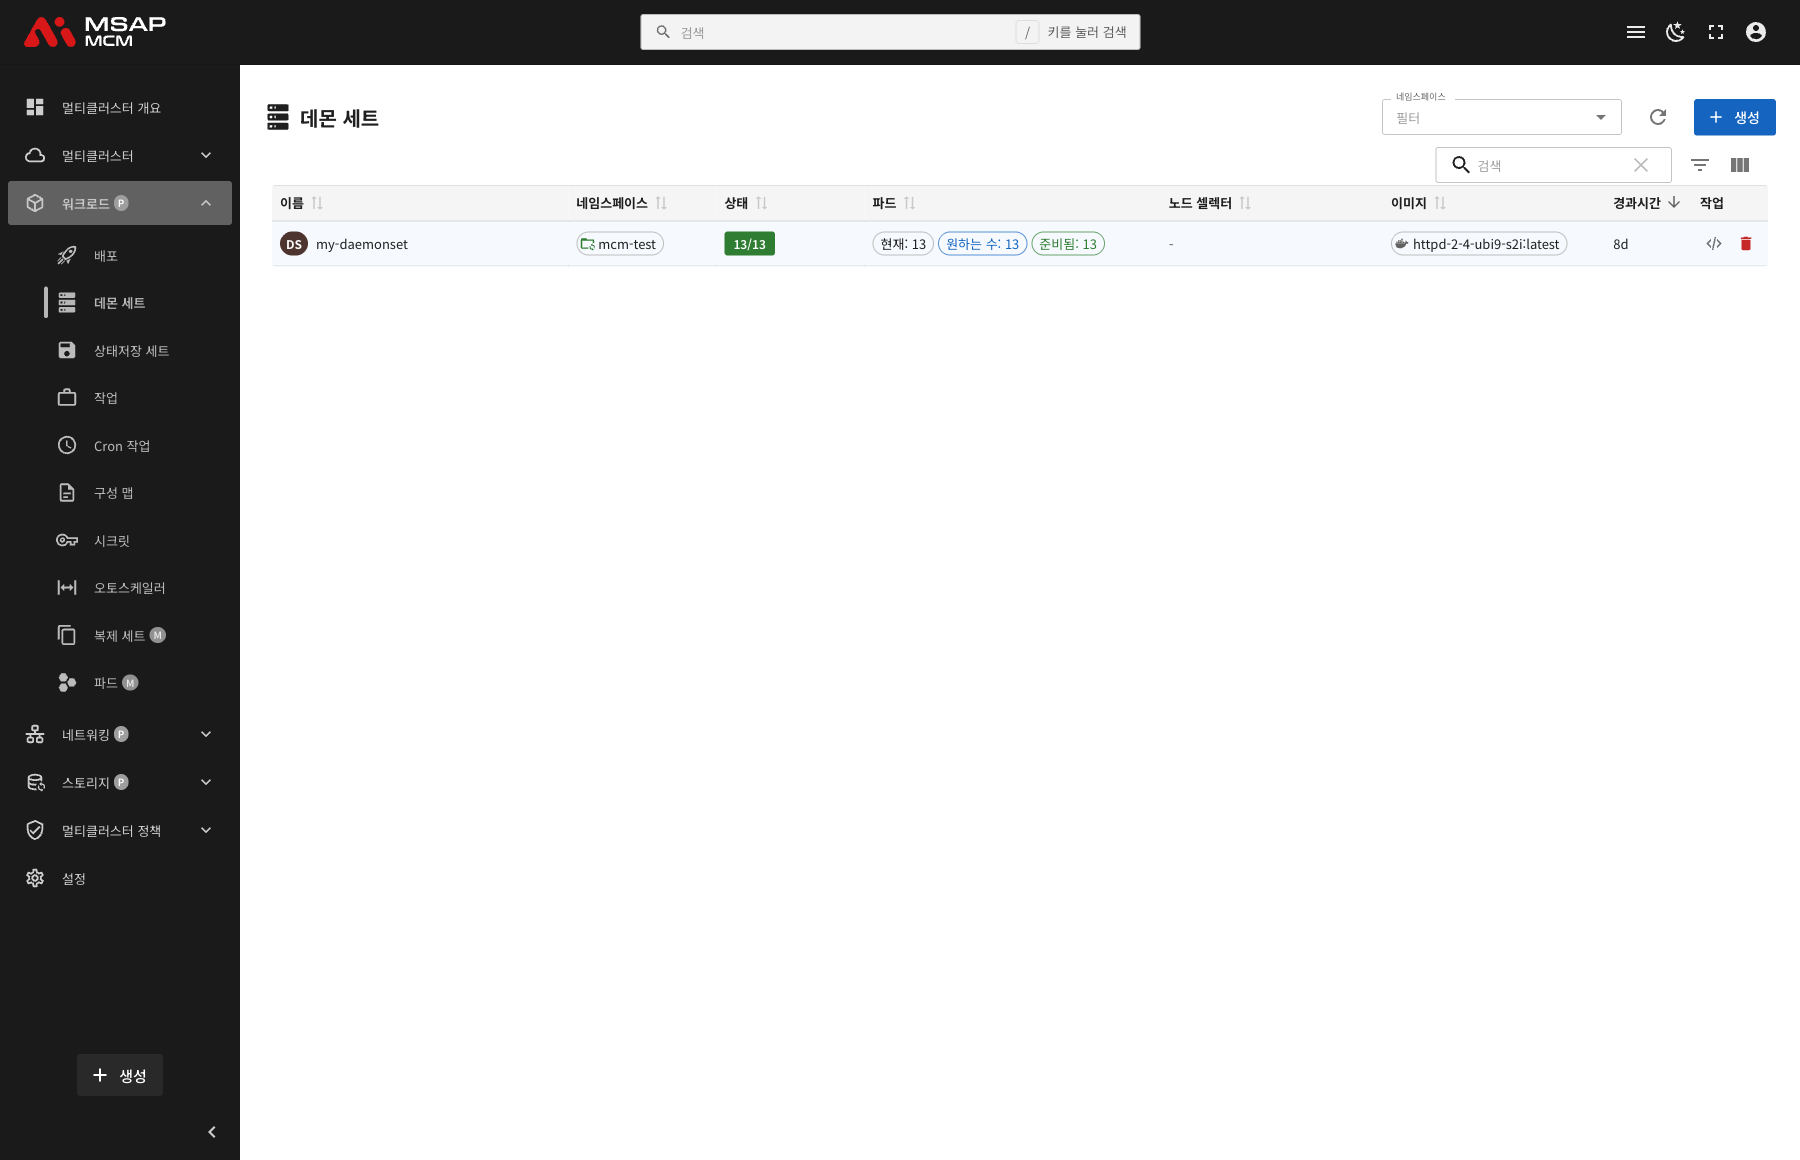
The Elements at the Top of the Page
| Element | Description |
|---|---|
| Namespace filter | Shows only the DaemonSets of a particular namespace |
| Refresh button | Refreshes the DaemonSet list |
| Create button | Opens the dialog for creating a new DaemonSet |
| Search box | Searches by DaemonSet name |
Table Columns
| Column | Description | Sortable |
|---|---|---|
| Name | The DaemonSet name | ✅ |
| Namespace | The namespace the DaemonSet belongs to | ✅ |
| Status | Ready pods / desired pods | ✅ |
| Pods | Shows current / desired / ready | ✅ |
| Node Selector | The node selection condition ("-" when there is none) | ✅ |
| Image | The container image name | ✅ |
| Age | The time since the DaemonSet was created | ✅ |
| Actions | The edit and delete buttons | - |
How Status Is Shown
The Status column is shown as ready / desired:
- 13/13: pods are Ready on all 13 nodes
- 10/13: only 10 of 13 are Ready
Pod Information
The Pods column shows the DaemonSet's pods in detail:
- Current: the number of pods currently scheduled
- Desired: the number of pods that should be scheduled
- Ready: the number of pods that are Ready
DaemonSet Detail
Clicking a DaemonSet row opens the detail panel.
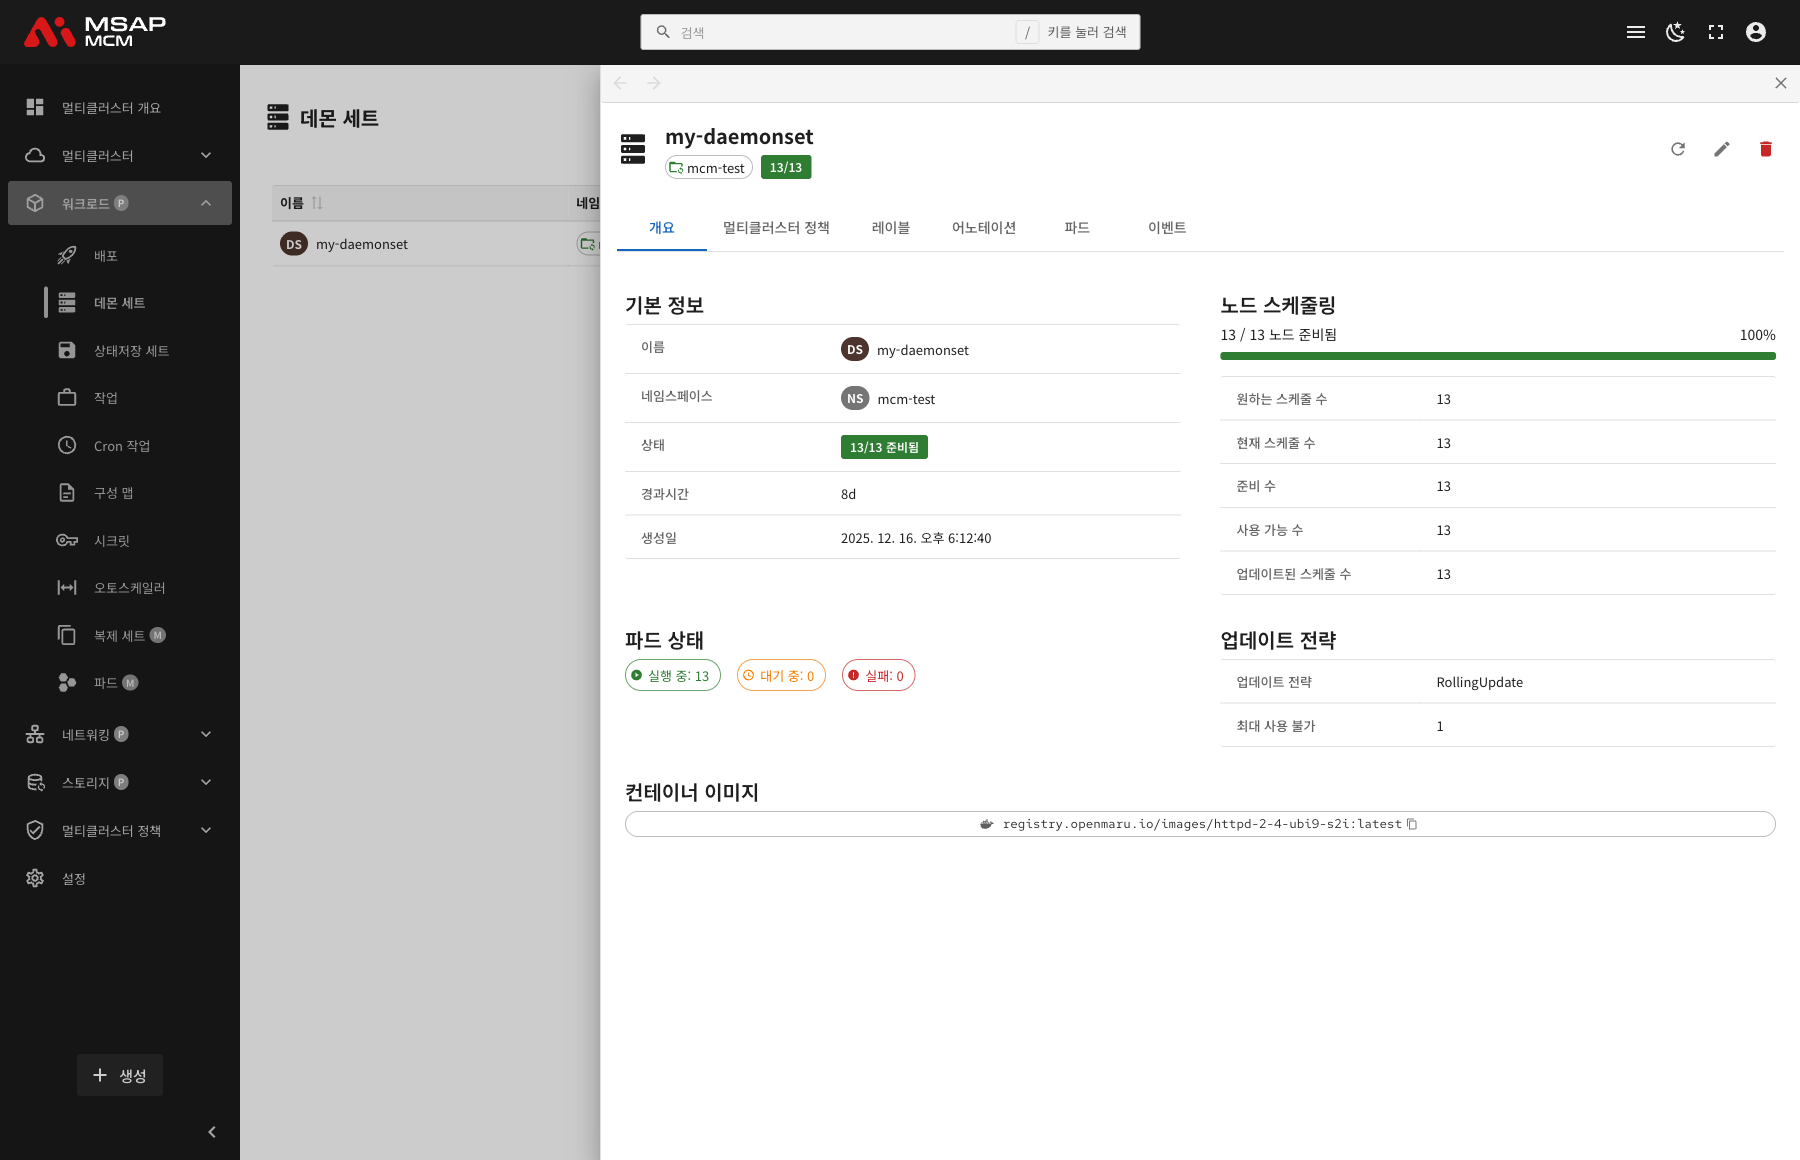
The Detail Panel Header
| Element | Description |
|---|---|
| DaemonSet name | The name of the chosen DaemonSet |
| Namespace | The namespace the DaemonSet belongs to |
| Sync Status | The N/N node-ready figure |
The Action Buttons
| Button | What it does |
|---|---|
| Refresh | Refreshes the DaemonSet information |
| Edit | Opens the YAML edit mode |
| Delete | Deletes the DaemonSet |
Note: a DaemonSet runs one pod per node, so unlike a Deployment it has no scale button.
The Tabs
The Overview Tab
Shows the DaemonSet's basic information, node scheduling state, and update strategy.
Basic information:
| Item | Description |
|---|---|
| Name | The DaemonSet name |
| Namespace | The namespace the DaemonSet belongs to |
| Status | N/N ready |
| Age | The time since creation |
| Created | When the DaemonSet was created |
Node scheduling:
The node scheduling section shows the DaemonSet's central state:
| Item | Description |
|---|---|
| Node ready state | N / N nodes ready (with a progress bar) |
| Desired Scheduled | The number of nodes that should be scheduled |
| Current Scheduled | The number of nodes currently scheduled |
| Number Ready | The number of pods that are Ready |
| Number Available | The number of pods that are Available |
| Updated Scheduled | The number of pods updated to the latest version |
Pod state:
The pod state section shows the DaemonSet's pods visually:
- Running: pods working normally
- Pending: pods waiting to be scheduled
- Failed: pods that failed
Update strategy:
| Item | Description |
|---|---|
| Update Strategy | RollingUpdate or OnDelete |
| Max Unavailable | The number of pods that may be down at once during an update |
Container images:
Shows the list of container images defined on the DaemonSet:
- The image name and tag
- A copy button
The Multi-Cluster Policies Tab
Shows the multi-cluster policies that apply to the DaemonSet.
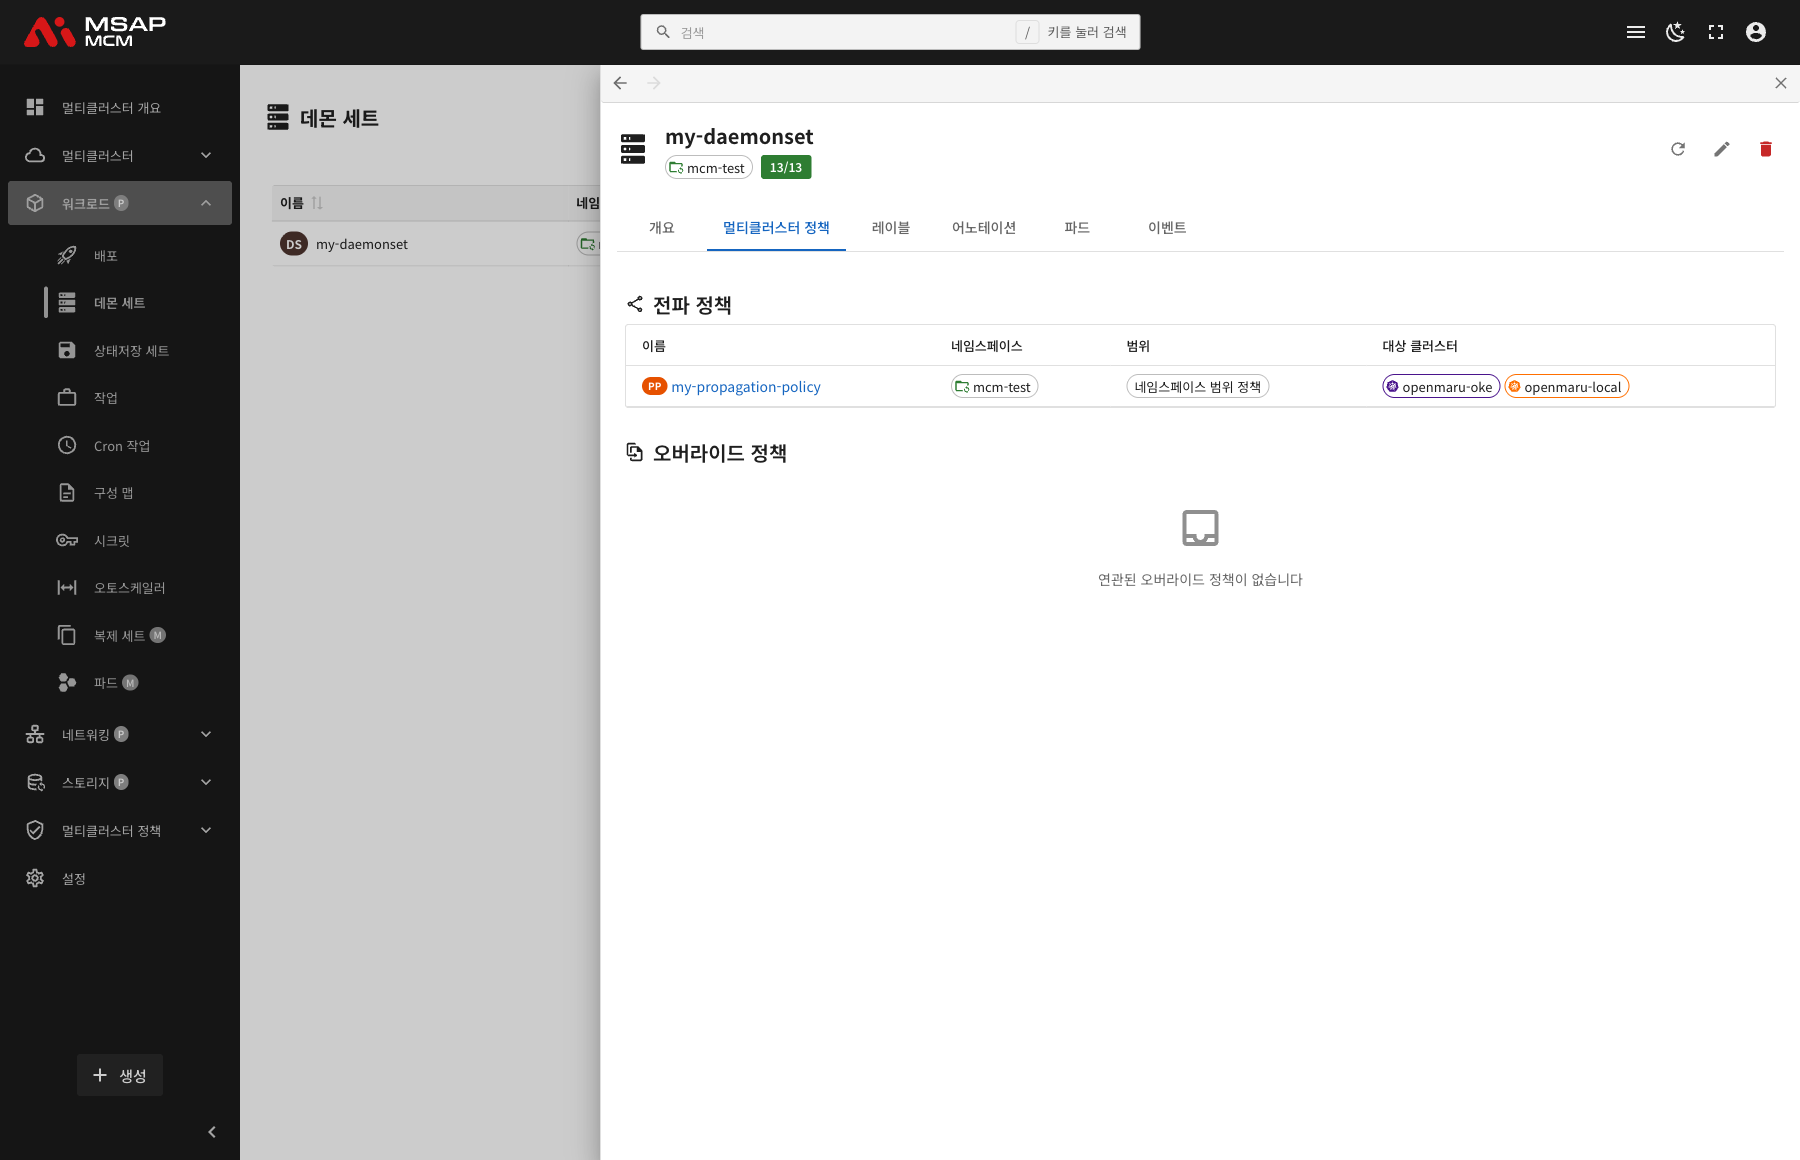
PropagationPolicy:
| Column | Description |
|---|---|
| Name | The PropagationPolicy name |
| Namespace | The namespace the policy belongs to |
| Scope | Namespace-scoped policies / cluster-scoped policies |
| Target Clusters | The list of target clusters |
OverridePolicy:
Shown where there are per-cluster custom settings. Where there are none, the message "No related override policies found" is shown.
The Labels Tab
Shows the list of Kubernetes labels applied to the DaemonSet.
The Annotations Tab
Shows the list of annotations applied to the DaemonSet.
The Pods Tab
Shows the list of pods running for that DaemonSet.
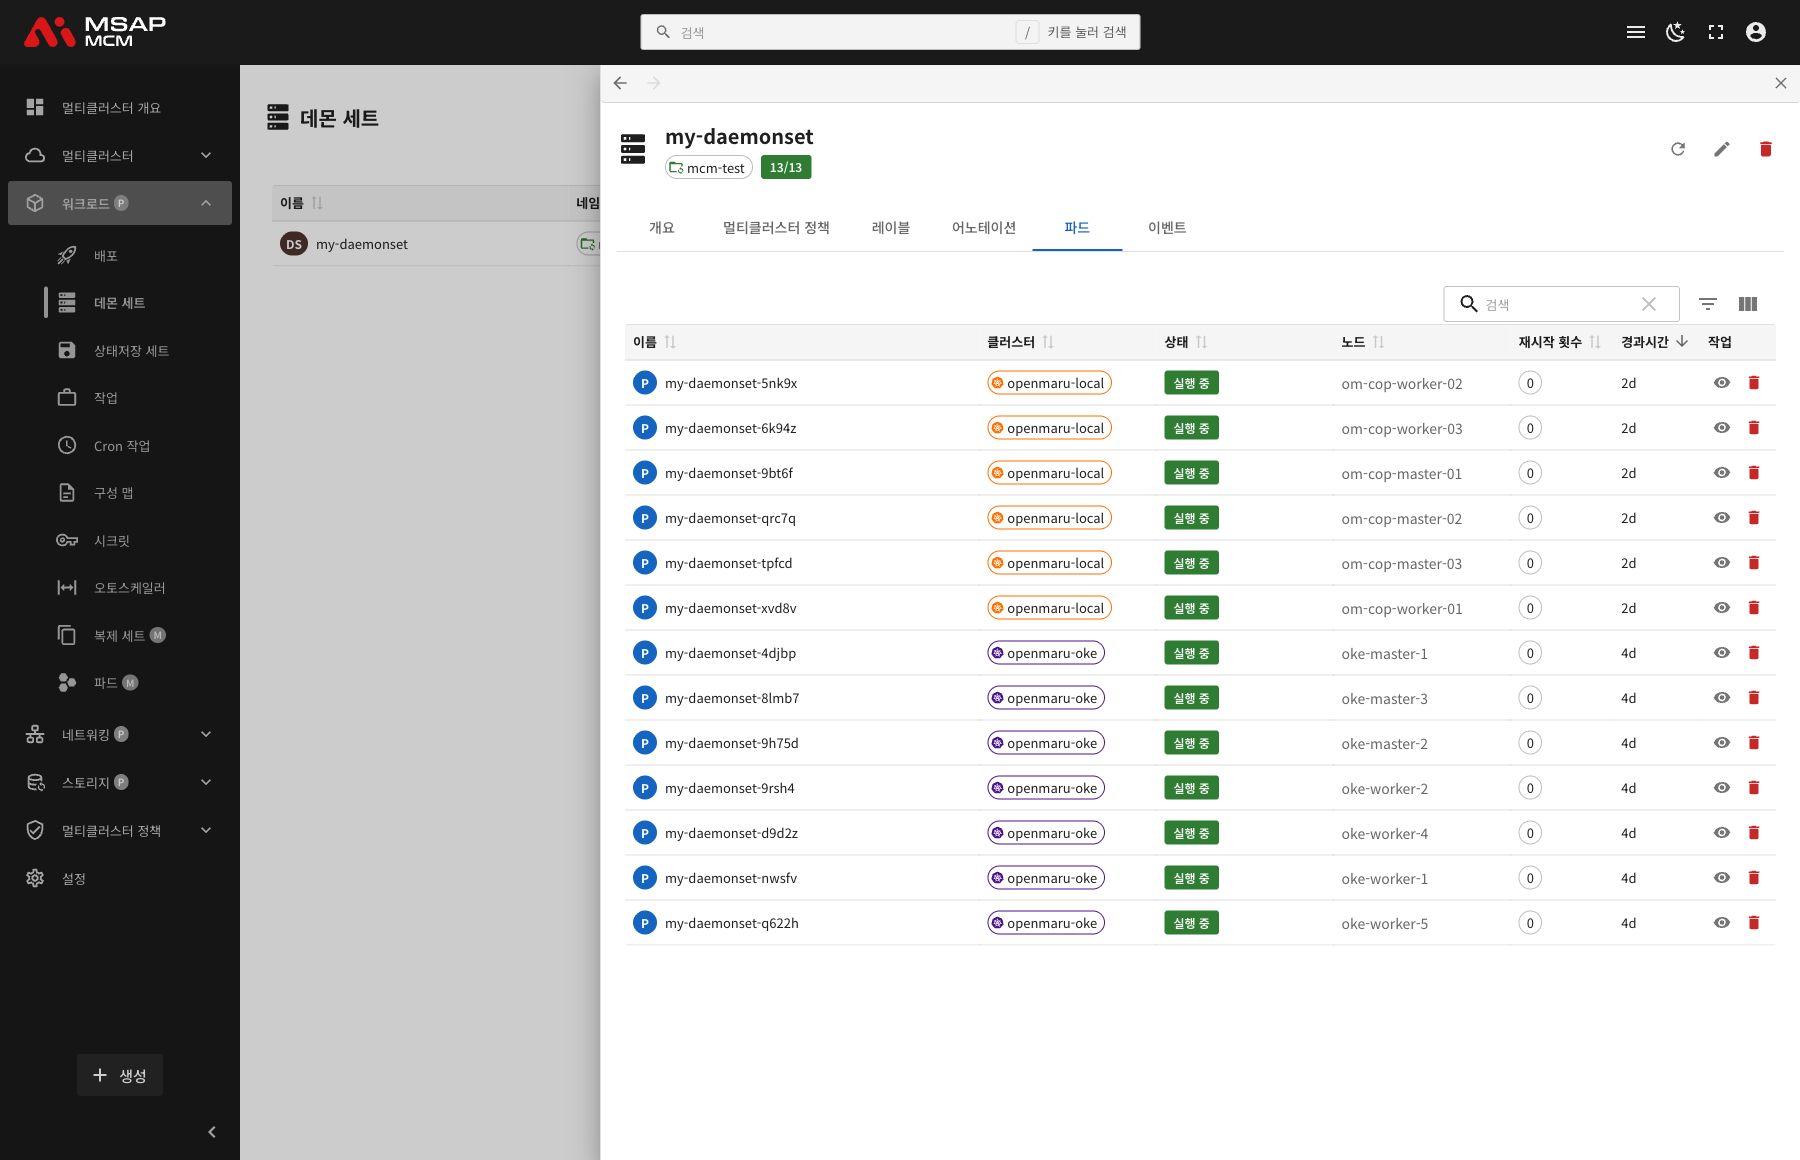
| Column | Description |
|---|---|
| Name | The pod name |
| Cluster | The cluster the pod is running on |
| Status | The pod state (Running / Pending / Failed and so on) |
| Node | The node the pod is scheduled on |
| Restarts | The pod restart count |
| Age | The time since the pod was created |
| Actions | The view and delete buttons |
In the pod list you can see one pod distributed to each node, per cluster.
The Events Tab
Shows the Kubernetes events related to the DaemonSet.
Creating a DaemonSet
Creates a new DaemonSet on the MCM control plane.
Fields
| Field | Required | Description |
|---|---|---|
| Name | ✅ | The DaemonSet name |
| Namespace | ✅ | The namespace to deploy into |
| Container image | ✅ | The container image URL |
| Node Selector | - | Set this to deploy only to particular nodes |
| Ports | - | The container port settings |
| Environment variables | - | The container environment variables |
| Resource limits | - | The CPU and memory limits and requests |
| Volume mounts | - | Host paths or volume mounts |
Editing the YAML
The "Edit YAML" tab lets you write the DaemonSet definition directly.
DaemonSet Operations
Editing a DaemonSet
- Choose the DaemonSet
- Press the "Edit" button in the detail panel
- Change the DaemonSet definition in the YAML editor
- Press the "Save" button
Deleting a DaemonSet
⚠️ Caution: deleting a DaemonSet deletes every pod that belongs to it. Resources deployed to member clusters are handled according to the deletion policy.
- Choose the DaemonSet to delete
- Press the "Delete" button in the detail panel
- Type the DaemonSet name in the confirmation dialog
- Press the "Delete" button
Worked Examples
Scenario 1: Deploying a Log Collection Agent Across Clusters
- Press the "Create" button
- Enter the DaemonSet details:
- Name:
fluentd-agent - Namespace:
logging - Container image:
fluent/fluentd:v1.14 - Volume mount:
/var/log→/var/log(read-only)
- Name:
- Press the "Create" button
- Create a PropagationPolicy naming the target clusters
- Confirm the agent is deployed to every node of each cluster
Scenario 2: Checking DaemonSet Status
- Click the DaemonSet you want to check in the list
- Check the node scheduling state on the Overview tab (the N/N figure)
- Check the pod distribution per cluster on the Pods tab
- Confirm the pod is running normally on each node
- Where there is a problem, find the cause on the Events tab
Scenario 3: Deploying a DaemonSet to Particular Nodes Only
- Press the "Create" button, or edit an existing DaemonSet
- Set the node selector:
nodeSelector:node-type: worker
- Save, then confirm pods are scheduled only on the worker nodes
- Confirm no pod is created on the master nodes
Scenario 4: A DaemonSet Rolling Update
- Choose the DaemonSet and press "Edit"
- Change the container image version (
v1.14→v1.15, for example) - Press "Save"
- Watch the update progress on the Overview tab:
- Updated Scheduled climbs steadily
- Watch the pods being replaced in turn on the Pods tab
Scenario 5: Checking Pod Distribution Across Clusters
- Choose the DaemonSet
- Click the "Pods" tab
- Check the pod distribution per cluster:
- Cluster A: 6 pods on 6 nodes
- Cluster B: 7 pods on 7 nodes
- Confirm only one pod runs on each node
- Confirm a pod is scheduled automatically when a new node is added
Related Concepts
DaemonSet against Deployment
| Trait | DaemonSet | Deployment |
|---|---|---|
| Pod placement | One per node | Spread over arbitrary nodes |
| Scaling | Automatic, with the node count | The replica count is set by hand |
| Where it is used | Node-level agents | Ordinary applications |
| Horizontal growth | Grows by adding nodes | Grows by adding replicas |
Update Strategies
RollingUpdate (the default):
- Updates the pods in turn
maxUnavailable: the number of pods that may be down at once (default: 1)- Minimises downtime
OnDelete:
- A pod updates only when it is deleted by hand
- Used where complete control is needed
Node Selectors and Tolerations
Node selector:
- Deploys pods only to nodes with a particular label
- For example
node-type: gpu,disk-type: ssd
Toleration:
- Allows pods onto nodes that carry a particular taint
- For example, deploying DaemonSet pods to master nodes as well
PropagationPolicy and DaemonSets
When deploying a DaemonSet across clusters:
- Name the target clusters with a PropagationPolicy
- A pod is created on every eligible node of each cluster
- Use an OverridePolicy where a cluster needs different settings
Next Steps
- StatefulSets -- managing multi-cluster StatefulSets
- Jobs -- managing multi-cluster Jobs
- Propagation Policies -- configuring a PropagationPolicy