7.3. Certificate Management
When to Look at This
- When an HTTPS connection produces a certificate error
- When a certificate is nearing expiry
- When issuing a certificate for a new domain
Why Certificates Are Needed
When you connect over HTTPS, what the browser and the server exchange is encrypted. The server has to prove "I am the real owner of that domain", and the certificate is that proof.
Certificates have a validity period. Once expired, the browser warns and blocks the connection. With several domains, the expiry times all differ, which makes manual management difficult.
What cert-manager Does
cert-manager issues and renews certificates automatically inside the cluster.
It works like any other Kubernetes resource. You create a request (a Certificate) saying "a certificate for this domain is needed", cert-manager proceeds with issuance to match that state, and it renews on its own as expiry approaches.
The result is stored as a Secret, and the Ingress points at that Secret to use it (see 3.4, 5.1).
The Certificate List
Go to Cert-manager > Certificates.
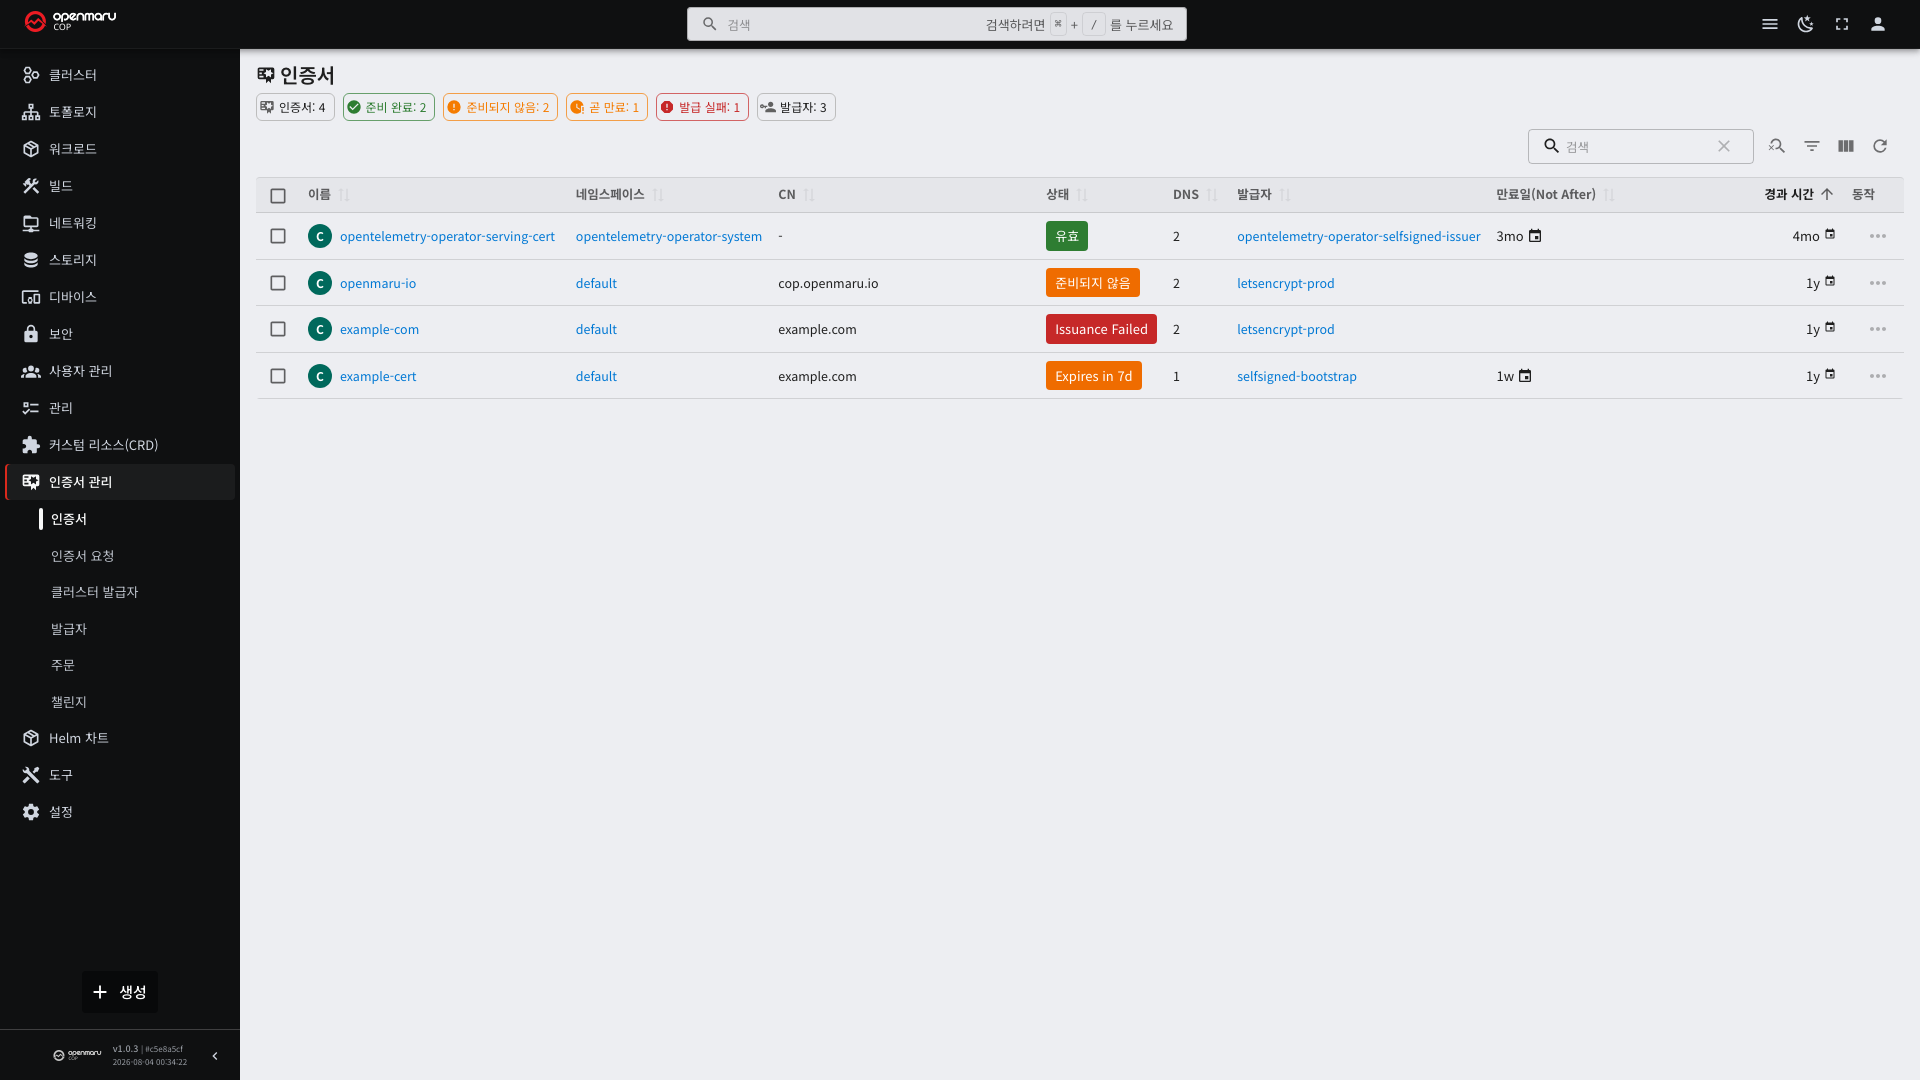
| Column | Description |
|---|---|
| Name | The certificate resource name |
| Namespace | The namespace it belongs to |
| Ready | Whether issuance has finished |
| Issuer | Which Issuer issued it |
| Expiry | When the certificate expires |
Ready being True means it is fine.
Certificates are namespace-scoped resources. They must be in the same namespace as the Ingress to be usable. A Secret in another namespace is not referenced.
Certificate Detail
Selecting the name shows the issuance state and expiry time in detail.
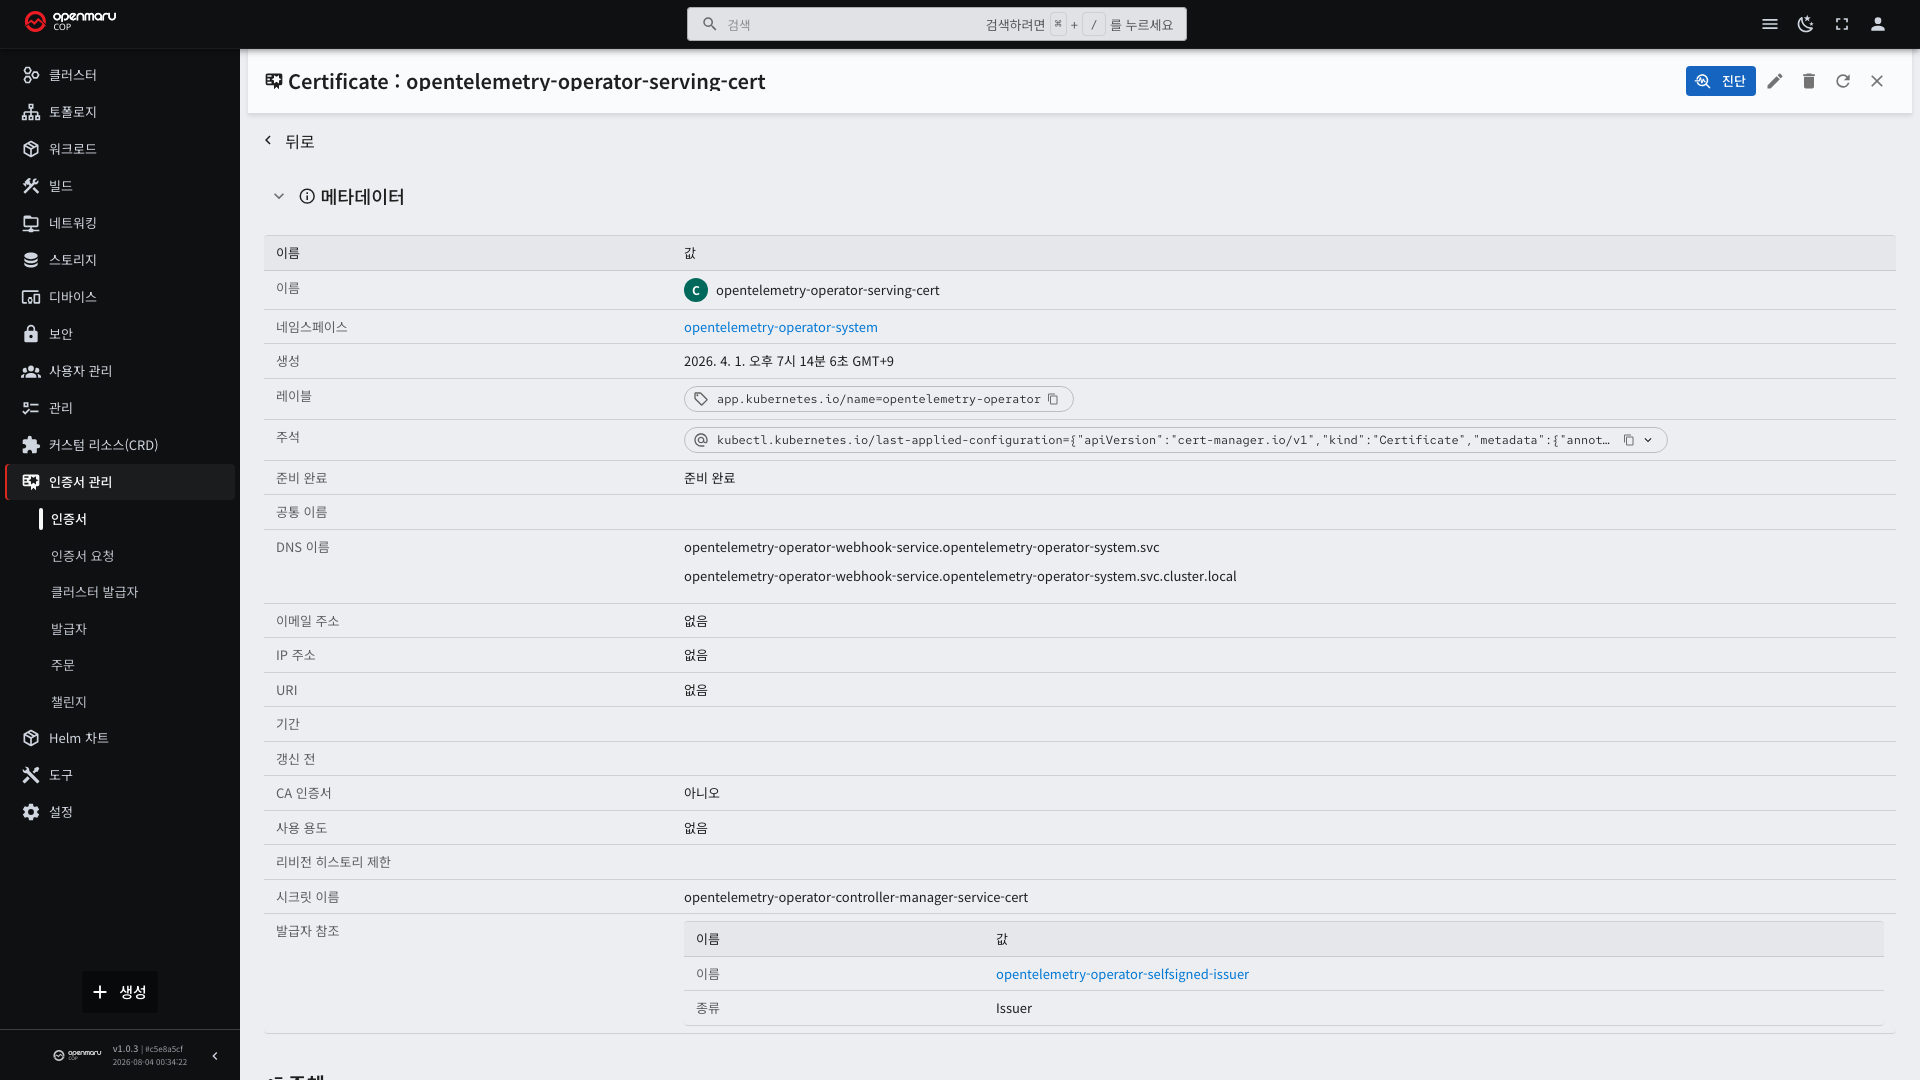
| Item | What to check |
|---|---|
| Conditions | Whether Ready is True, and the reason if False |
| Expiry time | How long it is valid |
| Scheduled renewal time | When cert-manager will attempt renewal |
| Target domains | The addresses this certificate covers |
| Storage Secret | The name of the Secret holding the result |
If the target domains differ from the actual access address, the browser raises a certificate error. Check that they match the Ingress host (see 5.1).
Issuing with a wildcard such as *.example.com covers all subdomains. However, the ownership verification method
changes (DNS verification only), which makes the setup more demanding.
Issuers
This is the configuration that decides where certificates come from.
| Kind | Scope |
|---|---|
| Issuer | Within one namespace only |
| ClusterIssuer | The whole cluster |
View them under Cert-manager > Cluster Issuers and Issuers respectively.
There are broadly three issuance methods.
| Method | Description | Air-gapped |
|---|---|---|
| Self-signed | Signed with a certificate cert-manager made itself | Possible |
| Internal certificate authority (CA) | Signed with a CA certificate the organization holds | Possible. This is usually the method used |
| ACME | Obtained automatically from a public authority | Requires external communication, so not possible |
ACME (Automatic Certificate Management Environment) is a protocol for obtaining certificates without human hands. In the past you submitted an application on the authority's website, waited for review, and downloaded a file; ACME completes that exchange between programs.
The sequence is as follows.
| Order | What happens |
|---|---|
| 1 | The side needing a certificate asks the authority "give me a certificate for this domain" |
| 2 | The authority sets a challenge: "prove that domain is really yours" |
| 3 | The requesting side completes the challenge (places a file at a given path or adds a value to DNS) |
| 4 | The authority verifies from outside and, if it matches, issues the certificate |
Steps 2 and 3 are why it cannot be used in an air-gapped environment. The authority has to reach our server or
DNS from the internet, and an air-gapped environment has no such route. The Order and Challenge resources come
from this protocol (see "Resources in the Issuance Process" below).
The best-known authority using ACME is Let's Encrypt, and it issues free of charge. The detailed procedure is in "Getting a Public Certificate With Let's Encrypt" below.
In an air-gapped environment, register an internal CA as a ClusterIssuer and use that. Because these certificates are not signed by a public authority, the organization's CA certificate has to be added to the trust store on the connecting PCs in advance for the browser warning to disappear.
Resources in the Issuance Process
Requesting a certificate creates the following resources in order.
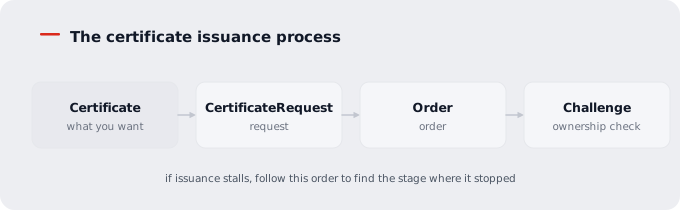
| Resource | What it does |
|---|---|
| Certificate | Declares the certificate you want |
| CertificateRequest | The actual signing request |
| Order | The order created in the ACME method |
| Challenge | The procedure proving domain ownership |
With the internal CA method, Order and Challenge are not created, because signing happens directly from the CertificateRequest.
If issuance stalls, follow this order to find the stage where it stopped. Each has a screen under the Cert-manager menu.
Creating Self-Signed Certificates — Step by Step
This is the method used most in air-gapped environments. You create an internal CA once and stamp out certificates for each service with it.
You could also create a separate self-signed certificate per service without going through a CA, but that is not recommended. Each certificate has a different signer, so connecting PCs need as many trust registrations as there are certificates. With one internal CA, only that CA has to be registered.
There are four steps. Each step is the material for the next, so the order has to be kept.
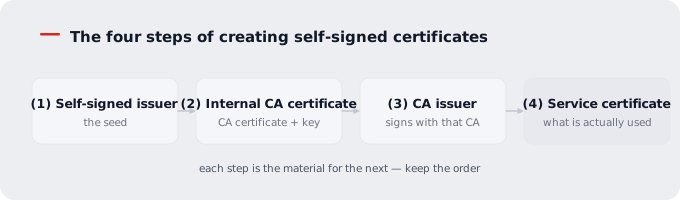
Apply the YAML for each step through Create resource in the Console or the YAML editor (see 1.2).
Step 1 — The Self-Signed Issuer
Something has to sign the CA certificate itself. The very first certificate has nothing above it to sign it, so it signs itself. This issuer is used once, in the next step, and then done.
apiVersion: cert-manager.io/v1
kind: ClusterIssuer
metadata:
  name: selfsigned-cluster-issuer
spec:
  selfSigned: {}
spec.selfSigned being an empty object is correct. There is nothing to set.
Step 2 — The Internal CA Certificate
Create the organization's root certificate. isCA: true is what makes this "a certificate that can sign other
certificates".
apiVersion: cert-manager.io/v1
kind: Certificate
metadata:
  name: cluster-root-ca
  namespace: cert-manager
spec:
  isCA: true                    # a certificate that can sign other certificates
  commonName: cluster-root-ca
  secretName: cluster-root-ca-secret   # the CA certificate and private key are stored here
  duration: 87600h              # 10 years
  renewBefore: 8760h            # renew one year before expiry
  privateKey:
    algorithm: RSA
    size: 4096                  # a CA is used for a long time, so be generous
  issuerRef:
    name: selfsigned-cluster-issuer
    kind: ClusterIssuer
| Field | Description |
|---|---|
isCA | true makes it a signing certificate. Do not set it on service certificates |
secretName | The name of the Secret where the created certificate and private key are stored |
duration | The validity period. Written in hours (h). 87600h = 10 years |
renewBefore | How many hours before expiry to renew |
privateKey.size | The key length. 4096 for a CA and 2048 for service certificates is typical |
Give a CA a long period. Changing the CA means reissuing every certificate signed by it and replacing the trust store on every connecting PC.
The reason for namespace: cert-manager is that the ClusterIssuer in the next step looks for this Secret in that
namespace. Created elsewhere, it will not be found.
Step 3 — The CA Issuer
This is the issuer that signs with the CA created above. From now on, every certificate points at this.
apiVersion: cert-manager.io/v1
kind: ClusterIssuer
metadata:
  name: cluster-ca-issuer
spec:
  ca:
    secretName: cluster-root-ca-secret   # the Secret created in step 2
This is the end of the one-time preparation.
Step 4 — Service Certificates
These are the certificates actually attached to services. Create one per service.
apiVersion: cert-manager.io/v1
kind: Certificate
metadata:
  name: app-tls
  namespace: my-app
spec:
  secretName: app-tls-secret     # the Ingress points at this name
  duration: 8760h                # 1 year
  renewBefore: 720h              # renew 30 days before expiry
  commonName: app.example.com
  dnsNames:                      # the list of addresses this certificate covers
    - app.example.com
    - app.my-app.svc.cluster.local
  privateKey:
    algorithm: RSA
    size: 2048
  issuerRef:
    name: cluster-ca-issuer      # the issuer created in step 3
    kind: ClusterIssuer
List every address you will actually connect to in dnsNames. Connecting on an address not listed makes the
browser warn that "the certificate name does not match". For a service used only inside the cluster, include the
internal address (<service>.<namespace>.svc.cluster.local) as well.
commonName is the older mechanism, and what matters now is dnsNames. Write both, but always include the
commonName value in dnsNames too.
Confirming Issuance
It is done when the Ready column turns True in the Cert-manager > Certificates list in the Console. The
detail screen shows the validity period and the scheduled renewal time.
Registering the CA on Connecting PCs
Certificates made with an internal CA make browsers warn, because they do not know that CA. Adding the CA certificate created in step 2 to the trust store on connecting PCs removes the warning. Operations staff handle this distribution — pushing it to company PCs in bulk is the usual approach.
Getting a Public Certificate With Let's Encrypt
For a service published on the internet, you can obtain a public certificate. cert-manager obtains and renews it automatically from Let's Encrypt using the ACME protocol described above.
It cannot be used in an air-gapped environment. The issuance process has to communicate with Let's Encrypt servers, and domain ownership verification requires that our service be reachable from outside. COP is installed air-gapped by default, so this method applies only to services exposed to the internet.
How Domain Ownership Is Proven
Let's Encrypt issues after confirming "is this domain really yours". There are two verification methods.
| Method | How it verifies | What it needs |
|---|---|---|
| HTTP-01 | Places a temporary file at a particular path on our web server and Let's Encrypt reads it from outside | Port 80 must be open from the internet |
| DNS-01 | Adds a temporary record to DNS and Let's Encrypt looks it up | API access to the DNS provider |
HTTP-01 is simpler. However, wildcard certificates such as *.example.com can be obtained only through DNS-01.
Step 1 — The ACME Issuer (Staging)
Always test with the staging server first. The Let's Encrypt production server has issuance limits. In particular, only five certificates per week for the same domain combination can be obtained, so repeated attempts with a wrong configuration block issuance for the rest of that week. The staging server has generous limits.
apiVersion: cert-manager.io/v1
kind: ClusterIssuer
metadata:
  name: letsencrypt-staging
spec:
  acme:
    server: https://acme-staging-v02.api.letsencrypt.org/directory
    email: admin@example.com          # the address for expiry notices
    privateKeySecretRef:
      name: letsencrypt-staging-key   # the Secret where the account key is stored (created automatically)
    solvers:
      - http01:
          ingress:
            ingressClassName: default   # the Ingress controller that will create the temporary path
| Field | Description |
|---|---|
server | The staging address. Production uses the address in step 2 below |
email | Where Let's Encrypt sends notices about impending expiry and problems. Use an address you actually read |
privateKeySecretRef | The Secret holding the ACME account key. It is created automatically; you do not have to prepare it |
solvers | The ownership verification method. HTTP-01 here |
Certificates issued by the staging server are not trusted by browsers. Warnings are expected; it is only for confirming that the issuance procedure runs end to end.
Step 2 — The ACME Issuer (Production)
Once issuance is confirmed with staging, create the production one by changing only the address.
apiVersion: cert-manager.io/v1
kind: ClusterIssuer
metadata:
  name: letsencrypt-prod
spec:
  acme:
    server: https://acme-v02.api.letsencrypt.org/directory
    email: admin@example.com
    privateKeySecretRef:
      name: letsencrypt-prod-key
    solvers:
      - http01:
          ingress:
            ingressClassName: default
Step 3 — Requesting the Certificate
Only the issuer name differs; the shape is the same as the self-signed method.
apiVersion: cert-manager.io/v1
kind: Certificate
metadata:
  name: app-tls
  namespace: my-app
spec:
  secretName: app-tls-secret
  dnsNames:
    - app.example.com
  issuerRef:
    name: letsencrypt-prod
    kind: ClusterIssuer
duration and renewBefore are not written here. Let's Encrypt fixes the validity period at 90 days and we
cannot set it. Writing them is either ignored or raises an error. cert-manager decides the renewal timing itself.
Step 4 — Attaching It to an Ingress
You can skip creating a Certificate and just add one annotation to the Ingress. cert-manager creates the Certificate for you.
apiVersion: networking.k8s.io/v1
kind: Ingress
metadata:
  name: app-ingress
  namespace: my-app
  annotations:
    cert-manager.io/cluster-issuer: letsencrypt-prod
spec:
  ingressClassName: default
  tls:
    - hosts:
        - app.example.com
      secretName: app-tls-secret     # cert-manager creates it under this name
  rules:
    - host: app.example.com
      http:
        paths:
          - path: /
            pathType: Prefix
            backend:
              service:
                name: app
                port:
                  number: 8080
This approach works the same with self-signed and internal CA issuers. Only the issuer name in the annotation changes.
When Using DNS-01
Use DNS-01 when you need a wildcard certificate or cannot open port 80. Only the solvers part differs, and
settings vary by DNS provider. Below is an example showing only the shape.
    solvers:
      - dns01:
          cloudflare:
            email: admin@example.com
            apiTokenSecretRef:
              name: cloudflare-api-token
              key: api-token
The DNS provider access information has to be created as a Secret in advance (see 3.4).
Attaching a Certificate to a Service
- Decide the Secret name to store it in when creating the Certificate.
- Wait until Ready turns
True. - Put that Secret name in the Ingress TLS settings (see 5.1).
Adding the cert-manager.io/cluster-issuer annotation to the Ingress means cert-manager creates the Certificate for
you, without creating one separately (see the example above).
The Benefits
Managing certificates by hand repeats the same work — request issuance, download the file, create a Secret, mark the expiry date on a calendar, and do it all again before expiry. cert-manager removes that.
| Benefit | Description |
|---|---|
| Outages from expiry disappear | This is the biggest reason. Certificate expiry is among the most common yet most preventable causes of service outages |
| Renewal takes no effort | It obtains a new certificate before expiry and swaps the Secret. The Ingress configuration is untouched |
| The configuration remains as code | Which certificate covers which addresses is written in YAML, so it can be kept under version control |
| Private keys never leave the cluster | Keys are generated inside the cluster and stored in a Secret. There is no exchanging them by email or shared folder |
| You see everything at once | The Console screen shows the expiry date and status of every certificate together |
| Each service can have its own | You do not have to reuse one everywhere, so if one certificate leaks, only that service needs reissuing |
Points to Watch
| Item | Content |
|---|---|
| The CA private key is the top-level asset | If cluster-root-ca-secret leaks, anyone can create certificates in your organization's name. Restrict who can see this Secret (see 7.1) |
| Secrets are not encrypted | Kubernetes Secrets are only encoded. Anyone who can read Secrets in that namespace reads the private key too (see 3.4) |
| Changing the CA means redoing everything | Every certificate signed by it has to be reissued and the trust store on connecting PCs replaced. That is why CA periods are set long |
| Applications reading certificates directly need a restart | The Ingress controller notices Secret changes, but an application reading the file directly does not know about a renewal. Prepare a procedure to restart the pods after renewal |
| Let's Encrypt has issuance limits | Test with the staging server first. Repeated attempts on production with a wrong configuration block you for that week |
Omitting dnsNames produces warnings | Adding an address later means editing the Certificate and reissuing |
| ACME does not work in an air-gapped environment | Choosing the wrong issuer leaves it stalled at the Challenge stage, never finishing |
| Keep checking expiry dates | Automatic renewal can fail (issuer problems, permission changes, DNS changes). Review the Console list regularly |
cert-manager does not manage the COP cluster's own certificates. Those are a separate system, covered in 7.4. Confusing the two leads to "the certificate management screen is fine but the cluster stops".
Automatic Renewal
cert-manager renews on its own before expiry. The default is when two thirds of the validity period has passed. For a 90-day certificate, that is around day 60.
On renewal, the Secret contents change automatically. The Ingress configuration does not have to be edited.
The Ingress controller detects the Secret change and uses the new certificate. However, if the application reads the certificate directly, the pod may have to be restarted for it to take effect.
When Issuance Fails
| Symptom | What to check |
|---|---|
Ready stays False | The conditions and events on the Certificate detail |
| It stalls at CertificateRequest | Whether the Issuer name is correct and that Issuer is ready |
| It stalls at Challenge | Whether the ownership verification method works in this environment. External verification methods cannot be used in an air-gapped environment |
| The Secret is not created | The certificate has not been issued yet. Check the ready state first |
| Browser warning | Domain mismatch, or the PC does not trust the internal CA |
The cause is recorded in the events on the Certificate detail. Look there first.