7.2. User Management
When to Look at This
- When giving a new team member access to the cluster
- When checking who holds which permissions
- When sign-in works but the screen is empty
Users and Groups
The Console signs in with accounts registered on the integrated authentication server (SSO). On this screen you view the registered users and groups and attach cluster access permissions.
Granting permissions per person means adjusting them whenever staffing changes. Granting permissions to a group and putting people in the group is easier to manage. This screen is built around groups for that reason.
The User List
Go to User Management > Users.
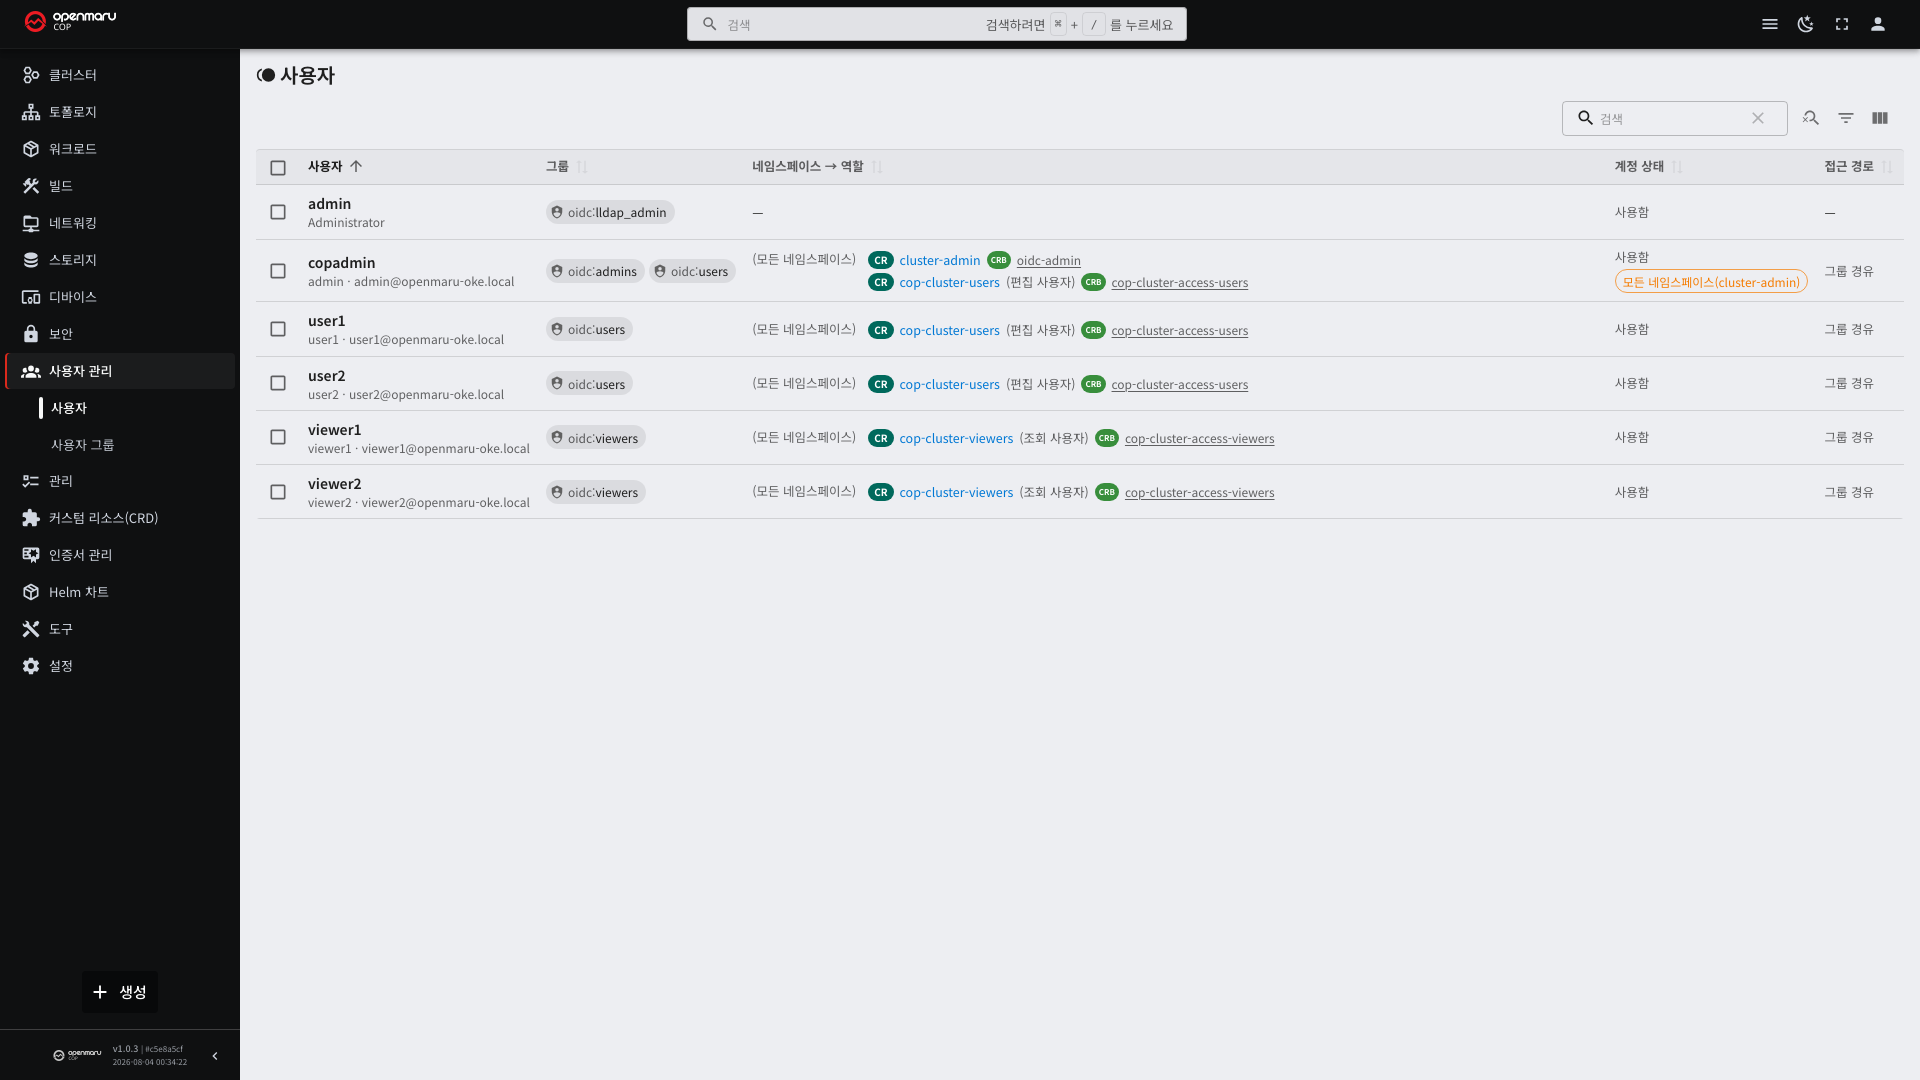
| Column | Description |
|---|---|
| User | The ID with the display name and email |
| Groups | The groups they belong to, prefixed with oidc:. The pencil icon beside them edits membership |
| Namespace | The scope the permission applies to |
| Role | What they can do in that scope (edit / view) |
| Cluster administrator | Shown only for accounts that administer the whole cluster |
| Access path | Whether the permission came from a group or was granted directly to the account |
If [Add user] is not visible at the top right, you do not have permission to create accounts. Only users in the
administrator group (admins) see it.
Adding a User
Selecting [Add user] opens the input screen. Fields marked with an asterisk (*) are required.
| Field | Description |
|---|---|
| ID * | Identifies the account. Cannot be changed after creation |
| Email * | This is what you sign in with. Cannot be changed in the Console after creation |
| Display name | The name shown in the list. If left empty, the last and first names are joined |
| Last name, First name | |
| Phone | Digits and hyphens (-) only |
| Initial password * | At least 8 characters. Repeat the same value in the confirmation field |
| Groups * | Select at least one |
You sign in with the email, not the ID. The cluster identifies users by email address. Include the address when you hand the account over.
At least one group is required because an account with no group can sign in but sees nothing. If no suitable group exists yet, create the group first and come back.
If a value breaks a rule, the reason appears under that field and nothing is saved.
Editing Account Details and Passwords
Selecting a row in the list opens the detail panel on the right. [Edit] at the top changes the display name, last and first names, and phone.
The ID and email cannot be changed. Both identify the account, so changing them would break the link to the permissions attached to it. If you must change them, create a new account and delete the old one.
[Change password] on the same screen sets another user's password. To change your own, use Change password in the account menu at the top right.
Deleting an Account
The delete icon at the top right of the detail panel removes the account. This cannot be undone, so a confirmation dialog names the account first.
Only the sign-in account is removed. Applications and other resources that person created stay in the cluster. Permissions granted directly to the account also remain, so remove those separately if needed.
The delete icon does not appear for these accounts.
| Account | Reason |
|---|---|
| Yourself | Removing it would cut off your own user management |
| The last administrator | Removing it would leave nobody able to manage users |
| The account that manages the user directory | The directory uses it for itself |
When someone leaves: remove them from every group, change the password if access must stop immediately, and delete the account once handover is finished. Deleting first makes it harder to trace which resources they created.
The User Group Screen
View the group list under User Management > User Groups. Selecting a group name opens the permission editor on the right.
The unit of editing is one role card = one role. A group can have several roles, and the scope is set separately for each.
Adding a Group
[Add group] at the top right creates a group. Only users in the administrator group (admins) see this button.
| Field | Description |
|---|---|
| Group name | Lowercase letters, digits, and hyphens only, 2 to 32 characters. For example developers, team-a |
| Permission | You must pick one of editing user or read-only user |
A permission is required because a group without one leaves its members able to sign in but unable to see anything. The person who created it believes permission was granted; the person who received it sees an empty screen.
A new group holds the chosen role across every namespace. To narrow it, edit the namespace field on the role card in the group detail.
Group names appear in the list with an oidc: prefix. Kubernetes adds it to show which system the group came from;
do not type it when creating one.
A new group takes effect immediately, and its members get the permission the next time they sign in.
The Console decides Kubernetes permissions only. For this group to hold permissions in other tools, the installer must configure them separately.
Deleting a Group
The delete icon at the top right of the group detail removes it. A confirmation dialog names the group first.
The dialog asks whether to remove the Kubernetes permissions granted to that group as well. The default is to remove them. If you keep them, a group created later with the same name inherits those permissions.
Permissions shared with other groups or users are not removed. Only this group is taken out of them; the rest stays. Otherwise unrelated people would lose access.
The delete icon does not appear for these groups.
| Group | What to do |
|---|---|
| A group that still has members | Move the members to another group first |
| Groups created by the installer | admins, users, viewers, and groups starting with lldap_. Leave them alone |
Namespaces You Cannot Create Resources In
The Console refuses these namespaces when you create a resource. Saving is rejected and the reason is shown.
| Namespace | Reason |
|---|---|
default | It shares permissions with the cluster core and cannot be deleted, so there is no way to clean it up. The CIS Kubernetes Benchmark also recommends against using it |
Names starting with kube- | kube-system, kube-public, kube-node-lease and others are used by the cluster core |
Create a namespace per purpose and place applications inside it. The namespace field on creation screens starts empty; you must pick or type a value.
How to Choose a Role
Selecting Add role shows the list of roles you can choose from.
There are conditions on which roles appear in the list.
| Condition | Description |
|---|---|
| Roles marked as managed | Roles that operations staff marked as "this role may be granted from the screen" |
cluster-admin | The cluster-wide administrator. It always appears, as an exception |
Roles without the marker do not appear in the list. A cluster has dozens of roles created by the tools installed on it, and showing them all would make the role you need impossible to find. If a role you need is not visible, ask operations staff to add it to the list.
Namespace-scoped roles (Role) can share a name across namespaces, so they appear in the form
name (namespace).
Choosing Between RoleBinding and ClusterRoleBinding
After choosing a role, decide how to attach it within the card.
| Method | Scope | Namespace selection |
|---|---|---|
| RoleBinding | Only the selected namespaces | Several can be selected |
| ClusterRoleBinding | All namespaces | The selection field disappears |
The default is RoleBinding. It is the safer side, with a narrower scope.
Granting one role across several namespaces is common. For example, to give the development team edit permission on
both the dev and test namespaces, select both namespaces in one role card.
A ClusterRoleBinding applies to every namespace, including
kube-system. Use it only when truly necessary.
Saving Several Changes at Once
Adding or removing roles does not take effect immediately; a change count and a save bar appear at the bottom of the screen.
- Make all the changes you need.
- Review the changes in the save bar at the bottom.
- Selecting Save opens a confirmation window.
- Progress is shown per item. If some fail, only those items can be retried.
Selecting Revert returns to the state before saving.
The order of application is revocations first, grants second. This prevents an intermediate state where permissions are wrongly widened.
When the Default Roles Are Missing
If the default roles are not prepared on the cluster, a guidance banner appears at the top of the screen. The Create default roles button creates them.
Three roles are created.
| Role | Permissions |
|---|---|
cop-cluster-users | Can create and edit resources (edit) |
cop-cluster-viewers | Can view resources (read) |
cop-namespace-lister | Can view the namespace list |
cop-namespace-lister is needed for the screen to work. Without it, sign-in succeeds but the namespace selector
appears empty and no lists are shown.
If they already exist, only missing rules are filled in, so selecting it several times is safe.
The Objects the Console Creates
Bindings the Console created carry a marker and their names begin with cop-.
| Name | What it is |
|---|---|
cop-access-* | A namespace-scoped binding |
cop-cluster-access-* | A cluster-wide binding |
cop-group-*-ns-lister | An automatic binding for listing namespaces |
Bindings the Console did not create cannot be edited. Changing something another person created from the command line would conflict with how they manage it. Such bindings are marked "externally managed", and if necessary you can select Take over in Console to adopt it and then edit it.
When Access Does Not Work
| Symptom | What to check |
|---|---|
| Sign-in works but the screen is empty | Whether cop-namespace-lister is attached to that group |
| Only some menus appear | Menus are hidden based on permissions. Whether you have view permission on the resources you need |
| Group permissions do not apply | The group name spelling, and whether the authentication server passes group information |
| The group list is empty | The authentication server connection. You can also specify it by typing it directly |
If group information is not reflected after signing in, sign out and sign in again. Permissions are carried in the token issued at sign-in time.