4.5. Building and Deploying From the Bastion
When to Use It
- When build options have to be specified in detail
- When embedding a build in an automation script
- When handling exceptional cases that the Console or Jenkins cannot
It requires server access, so it is usually used by development and operations staff.
There is one more way to build and deploy from the command line. Unlike the scripts in this chapter, the
kubectl plugin kubectl cop runs the build inside the cluster and uses the build configs created in the Console
as they are (see 4.10).
What the Bastion Is
It is a management server with the tools for working with the cluster installed. You work through this server rather than connecting to the cluster directly.
The following are prepared on it.
| Tool | What it does |
|---|---|
| kubectl | The command-line tool for working with the cluster |
| Connection settings (kubeconfig) | Which cluster to connect to and with what permissions |
| S2I build tooling | Creates images from source |
| Build and deploy scripts | Run the tools above in order |
Why a Separate Server Is Used
The cluster API must not be reachable from just anywhere. Allowing access only from the Bastion and blocking the rest narrows the management scope.
| With it | Without it |
|---|---|
| One access route makes control easy | Several PCs reach the cluster directly |
| Access records stay in one place | Who did what is scattered |
| Tool versions are unified | Versions differ by person and so do the results |
Connecting
Ask your installation staff for the address and account. You connect over SSH.
After connecting, first confirm that it reaches the cluster. Seeing the node list means it is working.
Directory Layout
The application build and deploy scripts are in a fixed location.
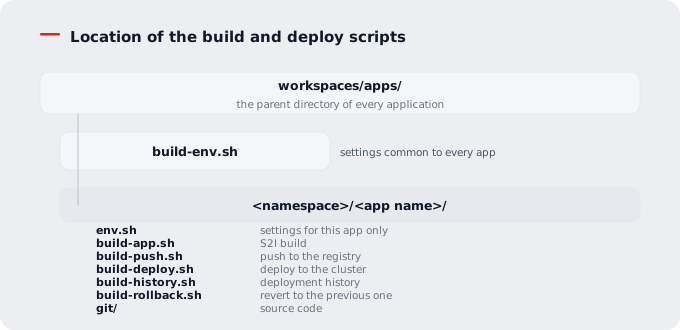
The exact path depends on the installation. Check the listing after connecting.
What the Scripts Do
Configuration is split into two layers. The upper layer, build-env.sh, holds values common to every
application, such as the registry address; the lower layer, env.sh, holds values specific to that application.
| File | What it holds |
|---|---|
build-env.sh | Registry address and account, and the repository name the image goes into. The shared function that derives the image tag from the source is also here |
env.sh | The namespace to deploy to, the Deployment name, the Git URL, the builder image, and the library repository address |
The other five are execution scripts.
| Script | What it does |
|---|---|
build-app.sh | Downloads the source and builds an image with S2I |
build-push.sh | Pushes the created image to the registry |
build-deploy.sh | Swaps the cluster Deployment's image and waits until the rollout finishes |
build-history.sh | Prints the deployment history of that Deployment |
build-rollback.sh | Reverts to the previous deployment and waits for completion |
The image tag is not chosen by a person; it is generated from the source automatically. The shared function in
build-env.sh reads the Git tag and commit number and forms <Git tag>-<first 7 characters of the commit>. Because
build and deploy use the same function, the two values cannot diverge, and the deployed image alone tells you which
commit it came from.
Change setting values only in
build-env.shandenv.sh. Writing them directly into the execution scripts makes the built tag and the deployed tag diverge, and the wrong image is deployed.
Running the Build and Deployment
Run them in order. Refreshing the source is included in build-app.sh, so it does not have to be done separately.
cd <install path>/workspaces/apps/<namespace>/<app name>

# 1. S2I build (includes refreshing the source)
./build-app.sh

# 2. push the image to the registry
./build-push.sh

# 3. deploy to the cluster
./build-deploy.sh
If a problem appears after deploying, revert from the same place.
./build-history.sh     # check what history exists
./build-rollback.sh    # revert to the previous deployment
build-rollback.sh reverts only to the previous deployment. To go further back, choose a revision in the
Deployment History in the Console (see 3.2).
Confirm that each stage succeeded before moving to the next. Running the deployment after a failed build deploys the previous image, and it ends as "deployment succeeded" with your changes not applied.
What to Check at Each Stage
| Stage | What to look at on failure |
|---|---|
build-app.sh — downloading the source | Repository access permission, branch name |
build-app.sh — build | Compilation errors, failure to download dependency libraries |
build-push.sh | Registry sign-in state, project permissions |
build-deploy.sh | Whether the namespace exists, the Deployment name, resource quotas (see 8.1) |
Build results are printed to the screen as they happen. When an error occurs, look at the end first.
Checking the Result in the Console
Even when deploying from the command line, check the result in the Console.
| What to check | Where |
|---|---|
| Whether pods started, and their logs | Workloads > Pods (see 3.1) |
| The deployed image tag | Workloads > Deployment detail (see 3.2) |
| The external access address | Network > Ingresses (see 5.1) |
| Resource connections | Map (see 2.2) |
Confirm on the Deployment detail that the deployed image tag matches the one you just pushed. With a tag of
latest you cannot tell which image is up.
Cautions
- Several people share the same Bastion. Running a script while someone else is working can affect them.
- Do not edit code directly in the source directory. Building an image from changes not committed to the Git repository loses them on the next build.
- If a deployment has problems, you can revert to a previous version in the Console (see 3.2).