3.2. Controllers
When to Look at This
- When checking how many instances of an application are up
- When confirming that a new version was deployed properly
- When increasing or decreasing the pod count
- When a problem appears after a deployment and you have to go back
What a Controller Is
A pod by itself is not recreated. If you create a pod directly, the application disappears the moment that pod terminates. The same is true if the node goes down.
Controllers solve this. You define the "desired state", and the controller keeps watching the cluster and brings the actual state in line with it.
For example, if you define "three replicas", it behaves like this.
| What actually happened | What the controller does |
|---|---|
| One pod terminated (two remain) | Creates one new pod to make three |
| A node went down and two pods disappeared | Starts two new ones on the remaining nodes |
| Someone deleted a pod by hand | Creates it again |
| The replica count was changed to 5 | Creates two more |
Nobody has to watch it. This is one of the biggest reasons for using Kubernetes.
What "Declarative" Means
The word "declarative" comes up when Kubernetes is explained. Comparing it with imperative makes it easier.
| Style | The instruction | When a problem occurs |
|---|---|---|
| Imperative | "Run this program" | Nothing happens if it terminates |
| Declarative | "Three of this program must be up" | The system restores it if one terminates |
Controllers are the mechanism that realizes the declarative style. You write only the outcome, and the controller takes charge of reaching it.
Changing the replica count or editing the image in the Console is editing the "desired state". It is not touching the actual pods.
What a Deployment Is
It is the controller for managing applications that do not store state. Use it for web servers, API servers, and anything else where the result is the same no matter which pod receives the request.
A Deployment does three things.
| What it does | Description |
|---|---|
| Maintains the count | Keeps the defined replica count |
| Replaces without downtime | Swaps pods one at a time when deploying a new version, so the service is not interrupted |
| Rolls back | Keeps a record of previous versions so you can return if a problem appears |
"Does not store state" means there is no data that has to remain inside the pod. Data lives in a database or separate storage, and the pod must not care when it terminates and is recreated.
If each pod needs its own data, use a StatefulSet rather than a Deployment (see below).
How a Deployment Manages Pods
A Deployment does not create pods directly. There is a ReplicaSet in between.
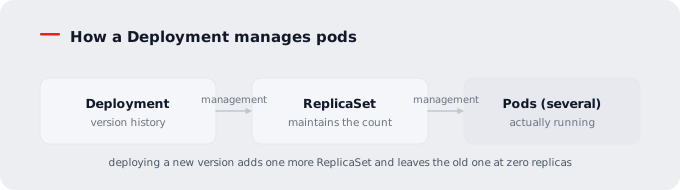
Deploying a new version creates one more ReplicaSet. The old ReplicaSet remains at zero replicas as history. Rolling back means raising the replicas of the old ReplicaSet again.
Seeing several ReplicaSets sharing the same name prefix in the list is the deployment history so far.
The Deployment List
Go to Workloads > Deployments.
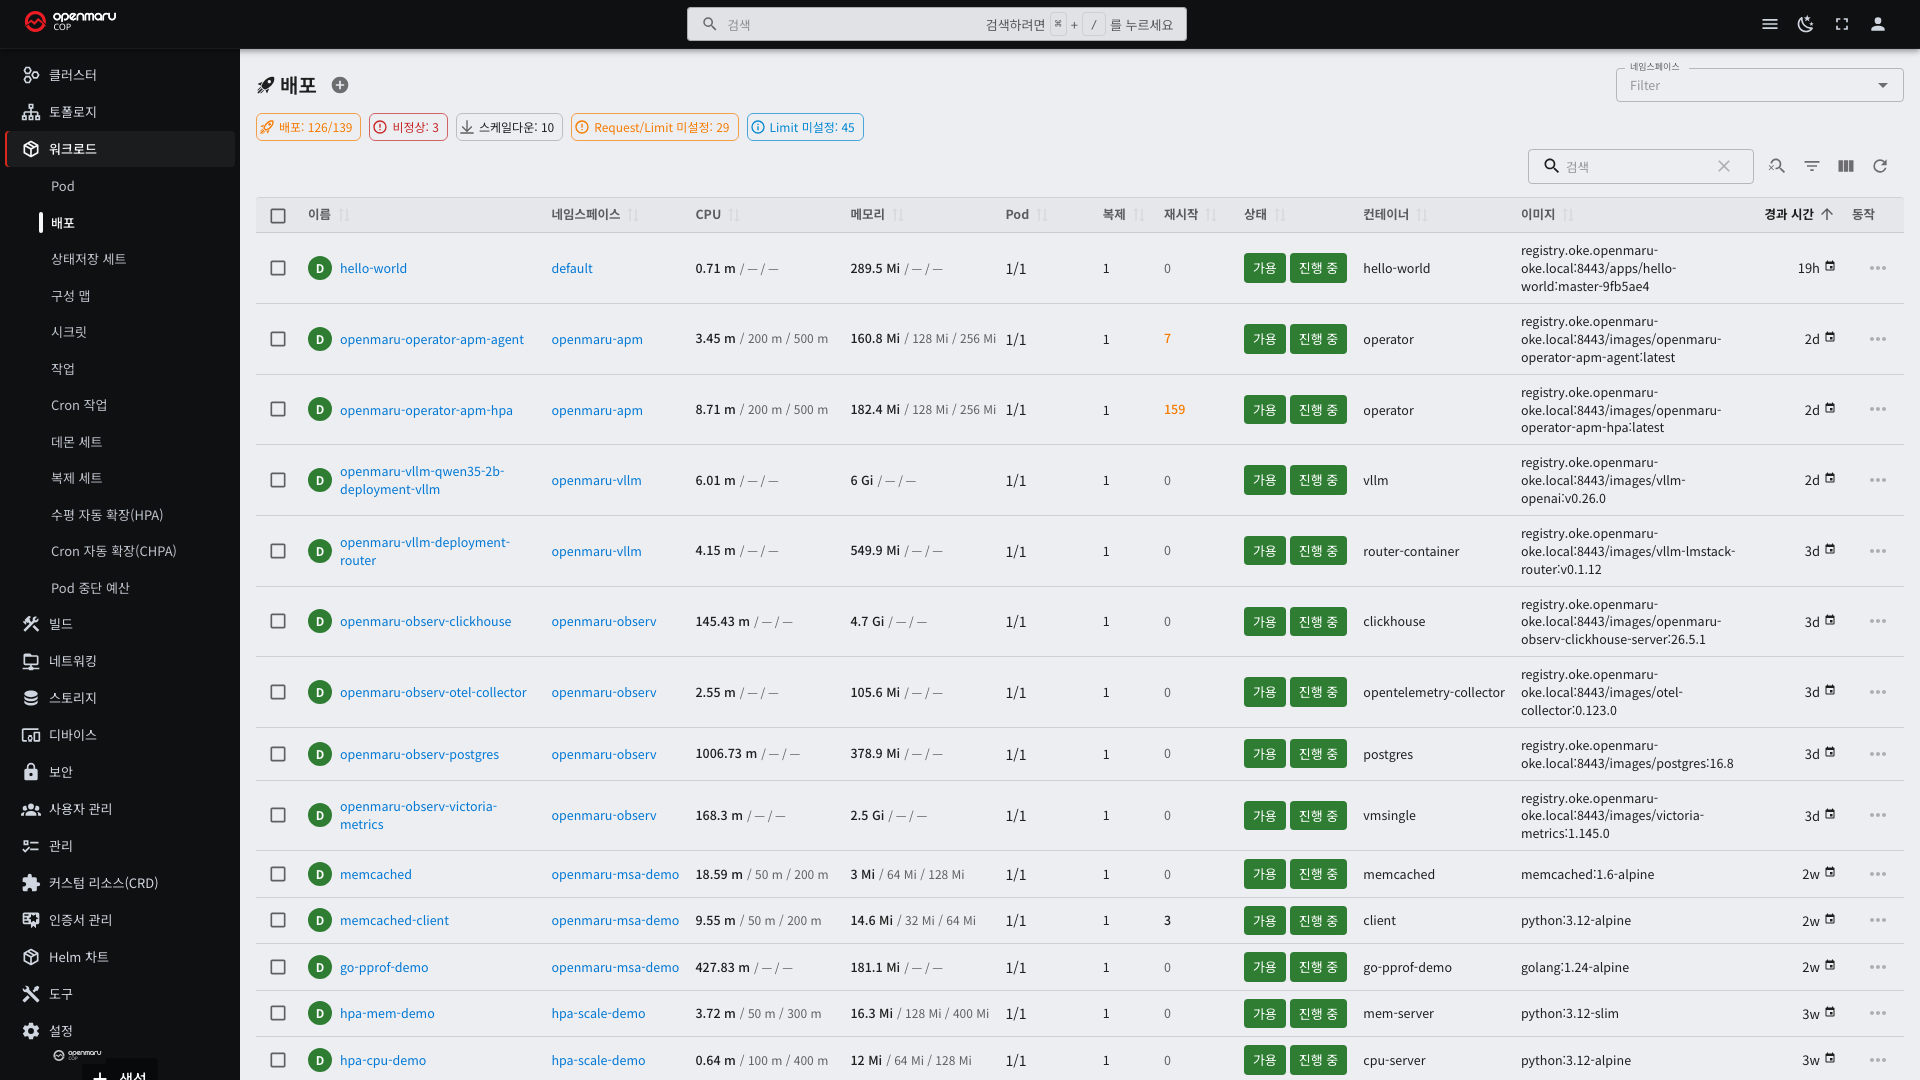
| Column | Description | How to read it |
|---|---|---|
| Name | The Deployment name | |
| Namespace | The namespace it belongs to | |
| Pods | Ready pods / desired pods | If the two numbers differ, a deployment is in progress or something is wrong |
| Replicas | The configured replica count | |
| Age | Time elapsed since creation |
If 2/3 persists for more than a few minutes, find the pod that is not ready in the pod list and check its events
(see 3.1).
Creating a Deployment — Guided Edit
Select the + next to the list title to open a window with four tabs.
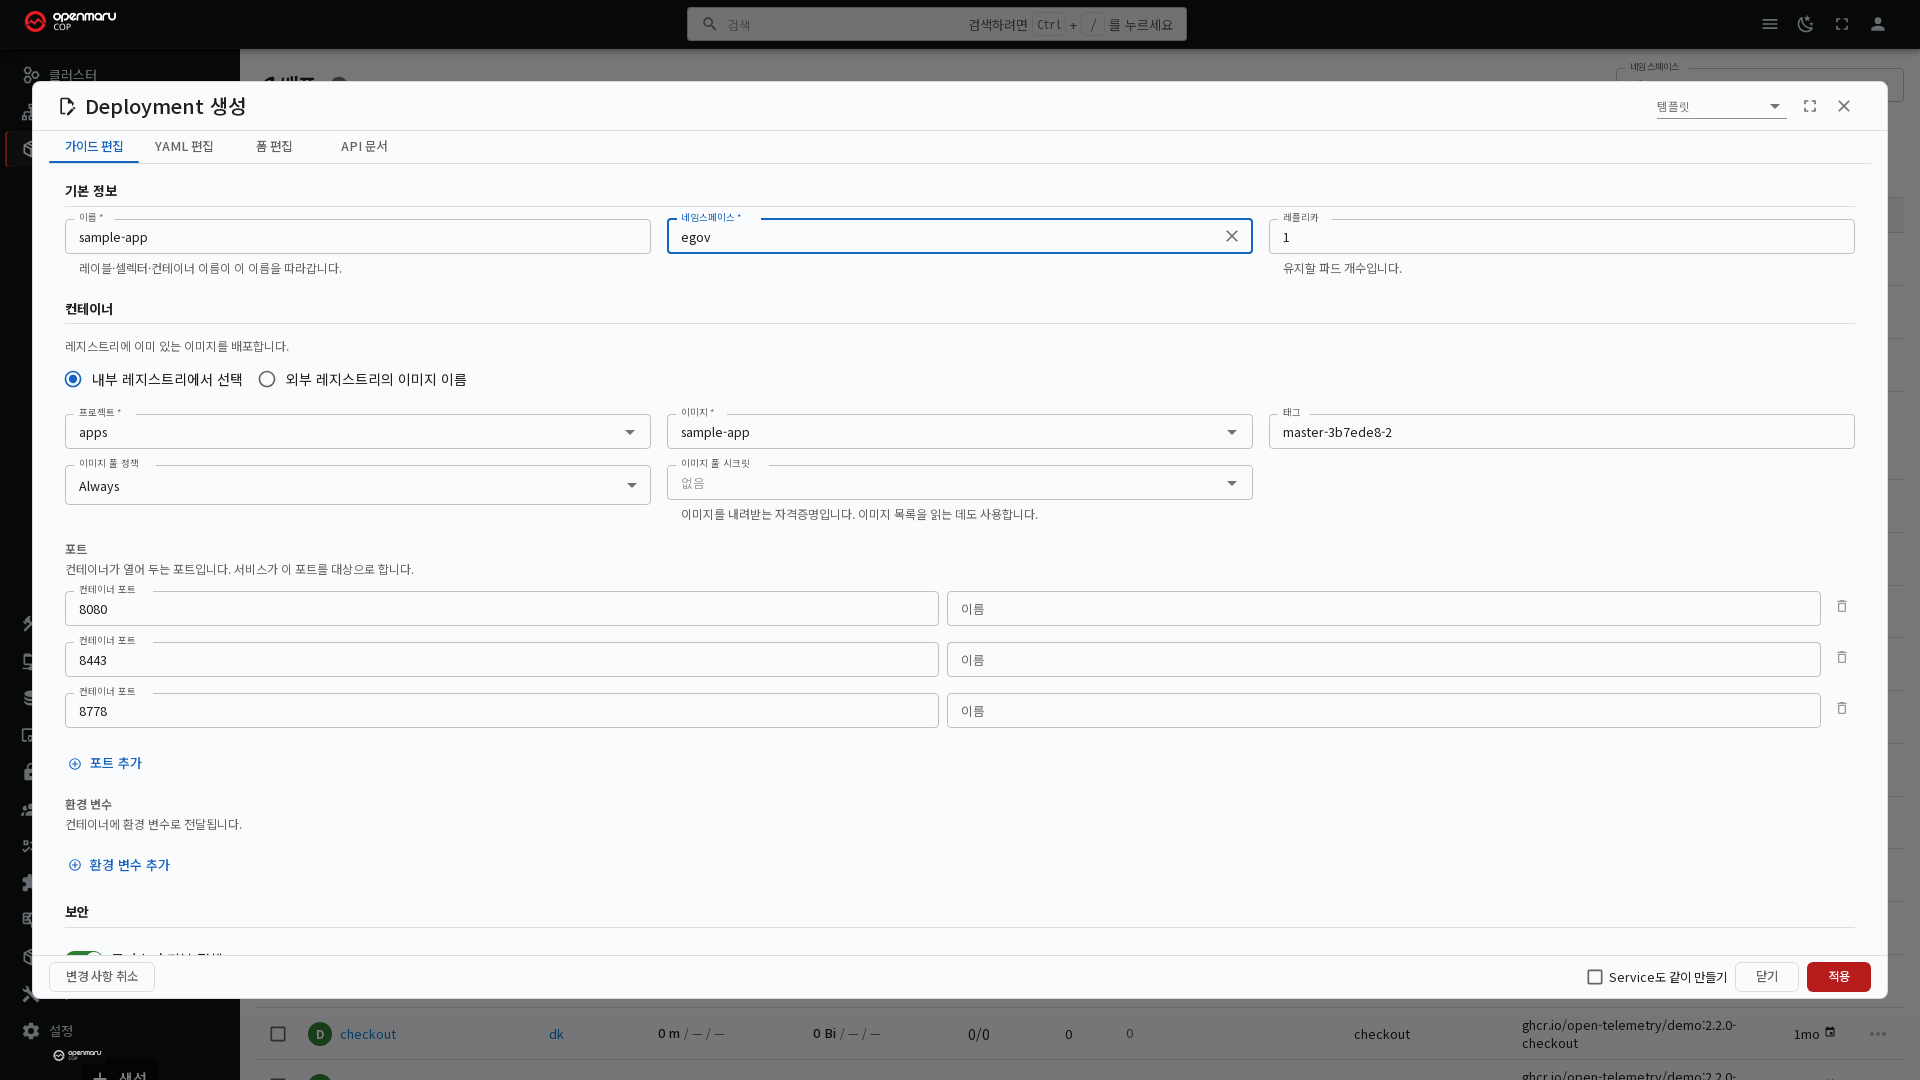
| Tab | Description | When to use it |
|---|---|---|
| Guided Edit | A form built for Deployments | The default. Enough for most cases |
| YAML Edit | Enter the definition as YAML | When copying from another Deployment |
| Form Edit | Every field in an auto-generated form | When you need a field the guided form does not have |
| API Docs | Descriptions of each field | When you want to know what a field means |
Choosing Template at the top right of the window loads a prepared definition (Nginx 웹서버 Deployment, for example). Left unselected, you start from an empty form.
Values That Follow the Name
Entering the name also fills in the labels, the selector, and the container name. A Deployment repeats the same name in five places, and if the selector and the pod labels disagree the save is rejected. Values you edit yourself are left alone, so you can still change each field separately.
The image does not follow the name. The image to deploy is chosen from what is already in the registry, so an address derived from the name would usually point at an image that does not exist. See "The Image Is Chosen from a List" below.
The other way around, picking an image fills in the name. When the Name field is empty, the
name of the image you picked goes into it. Picking sample-app from the apps project, for
example, sets the name to sample-app, and the labels, the selector, and the container name follow
along. A name you typed yourself is left alone.
An image name may contain characters a Deployment name cannot use (., _). Those are replaced
with -, and only the first 63 characters are used. Edit the Name field if you want something
else.
Guided Edit Fields
| Field | Description | Example |
|---|---|---|
| Name | The Deployment name. Must be unique within the namespace | sample-app |
| Namespace | Where to deploy | egov |
| Replicas | Number of pods to keep running. 1 if left empty | 2 |
| Image source | Pick from the internal registry / Image name in an external registry | Pick from the internal registry |
| Project, Image, Tag | When picking from the internal registry | apps / sample-app / master-3b7ede8-2 |
| Image Pull Policy | When to fetch the image again | Always |
| Image Pull Secret | Registry credentials. Also used to read the image list | default-registry-secret |
| Ports | Ports the container listens on. A Service targets these | 8080 |
| Environment Variables | Values passed to the container | SPRING_PROFILES_ACTIVE |
| Cluster default policy | See "Security Setting" below | On |
There is no container name field — it follows the Name field automatically.
Expanding Advanced Options lets you set resource requests and limits (100m / 128Mi and the
like) and a node selector. Left empty means no request and no limit.
Turning on Also create Service at the bottom of the window creates a Service alongside it.
The Service targets the ports you entered, so the deployed application is callable from inside the
cluster right away. It starts turned off.
Environment Variables That Come from a Secret
Some environment variables do not hold a value directly but take it from somewhere else. Keeping a password in a Secret and referring to it by name is the common case.
For those entries the value field is locked and shows where the value comes from.
Name CLICKHOUSE_PASSWORD Value Secret · openmaru-observ-clickhouse · admin-password
| Shown as | Meaning |
|---|---|
| Secret · name · key | Taken from a Secret |
| ConfigMap · name · key | Taken from a ConfigMap |
| Pod field · path | A value decided at run time, such as the pod name, namespace, or pod address |
| Container resource · … | The CPU or memory limit set on the container |
It is locked so that a typed value cannot overwrite it. Typing here would drop the reference, and a password typed in its place would stay in the deployment definition as plain text. More people can read a deployment definition than can read a Secret, so keeping the password in a Secret would no longer mean anything.
To change it, delete the row and add it again, or edit it in the YAML Edit tab.
The name field is still editable. The reference belongs to the value, so it follows a renamed variable.
Some deployments take a whole Secret or ConfigMap as environment variables. Those do not appear in this list and are left unchanged; the field description reports only how many there are.
When There Is More Than One Container
Guided Edit handles the first container only. Opening a Deployment that has two or more containers shows a note on the container section: "This deployment has N containers. Only the first one is edited here."
To add or change a side container such as a log collector or a proxy, use the YAML Edit tab.
The security setting alone applies to the whole pod. The cluster policy rejects the entire pod if even one container violates it, so that setting is applied to every container.
The Image Is Chosen from a List
There are two ways to specify the image.
| Method | When to use it |
|---|---|
| Pick from the internal registry | To deploy an image already pushed to the internal registry. This is the default |
| Image name in an external registry | To use an image outside the internal registry. Enter the full name including the address |
Choosing Pick from the internal registry splits the field into three.
| Field | What you choose | Example |
|---|---|---|
| Project | A grouping inside the registry | apps |
| Image | An image pushed to that project | sample-app |
| Tag | A version of that image | master-3b7ede8-2 |
Each list appears only after the field before it is chosen. Choosing a project reads that project's image list from the registry, and choosing an image reads that image's tags. Changing an earlier field clears the ones after it.
A tag that is not in the list can also be typed. Use this when you prepare a Deployment for a
tag you have not pushed yet. Leaving it empty pulls latest, which often does not exist in an
air-gapped registry, so specify a tag whenever you can.
Choosing a tag also fills in the ports. The ports the image was built to expose are read from
the registry and entered in the first container's Ports field. A Java application image, for
example, usually gives 8080, 8443, and 8778. Ports you edited yourself are left alone when
the tag changes.
If the list cannot be read, the reason appears under the field. You can still create the Deployment by choosing Image name in an external registry and entering the full address yourself.
Security Setting — Cluster Default Policy
The Cluster default policy switch under Security starts turned on. On this cluster a
namespace without a label is enforced as Pod Security Admission restricted, so if you turn the
switch off and save, the Deployment is created but no pod starts.
To keep it on, the container image must be built with a non-root USER. Some public images run as
root (the official nginx image, for example); in that case use a non-root image such as
nginxinc/nginx-unprivileged first.
If you genuinely need to run as root, turn the switch off. A warning appears on the screen, and the
namespace holding that Deployment must carry a pod-security.kubernetes.io/enforce label set to
baseline or privileged for the pod to start. Check with your operations team.
On a Deployment that already carries security settings this form does not cover, the switch is locked and the reason is shown below it. Edit such a Deployment in the YAML Edit tab.
Deployment Detail
Selecting the name opens the detail screen.
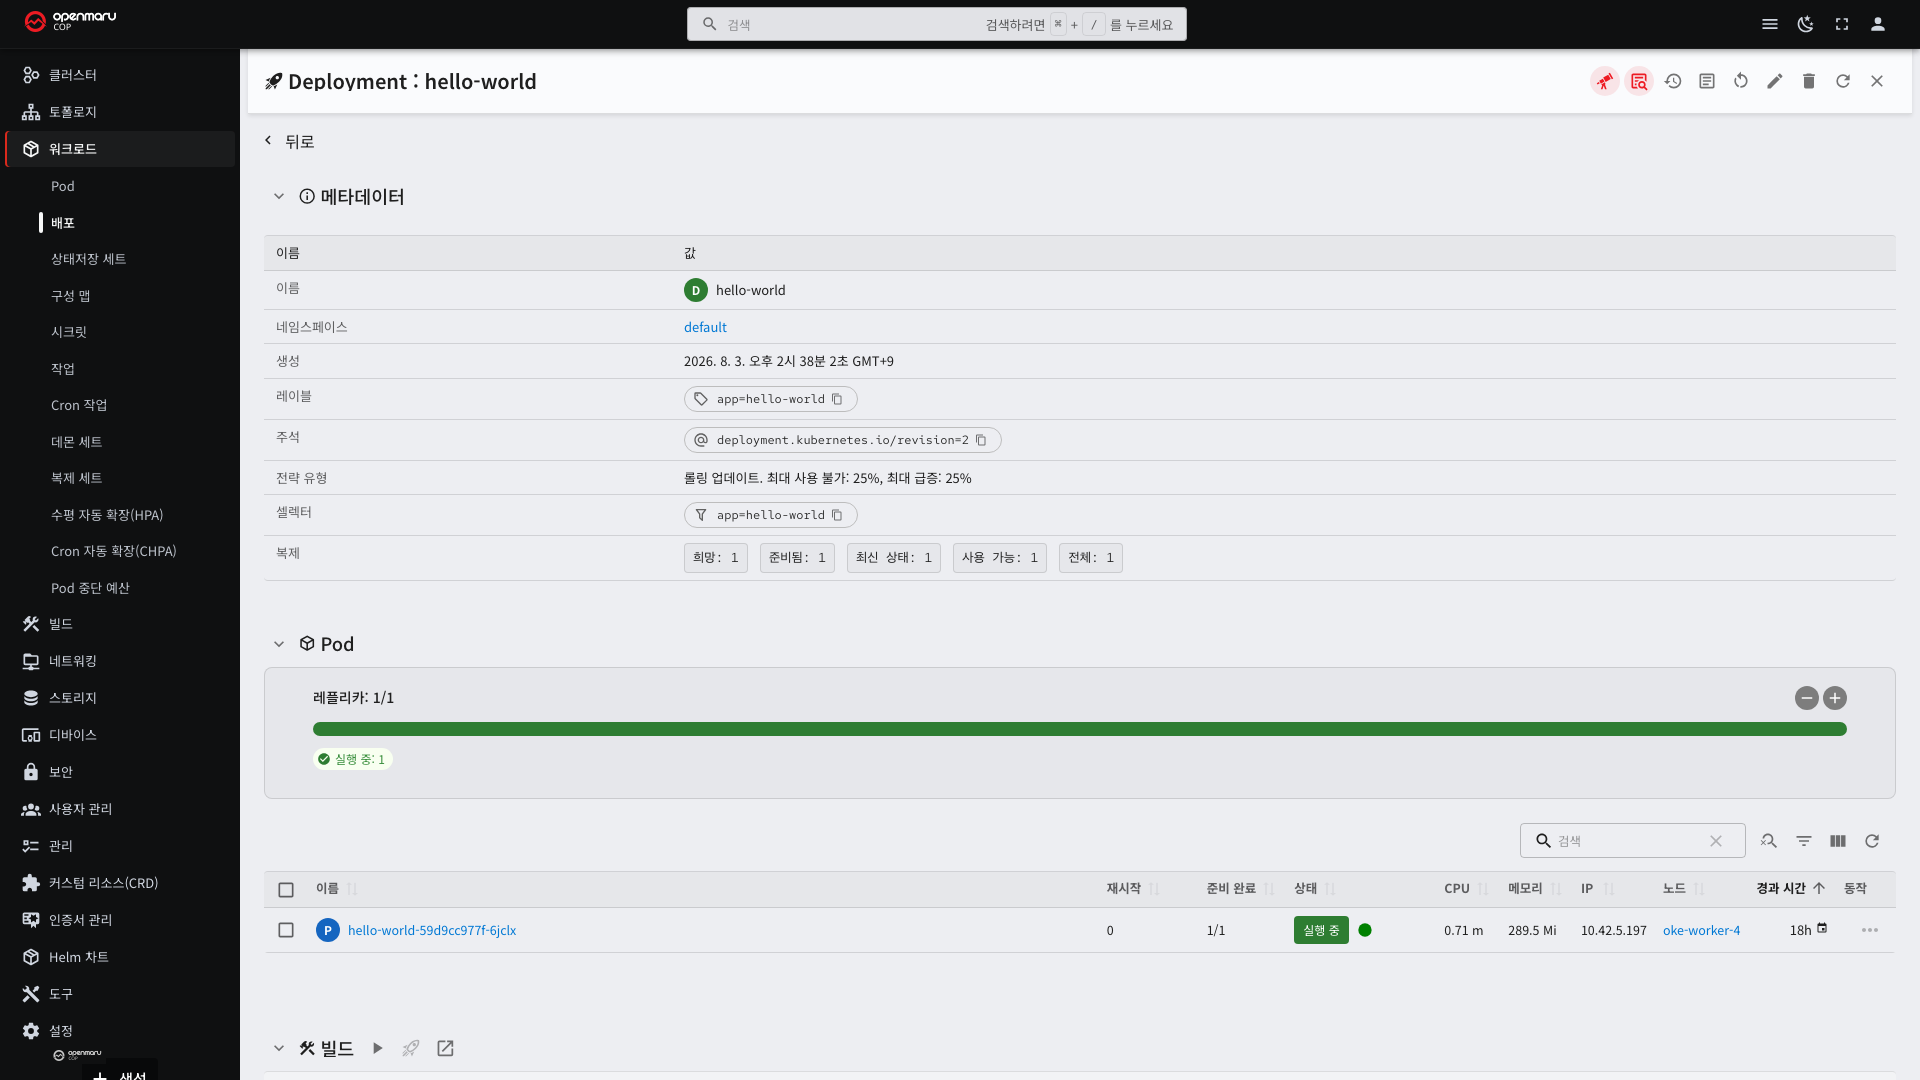
| Section | What it tells you |
|---|---|
| Metadata | Name, namespace, labels, annotations |
| Strategy | How it switches to a new version |
| Selectors | Which labeled pods it considers its own |
| Containers | Image, tag, environment variables, requested and limited resources |
| Conditions | Deployment progress |
| Related resources | The ReplicaSets and pods that were created |
Check the container image tag. This is where you see whether the version you deployed actually took effect.
The selector cannot be changed after creation. It is how the Deployment finds its own pods, so changing it breaks the link with the existing pods.
Read the deployment state from the conditions.
The screen shows one badge per condition. It is green when the condition is met, red when it is not.
| Condition | Badge when met | Badge when not | What it means when not met |
|---|---|---|---|
| Available | Available | Not available | Not enough pods are ready |
| Progressing | Progressing | Not progressing | The deployment has stalled. Check the reason |
Hovering over the Progressing badge shows the reason. NewReplicaSetAvailable means the rollout
finished normally.
If a deployment does not finish within a set time (10 minutes by default), it turns to
ProgressDeadlineExceeded. That means new pods cannot start, so look at the pod events.
If new pods are Running but the deployment does not finish, check the readiness probe. A rolling update
replaces the next pod only when the new pod becomes ready. If the probe keeps failing, it stalls at the first pod
and makes no progress (see 3.1).
Deployment Strategy Settings
| Strategy | Behavior | When to use it |
|---|---|---|
| RollingUpdate | Starts new pods one at a time and takes old pods down one at a time | The default. The service is not interrupted |
| Recreate | Takes all old pods down, then starts the new ones | When two versions must not be up at the same time |
Recreate stops the service briefly. Use it only when a database schema change means the old and new versions
cannot coexist.
RollingUpdate has two tuning values.
| Value | Meaning | Default |
|---|---|---|
| maxSurge | How many more than the desired count may be up | 25% |
| maxUnavailable | How many may be missing at once | 25% |
Setting maxUnavailable: 0 keeps the healthy pod count intact during a deployment. In exchange, more resources are
needed briefly.
Write the settings like this.
apiVersion: apps/v1
kind: Deployment
metadata:
  name: my-app
  namespace: my-app
spec:
  replicas: 4
  revisionHistoryLimit: 10          # how many revisions can be rolled back to
  strategy:
    type: RollingUpdate
    rollingUpdate:
      maxSurge: 1                   # a count or a ratio ("25%")
      maxUnavailable: 0             # keeps 4 up even during the deployment
  selector:
    matchLabels:
      app: my-app
  template:
    metadata:
      labels:
        app: my-app                 # must match the selector
      annotations:
        kubernetes.io/change-cause: "1.2.0 - fix login error"
    spec:
      containers:
        - name: app
          image: registry.example.com/my-app:1.2.0
| Field | Description |
|---|---|
maxSurge | How many more than the desired count may be started. 0 uses no extra resources but makes the deployment slower |
maxUnavailable | How many may be missing at once. 0 means the serving count never drops |
revisionHistoryLimit | How many revisions to keep. Beyond this number the oldest are deleted and cannot be rolled back to |
change-cause annotation | Appears in the Change Cause column of the deployment history |
maxSurge and maxUnavailable cannot both be 0. Nothing could be started and nothing taken down, so the
deployment would not proceed. It is rejected on apply.
Include change-cause. Without it, the change cause in the deployment history stays <none>, and you have to
choose a revision to roll back to from the image tag and time alone.
Recreate has no tuning values.
  strategy:
    type: Recreate
Deployment styles that also involve Services, such as blue-green and canary, are covered in 4.8.
The strategy in this section is a setting contained within a single Deployment.
What a StatefulSet Is
It is the controller for managing applications where each pod needs its own identity and storage.
The pods of a Deployment are not distinguishable from one another. A random string is appended to the name, and the name changes when a pod is recreated. Storage is shared or absent.
A StatefulSet is different.
| Characteristic | Deployment | StatefulSet |
|---|---|---|
| Pod name | Random (web-7d4f-x8k2) | Ordinal (db-0, db-1, db-2) |
| Creation order | All at once | From 0, in order |
| Deletion order | All at once | From the last ordinal, in reverse |
| Storage | Shared or absent | One fixed volume per pod |
| Network name | None | A fixed name per pod |
The key point is "the same thing even after being recreated". If db-0 terminates and comes back, its name is
still db-0 and it reconnects to the storage it was using before. The data is preserved.
When to Use a StatefulSet
| Situation | Reason |
|---|---|
| Databases (MySQL, PostgreSQL) | Each instance has its own data files |
| Message queues (Kafka) | Partitions are assigned to particular instances |
| Distributed stores (Elasticsearch) | Each node holds different data |
| When cluster members must find each other by name | Fixed network names are needed |
Why creating in order matters. A database cluster usually has the first instance start and initialize, after which the rest join it. Starting all at once makes them fail to find each other.
Deleting in order matters too. Removing from the last ordinal keeps the remaining members in quorum.
View them under Workloads > Stateful Sets. The screen layout is the same as for Deployments.
Creating a StatefulSet — Guided Edit
The + beside the list title opens the same guided edit form as for Deployments. The container, image, ports, environment variables, and security setting are identical, so see "Creating a Deployment — Guided Edit" above. The only difference is the Service Name field.
| Field | Deployment | StatefulSet |
|---|---|---|
| Replicas | Yes | Yes |
| Service Name | No | Yes (left empty, the workload name is used) |
Service Name
The name of the Service that will point at this StatefulSet's pods. It is what gives each pod a stable network name.
db-0.db-svc.egov.svc.cluster.local
      L the value entered in Service Name
Leave it empty and the workload name is used. Typing db in the name field makes the service name db too.
Edit it and your value stays — typing a new name afterwards does not overwrite it.
There is usually no reason to make it different. The convention is to keep them the same.
The service name cannot be changed after creation. The edit screen locks this field along with the name and namespace.
A Headless Service Is Created with It
Creating a StatefulSet also creates a headless Service with the same name as the service name. The
Also create Service toggle at the bottom of the window is on by default for StatefulSets.
There is a reason you should not have to remember this. Without that Service, the stable per-pod names are never created, while the StatefulSet itself comes up normally. Nothing on screen says what is missing; you find out later, when the pods fail to reach each other.
The Service that is created looks like this.
| Field | Value |
|---|---|
| Name | The value in Service Name |
| Type | Headless (clusterIP: None) |
| Selector | The StatefulSet's pod labels |
| Ports | The container ports |
Turn the toggle off if you do not need it. Switching it to a regular Service later means deleting and recreating it — whether a Service is headless cannot be changed after creation (see 5.1).
It does not have to be headless. That is required only when the pods must find each other (database replication, Kafka). Because that is the typical reason to choose a StatefulSet, it is the default.
What a DaemonSet Is
It is the controller that runs one pod on every node. You do not set a replica count; it matches the node count automatically.
| Situation | Behavior |
|---|---|
| A new node is added to the cluster | A pod is created on that node automatically |
| A node is removed from the cluster | That node's pod disappears |
Use it for things that must exist once per node.
| Use | Example |
|---|---|
| Log collection | Gathers and ships the container logs of each node |
| Metric collection | Measures and reports node CPU and memory |
| Networking | Handles communication between nodes |
| Storage | Provides the node's disk to pods |
View them under Workloads > Daemon Sets. The desired count is usually the same as the node count.
Creating one with the + in the list also opens the same guided edit form as for Deployments. The only difference is that there is no Replicas field — the pod count is set by the number of nodes, not by you.
A count lower than the node count means it could not be scheduled on some nodes. Nodes with taints are excluded unless there is a toleration (see 2.1), so management nodes being absent can be normal.
What a ReplicaSet Is
It is the controller that maintains a set number of pods. It only maintains the count; it has no version management or zero-downtime replacement.
You do not create them directly. A Deployment creates and uses them internally. What appears in the list is deployment history, so do not delete them.
View them under Workloads > Replica Sets.
| State | Meaning |
|---|---|
| Replicas not 0 | The version currently in use |
| Replicas 0 | A previous version. Used for rollback |
Which Controller to Choose
| Question | Yes | No |
|---|---|---|
| Does each pod have to store different data? | StatefulSet | Next question |
| Does there have to be one on every node? | DaemonSet | Next question |
| Is it work that runs once and finishes? | Job or CronJob (see 3.3) | Deployment |
A Deployment is enough for most applications.
Adjusting the Replica Count
Select the scale button at the top right of the detail screen.
- Select the scale button.
- Enter the replica count you want.
- Saving applies it immediately.
To adjust automatically with load, use autoscaling (see 3.5).
Changing the replica count by hand on a resource with autoscaling configured soon reverts to the automatic value.
Restarting
Selecting the Restart button at the top right of the detail screen starts the pods anew without changing any settings.
Use it to apply values after editing a ConfigMap or Secret. Values injected as environment variables change only when the pod is started again (see 3.4).
A restart proceeds as a rolling update, so the service is not interrupted. The result is the same as deleting pods one at a time, but the order is controlled.
Here is how it works. The Console adds a "restarted at" annotation to the pod template. Because the template changed, Kubernetes treats it as a new version deployment and starts a rolling update. The image and settings stay the same.
Viewing Deployment History
Selecting the clock icon (Deployment History) at the top right of the detail screen shows the record of past deployments.
Three resource types are supported.
| Resource | View history | Roll back |
|---|---|---|
| Deployment | Yes | Yes |
| DaemonSet | Yes | Yes |
| StatefulSet | Yes | No (history only) |
The history table shows the following.
| Column | Description |
|---|---|
| Revision | The deployment ordinal. Higher is more recent |
| Name | The name of the ReplicaSet holding that revision |
| Image | The container image and tag deployed at that time |
| Change Cause | The description left at deployment time. <none> if absent |
| Creation time | When that revision was created |
| Status | The revision currently in use is marked Current |
The image tag tells you which version it is right away. If you pin the tag to latest, every revision shows the
same value and they cannot be told apart, so use different tags when building (see 4.2).
Change Cause is filled in only if you add the kubernetes.io/change-cause annotation when deploying. Without it,
it stays <none>. Recording why you deployed makes it easier to pick a revision to roll back to later.
How to Roll Back
Return to a previous state when a problem appears after deploying a new version.
- Open the detail screen of the resource to roll back (a Deployment or DaemonSet).
- Select the clock icon at the top right to open the Deployment History.
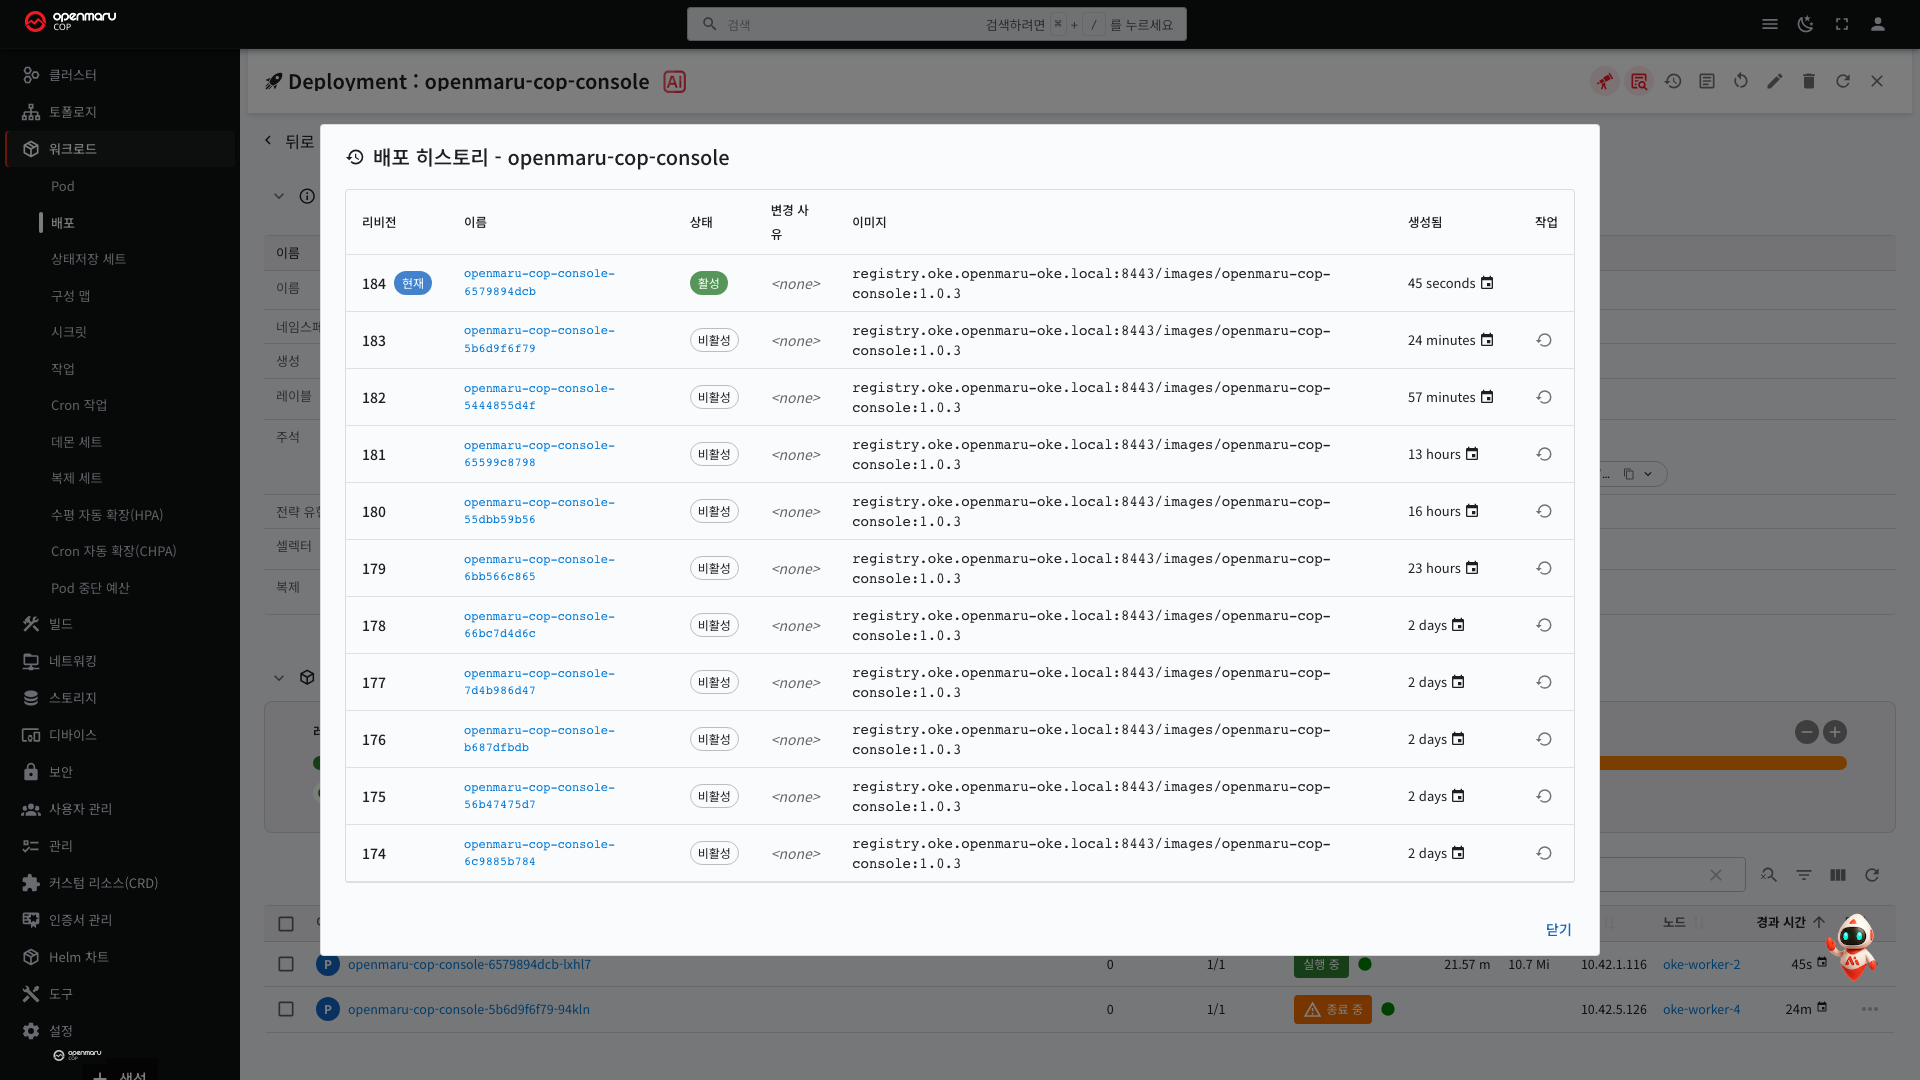
- Find the revision to return to. Identify it by image tag and creation time.
- Select the revert icon in the Actions column on that row.
- A rolling update starts. The history updates shortly after.
The revision currently in use has no revert icon. In the figure above, revision 183 carries the Current marker and the Active state, and its Actions cell is empty. It is already that state, so there is nothing to revert to. The remaining rows are Inactive and each has a revert icon.
Choose the revision to return to by image tag and creation time. If the image tags are all the same, as in the figure above, the revision alone does not tell you what changed. In that case use the creation time to find "the last deployment before the problem appeared". If you recorded change causes, that value is the surest clue.
What a Rollback Reverts
The entire pod template returns to the state of that revision.
| Item | Does it revert |
|---|---|
| Container image and tag | Yes |
| Environment variables | Yes |
| Resource requests and limits | Yes |
| The names of attached volumes, ConfigMaps, and Secrets | Yes |
| Replica count | No. The current value is kept |
| The contents of ConfigMaps and Secrets | No. Only the references revert |
| Database data | No |
Leaving the replica count alone is intentional. A rollback reverts "which version to run", not "how many to run".
ConfigMap contents do not revert. If editing a setting value was the problem, a rollback alone does not solve it. The ConfigMap has to be reverted as well (see 3.4).
What to Check After a Rollback
| Check | Where |
|---|---|
| Whether new pods started and became ready | Workloads > Pods (see 3.1) |
| Whether the image tag is the intended one | Containers on the Deployment detail |
| Whether the revision count increased in the history | Deployment History |
Revision numbers move forward even on a rollback. Reverting from revision 5 to 3 creates revision 6 with the same content as 3, because the revert is itself recorded as a deployment.
When a Rollback Does Not Work
| Symptom | Cause | Remedy |
|---|---|---|
| The revision to revert to is not in the list | It was deleted beyond the retention count | See "History Retention Count" below |
| The rollback ran but pods will not start | The image used at that time was deleted from the registry | Upload the image again or rebuild |
| The rollback ran but the symptom persists | The cause is in configuration or data, not the application | Check the ConfigMap, Secret, and external integrations |
| There is no rollback button on the StatefulSet | It is not supported | See below |
StatefulSets offer history only and cannot be rolled back. Each pod has storage attached, so reverting the version leaves the data as it is, and the older version may not be able to read data in the newer format. If you must revert, edit the image tag back to the previous value directly and confirm data compatibility first.
History Retention Count
As many revisions are kept as the Revision History Limit value on the Deployment detail. The default is 10.
Beyond this number, the oldest revisions are deleted and cannot be rolled back to. Raise the value for applications that deploy frequently.
Do not delete ReplicaSets with 0 replicas from the list. They are the history.