3.3. Namespaces
Overview
The Namespaces page manages every namespace that exists on the MCM control plane. You can check a namespace's multi-cluster propagation state, and create a new namespace or edit or delete an existing one.
What it is for:
- Managing MCM control plane namespaces
- Monitoring the multi-cluster propagation state
- Checking the sync state per cluster for each namespace
- Managing the automatic scheduling setting
How the Screen Is Laid Out
The Namespaces page shows the namespace list as a table.
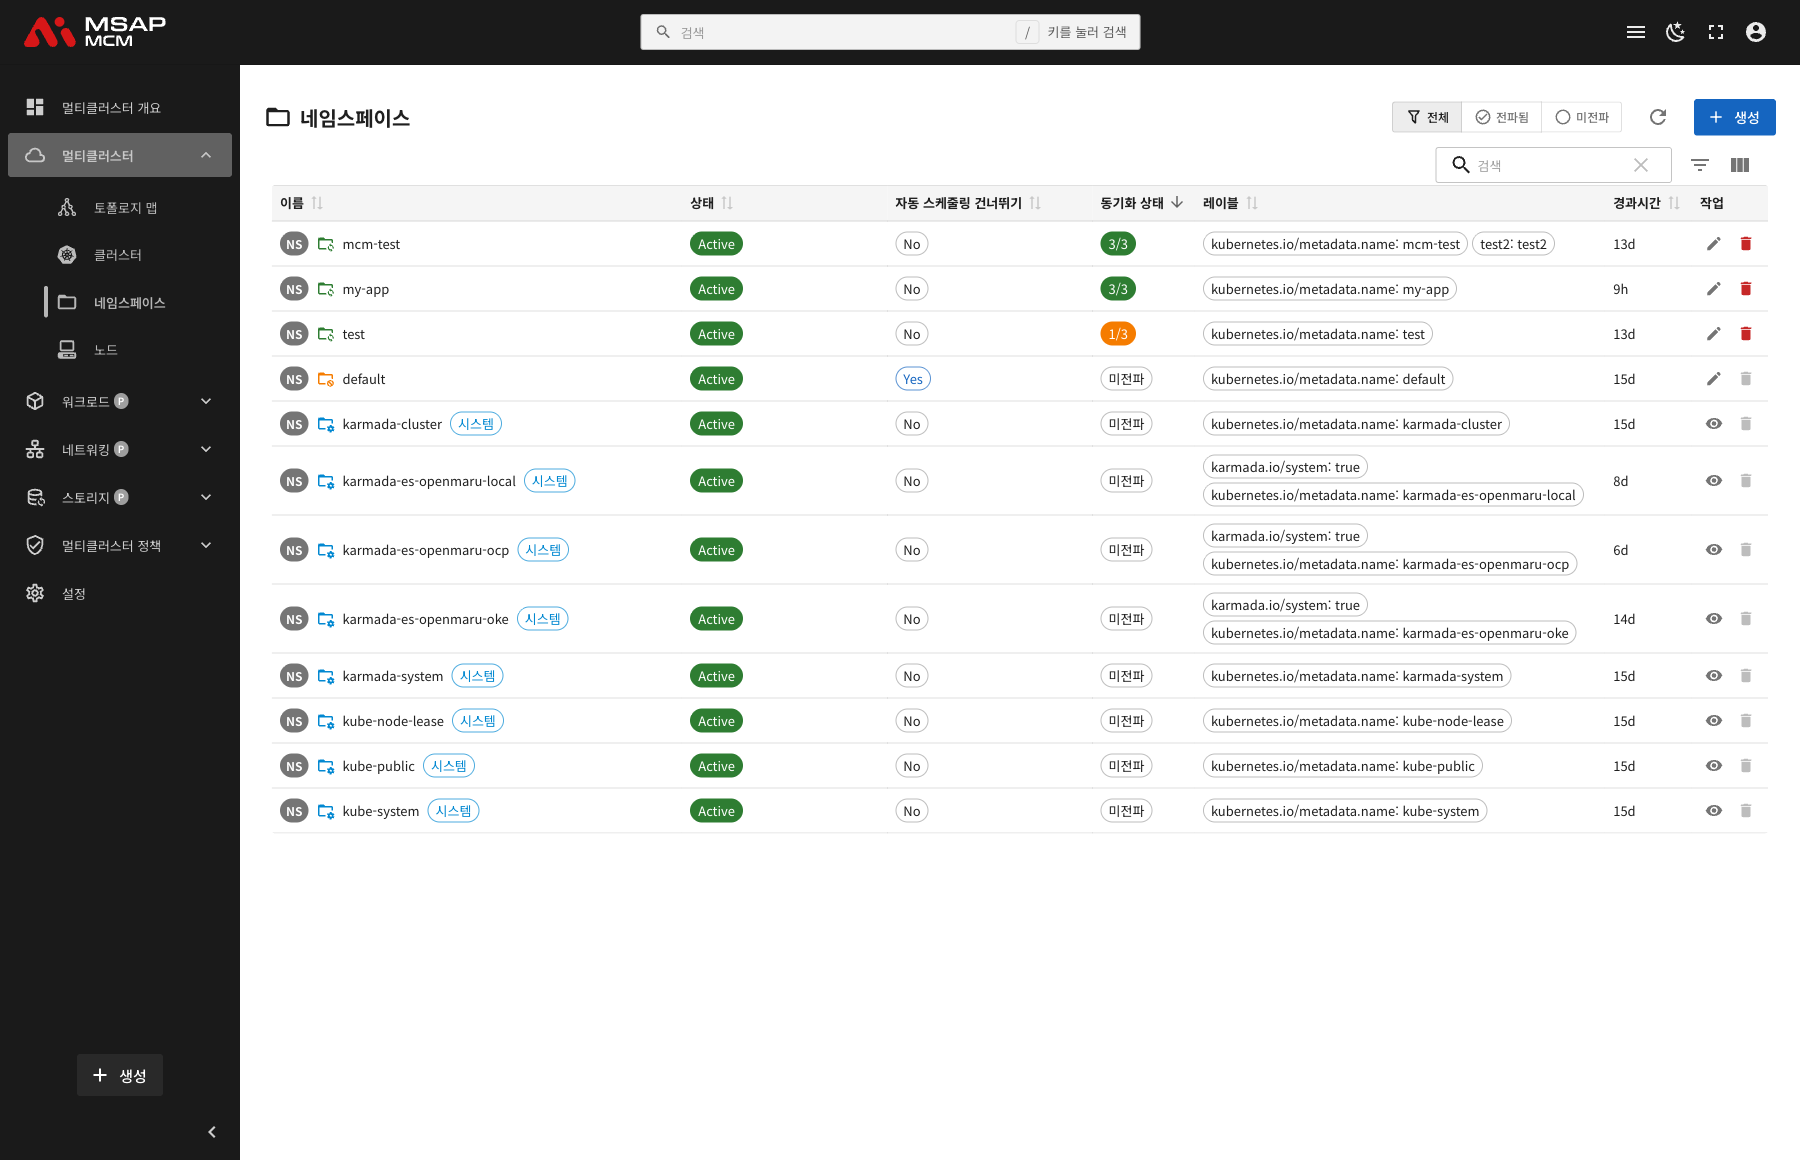
The Elements at the Top of the Page
| Element | Description |
|---|---|
| Filter buttons | Filter by All / Propagated / Not Propagated |
| Refresh button | Refreshes the namespace list |
| Create button | Opens the dialog for creating a new namespace |
| Search box | Searches by namespace name |
The Filter Options
| Filter | Description |
|---|---|
| All | Shows every namespace |
| Propagated | Shows only namespaces propagated to member clusters |
| Not Propagated | Shows only namespaces that are not propagated |
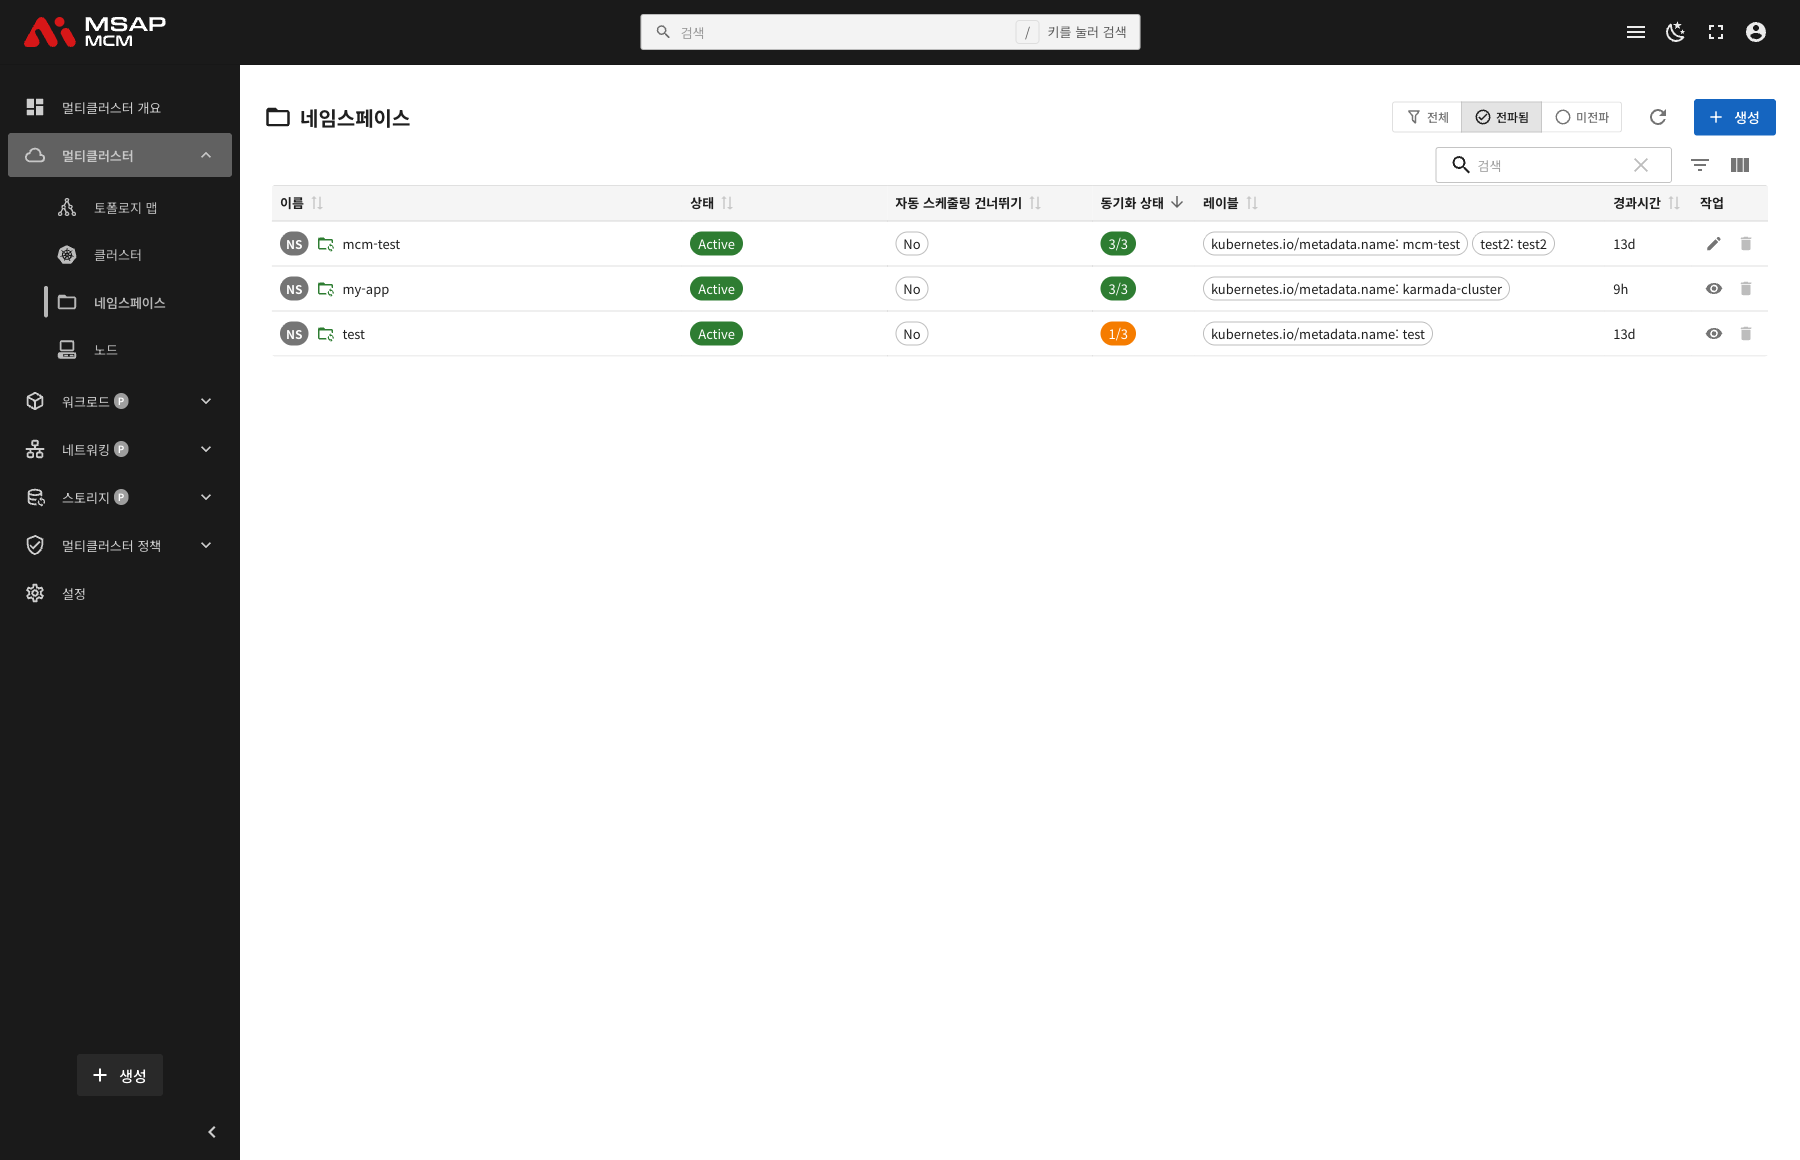
Table Columns
| Column | Description | Sortable |
|---|---|---|
| Name | The namespace name and its status icon | ✅ |
| Status | Active / Terminating | ✅ |
| Skip Automatic Scheduling | Yes / No | ✅ |
| Sync Status | Synced clusters / propagated clusters | ✅ |
| Labels | The labels applied to the namespace | ✅ |
| Age | The time since the namespace was created | ✅ |
| Actions | The edit and delete buttons | - |
The Namespace Status Icons
The Name column carries an icon showing the kind of namespace:
| Icon | Meaning | Description |
|---|---|---|
| 🔄 (blue) | Namespace is propagated to multi-clusters | A PropagationPolicy applies and it is propagated to member clusters |
| ⏭️ (yellow) | Automatic scheduling skipped | The namespace.karmada.io/skip-auto-propagation label is applied |
| 🔒 (red) | System namespace (protected) | A system namespace such as karmada-system or kube-system |
| System badge | System namespace | A namespace used for system purposes |
Sync Status
For a propagated namespace, the Sync Status column shows how far the sync has got per cluster:
- 3/3: synced to 3 of 3 clusters
- 1/3: synced to only 1 of 3 clusters (some failed)
- Not Propagated: propagated to no cluster
Namespace Detail
Clicking a namespace row opens the detail panel.
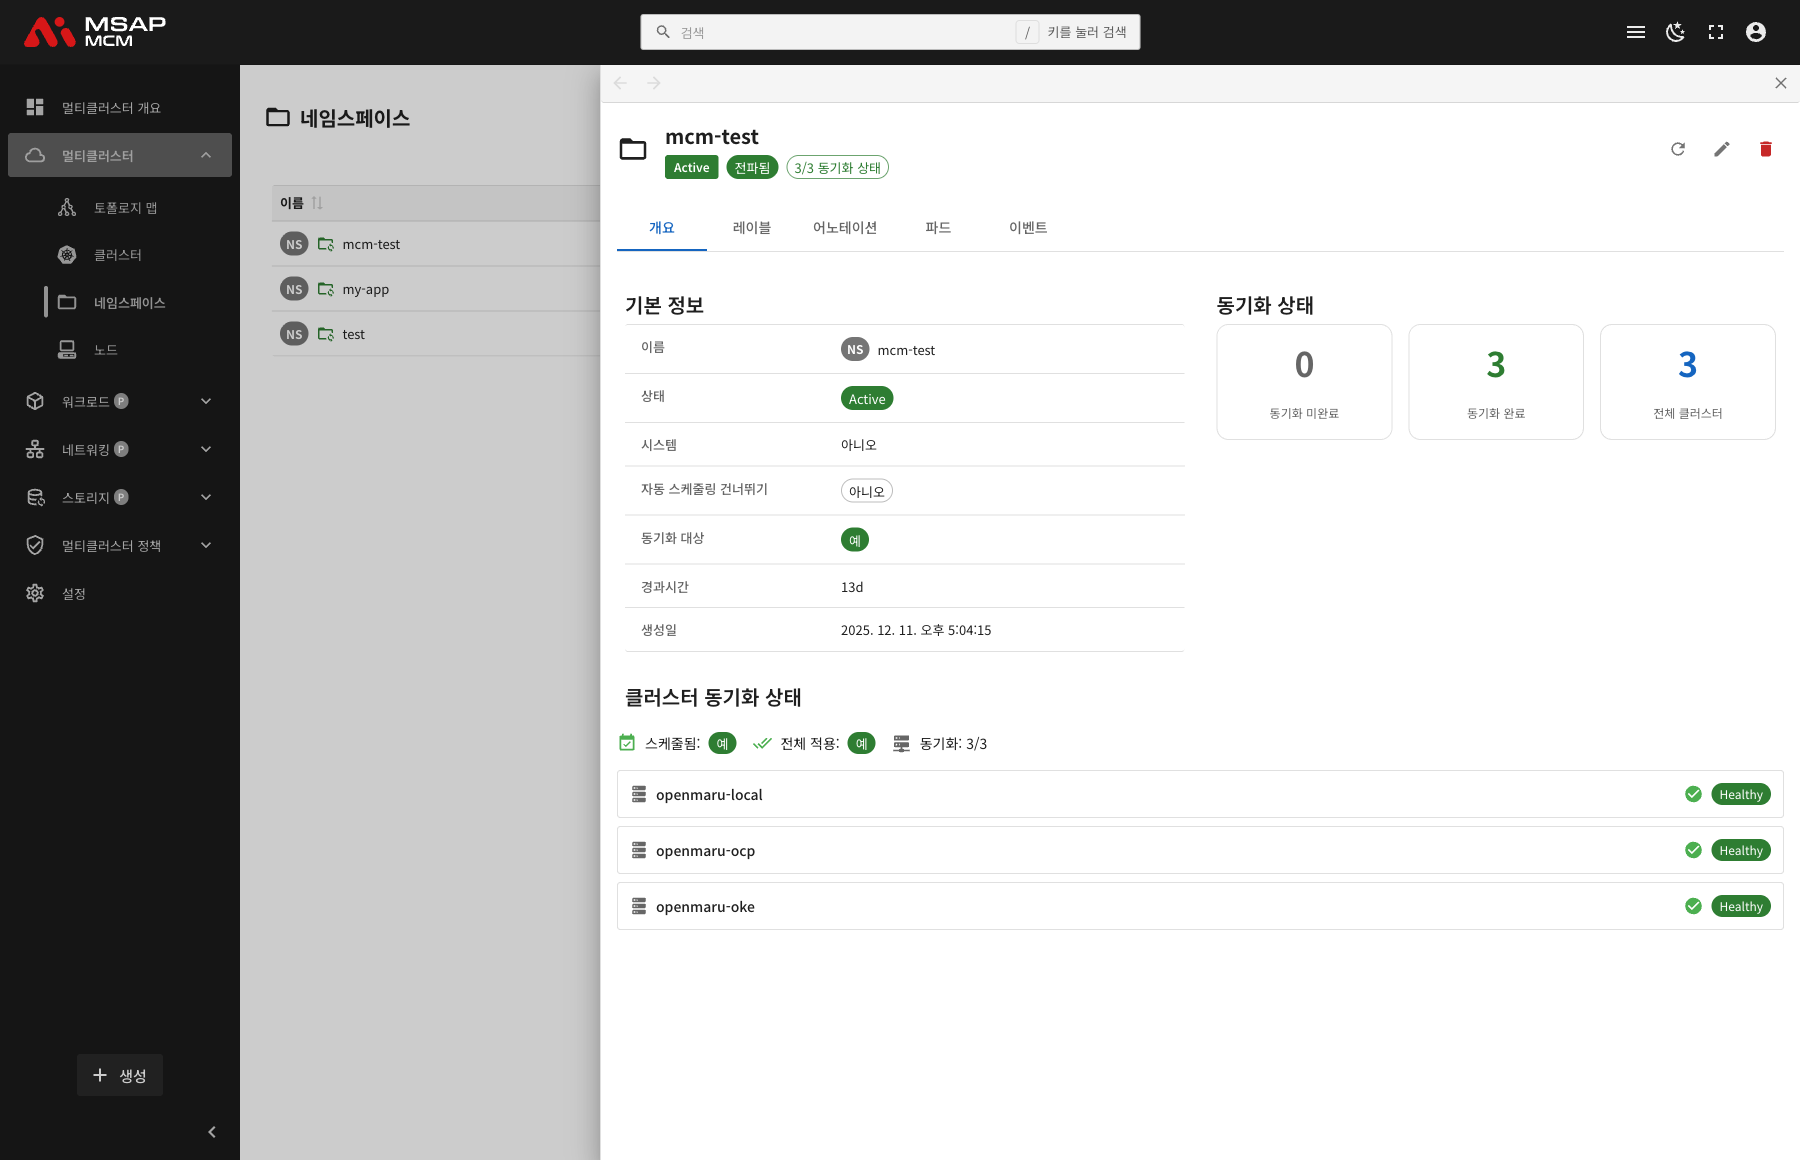
The Detail Panel Header
| Element | Description |
|---|---|
| Namespace name | The name of the chosen namespace |
| Status badge | Active / Terminating |
| Propagation badge | Propagated / Not Propagated |
| Sync Status | The N/N sync state |
The Action Buttons
| Button | What it does |
|---|---|
| Refresh | Refreshes the namespace information |
| Edit | Opens the YAML edit mode |
| Delete | Deletes the namespace |
The Tabs
The Overview Tab
Shows the namespace's basic information and its sync state.
Basic information:
| Item | Description |
|---|---|
| Name | The namespace name |
| Status | Active / Terminating |
| System | Whether it is a system namespace (Yes/No) |
| Skip Automatic Scheduling | Whether automatic propagation is skipped (Yes/No) |
| Sync Target | Whether a propagation policy applies (Yes/No) |
| Age | The time since creation |
| Created | When the namespace was created |
Sync status:
- Not Synced Clusters: the number of clusters not yet synced
- Synced Clusters: the number of clusters synced
- Total Clusters: the number of clusters propagated to
Cluster sync state:
- Whether it is scheduled
- Whether it is fully applied
- The sync figure (N/N)
- The state of each cluster (Healthy / Unhealthy)
The Labels Tab
Shows the list of Kubernetes labels applied to the namespace.
The Annotations Tab
Shows the list of annotations applied to the namespace.
The Pods Tab
Shows the list of pods in that namespace.
The Events Tab
Shows the Kubernetes events related to the namespace.
Creating a Namespace
Creates a new namespace on the MCM control plane.
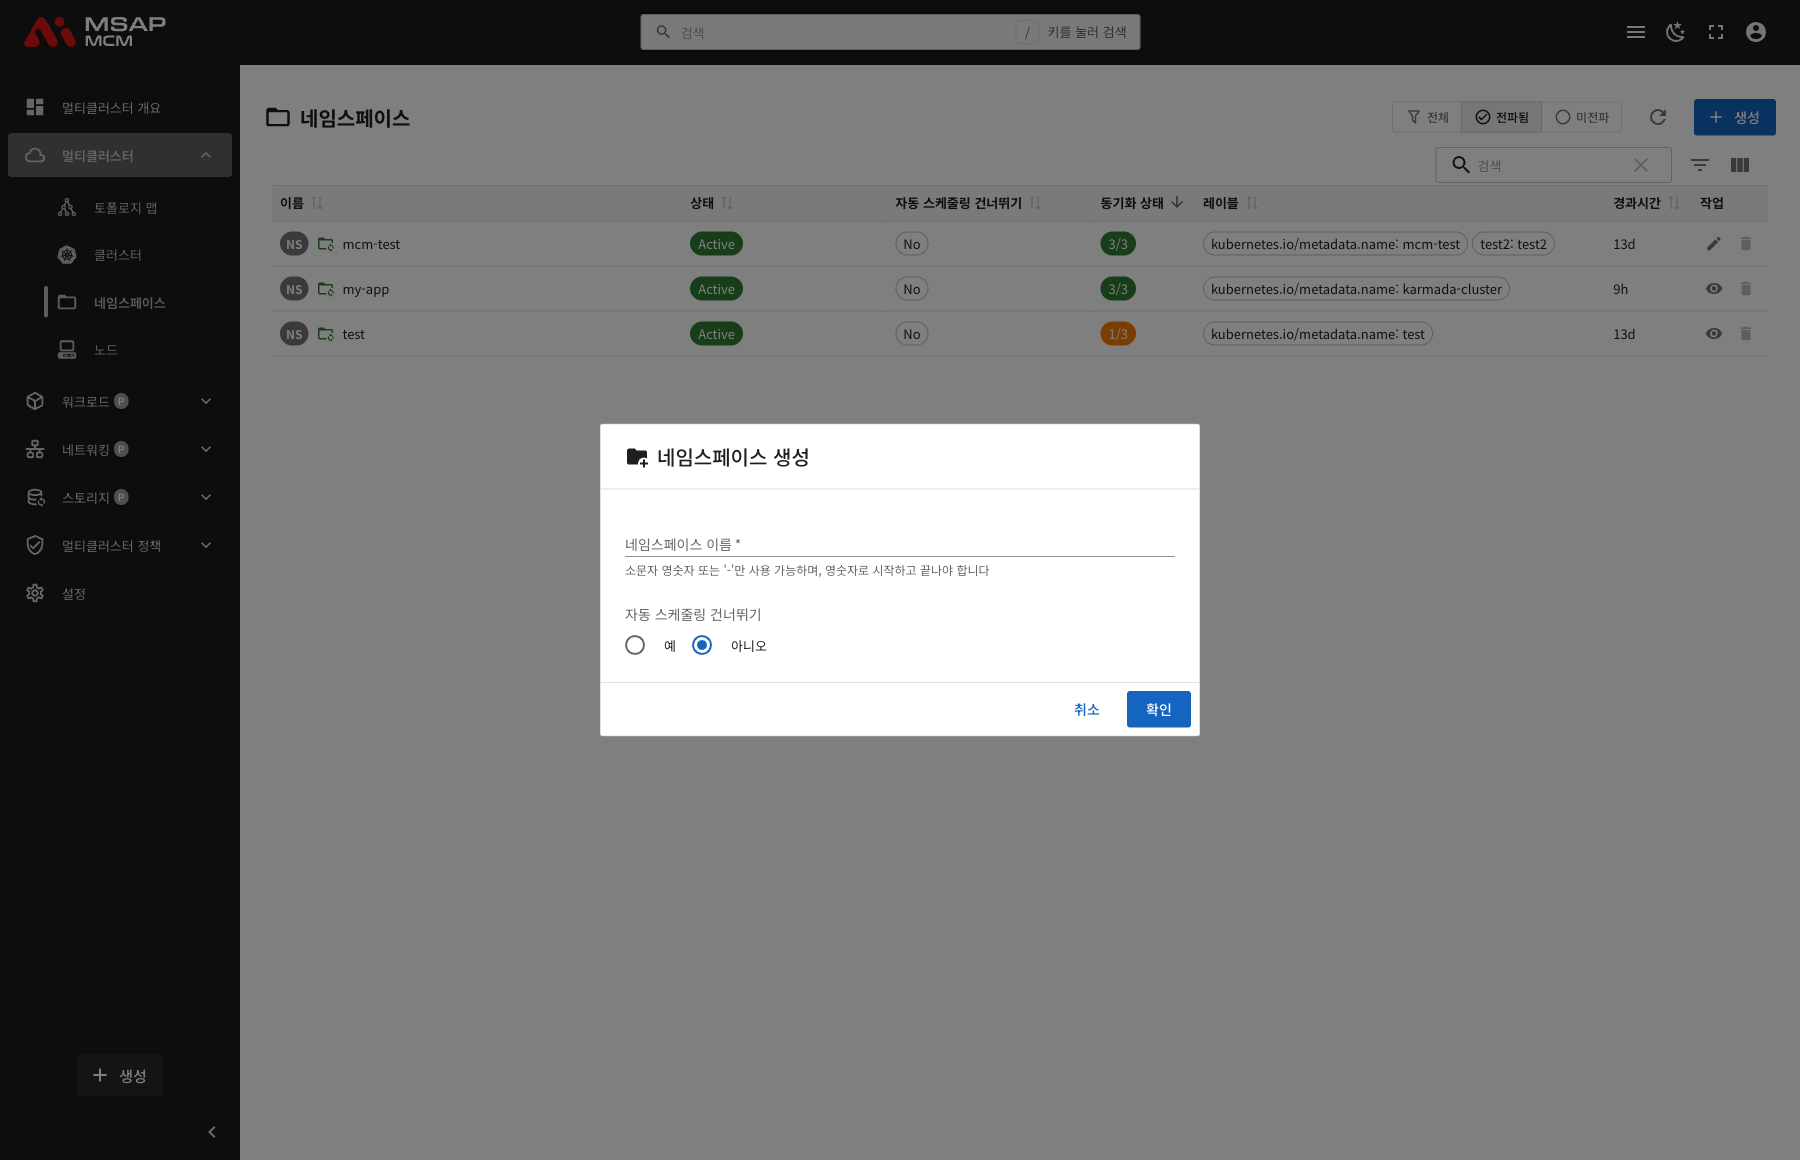
Fields
| Field | Required | Description |
|---|---|---|
| Namespace Name | ✅ | A unique namespace name |
| Skip Automatic Propagation | - | Yes / No (default: No) |
The Rules for a Namespace Name
- Must be lowercase alphanumeric characters or '-'
- Must start and end with an alphanumeric character
- For example:
my-app,production,test-namespace
Skip Automatic Scheduling
| Option | Description |
|---|---|
| Yes | Applies the namespace.karmada.io/skip-auto-propagation=true label. It is excluded from automatic propagation policies |
| No | The default. It may be propagated automatically to member clusters according to the propagation policy |
Editing a Namespace
Changes the settings of an existing namespace.
- Press the "Edit" button on the row of the namespace to edit
- Change the namespace definition in the YAML editor
- Press the "Save" button
What Can Be Edited
- Labels
- Annotations
- The skip-automatic-scheduling setting
Note: editing may be restricted on system namespaces.
Deleting a Namespace
⚠️ Caution: deleting a namespace deletes every resource in it as well. Resources propagated to member clusters are handled according to the deletion policy.
When Deletion Is Possible
- System namespaces (karmada-system, kube-system and so on) cannot be deleted
- Protected namespaces cannot be deleted
How to Delete
- Press the "Delete" button on the row of the namespace to delete
- Type the namespace name in the confirmation dialog
- Press the "Delete" button
Worked Examples
Scenario 1: Creating a Namespace for Multi-Cluster Use
- Press the "Create" button
- Enter the namespace name (
my-app, for example) - Skip Automatic Propagation: choose "No"
- Press the "Confirm" button
- Apply a PropagationPolicy to the created namespace to propagate it to member clusters
Scenario 2: Creating a Namespace Excluded from Propagation
- Press the "Create" button
- Enter the namespace name (
local-only, for example) - Skip Automatic Propagation: choose "Yes"
- Press the "Confirm" button
- That namespace is excluded from automatic propagation policies
Scenario 3: Checking the Propagation State
- Press the "Propagated" filter to show only propagated namespaces
- Check the N/N figure in the Sync Status column
- Click a namespace whose sync is incomplete
- Check the sync state per cluster in the detail panel
- Identify the cluster with the problem and act
Scenario 4: Adding a Namespace Label
- Click the namespace to add the label to
- Press the "Edit" button in the detail panel
- Add the label to the
labelssection in the YAML:metadata:labels:environment: productionteam: backend - Press the "Save" button
Related Concepts
Skip Automatic Scheduling
By default MCM can propagate a namespace to member clusters automatically through a
ClusterPropagationPolicy. A namespace with the namespace.karmada.io/skip-auto-propagation=true label
is excluded from that automatic propagation.
System Namespaces
These namespaces are protected as system namespaces:
karmada-system: the Karmada system componentskarmada-cluster: the cluster management namespacekarmada-es-*: the per-cluster execution space namespaceskube-system: the Kubernetes system componentskube-public: public resourceskube-node-lease: node lease managementdefault: the default namespace
Next Steps
- Nodes (node management) -- managing all nodes
- Deployments -- managing multi-cluster Deployments