3.5. Custom Setup mode
Choosing the scenario, targets and time range yourself
You get here with the Custom Setup button at the bottom of the scenario list.
Everything the wizard asks in sequence is chosen on a single screen.
When to use it
| Situation | Which mode |
|---|---|
| One of the prepared scenarios fits | Wizard |
| You know exactly which metric combination you want | Custom Setup |
| You want a combination no scenario covers | Custom Setup |
| You are not sure what to choose | Wizard |
The prepared scenarios are frequently used combinations bundled in advance. Use Custom Setup only for what they do not cover.
What you choose
The fields are laid out in order on one screen.
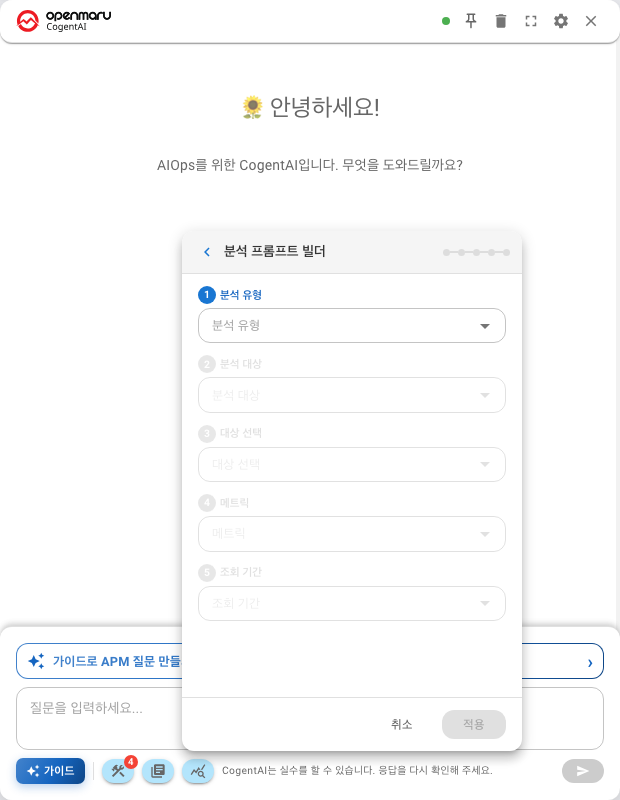

Analysis type
Choose one of four. Part 4 covers what each one answers.
| Type | What it asks |
|---|---|
| Predictive analysis | When will it hit the limit |
| Correlation analysis | Do they move together |
| Anomaly detection | Is anything different from normal |
| Trend analysis | Which way is it heading |
Analysis target
Choose Application, Node or Cluster. The target list and the metric list below change with it.
Metrics
Choose what to look at. Recommended presets are offered, so picking one of those is fine.
You can select several. Selecting too many scatters the answer, though, so narrowing it to the two or three you care about works better.
Time range
1 hour · 6 hours · 1 day · 3 days
When you choose forecasting, this window is the whole of the evidence.
Custom Setup does not check your choices
The wizard picks a combination that suits the scenario. Custom Setup runs exactly what you chose.
- It does not stop you combining unrelated metrics
- It also runs combinations whose window is too short to judge
If a result looks wrong, suspect the combination first. The criteria are in Appendix: How to read the results.
Going back to the wizard
Return to the scenario list. Values you chose in Custom Setup are not kept.
Next
- Choosing by scenario — Wizard mode
- The dialog that asks you back — The parameter confirmation dialog
- Reading the result — Appendix: How to read the results