3.1. OPENMARU COP Operating Procedures
OPENMARU COP Console Overview
Most of the work done with the CLI (kubectl/helm) can equally be done in the OPENMARU COP Console (the web console). Each procedure in this chapter presents the CLI commands together with the Console screen that corresponds to the same work.
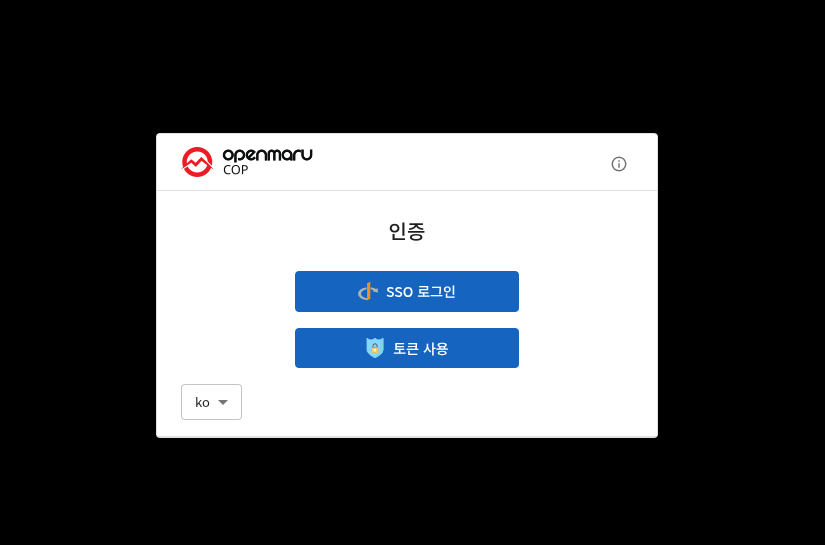
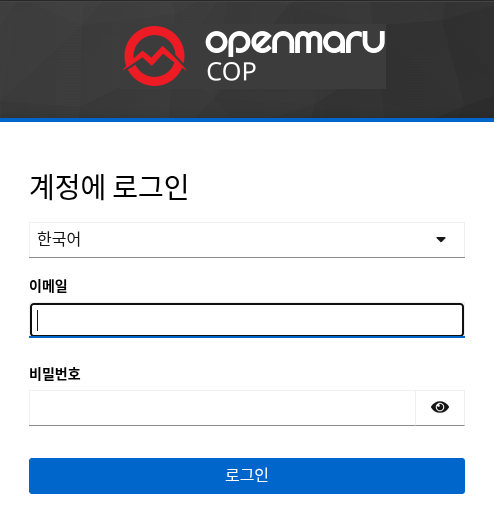
The Console is reached at https://console.{sub_domain}.{domain}.{TLD} and supports two sign-in methods: SSO sign-in (Keycloak integrated authentication) and token sign-in (a ServiceAccount token).
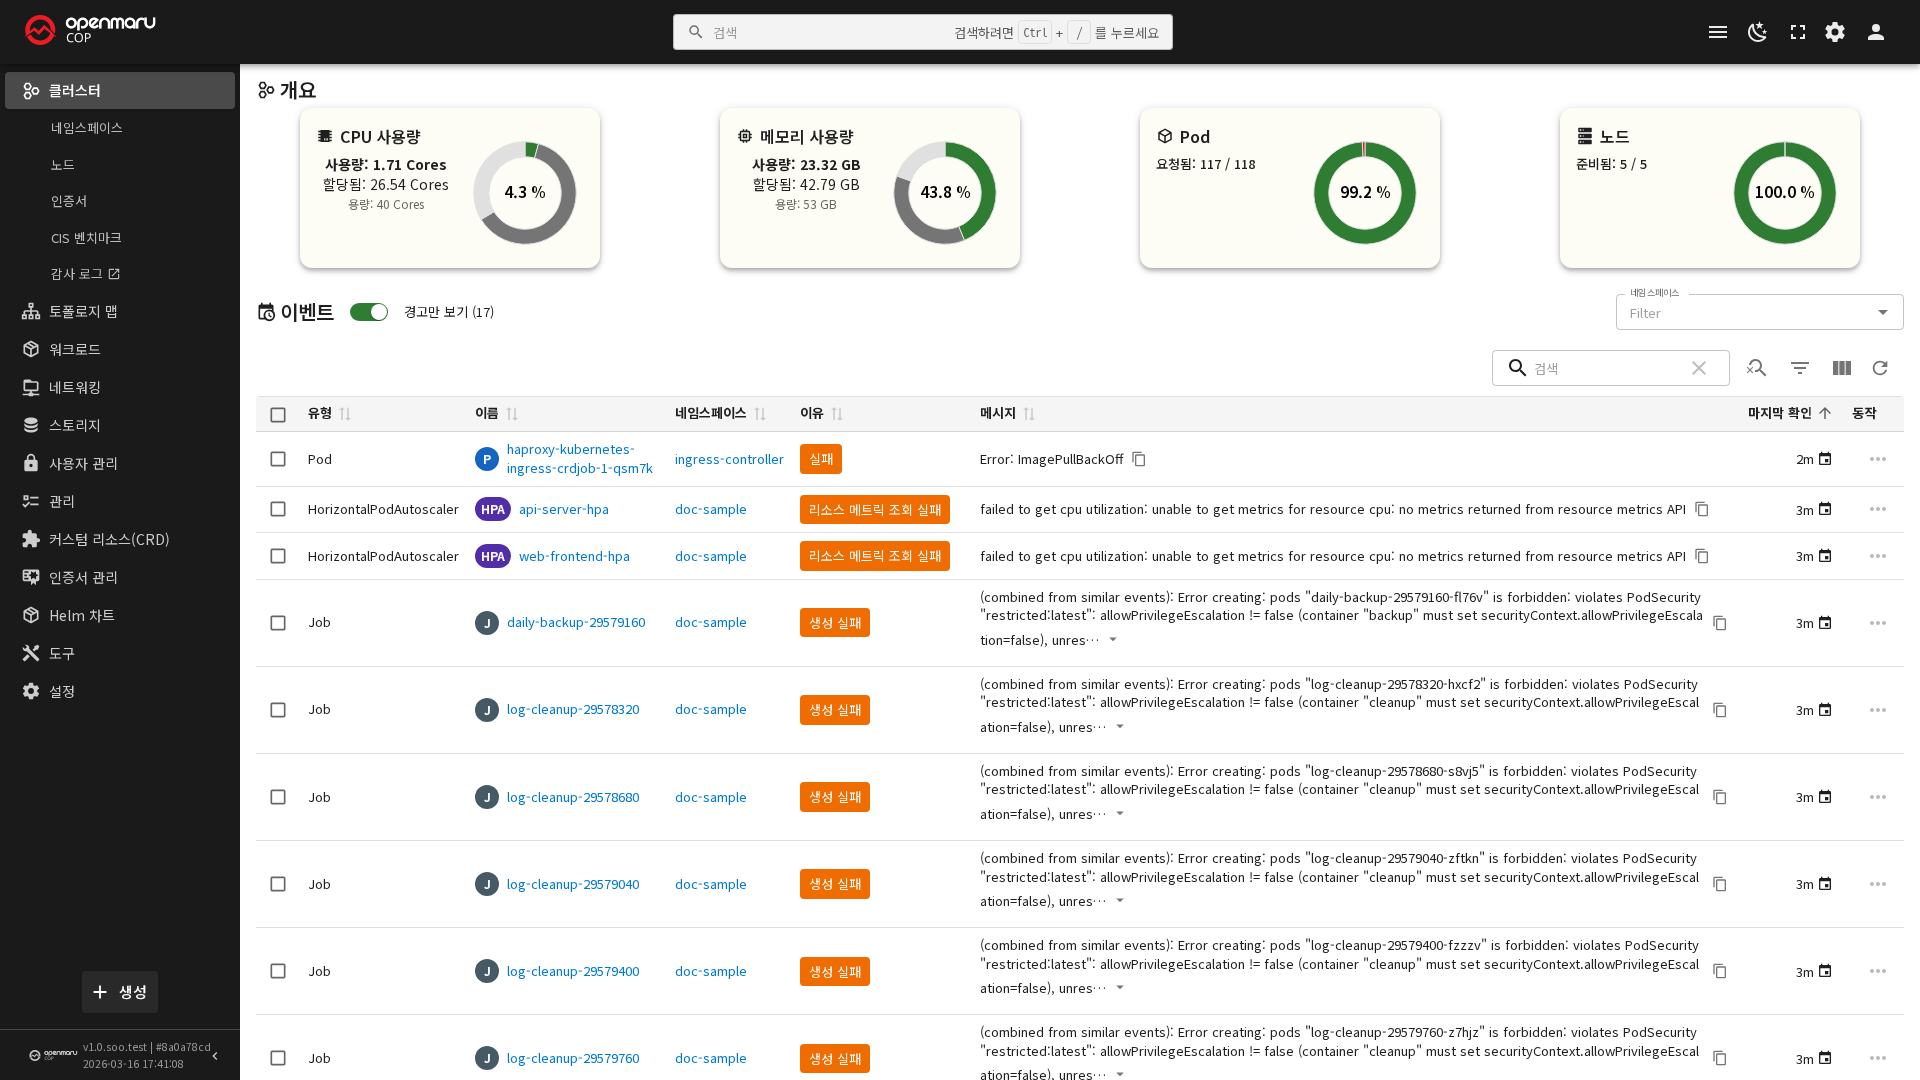
After signing in, the menus shown and the work that can be done differ according to the user's permissions (admins/users/viewers). In an environment with several clusters registered, the cluster selection dropdown in the top bar switches clusters, and the namespace dropdown switches the namespace being worked on. Signing out is done from the profile menu at the top right.
User Management
OPENMARU COP manages user accounts centrally through LLDAP (a lightweight user directory) and Keycloak (SSO/OIDC).
LLDAP Connection Information
| Item | Value |
|---|---|
| Namespace | openmaru-sso |
| LDAP port | 3890 |
| Web UI port | 17170 |
| Web UI URL | https://ldap.{sub_domain}.{domain}.{TLD} |
| Base DN | dc={sub_domain},dc={domain},dc={TLD} |
ℹ️ Recommended: Create users and groups from the COP Console
User Managementmenu. Creating them there also grants permissions and updates SSO in one step. Use the LLDAP web UI and the CLI (lldap-cli) only when the console is unavailable or when you automate with scripts.
Method 1) Creating a User in the COP Console (recommended)
On the User Management > Users screen, press Add user. The button is visible only to
members of the admins group.
| Field | Description |
|---|---|
| User ID | The sign-in account. It cannot be changed afterwards |
| Used as the Kubernetes user name, so the console cannot change it afterwards | |
| Display name / Last name / First name | Shown in the list and the detail pane |
| Phone | Digits and hyphens (-) only |
| Groups | At least one is required. The default is users |
| Password | 8 characters or more |
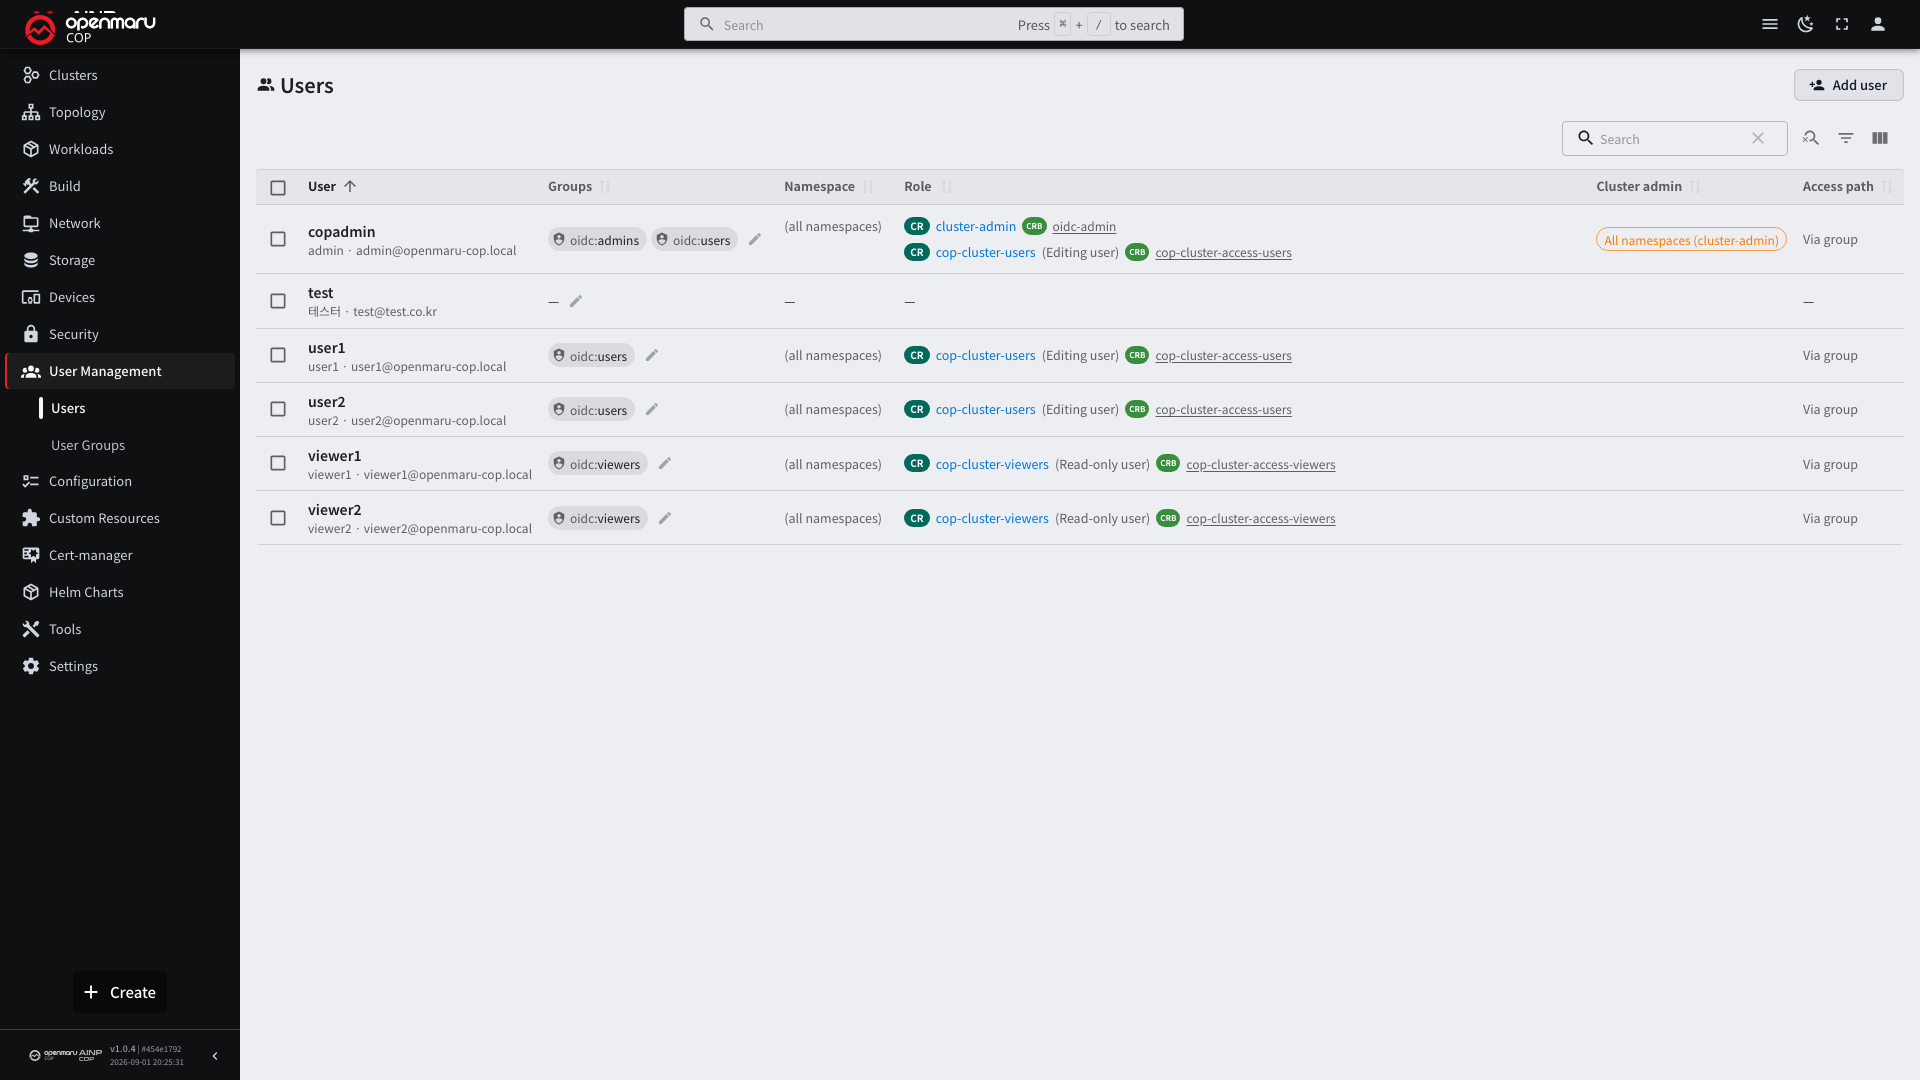
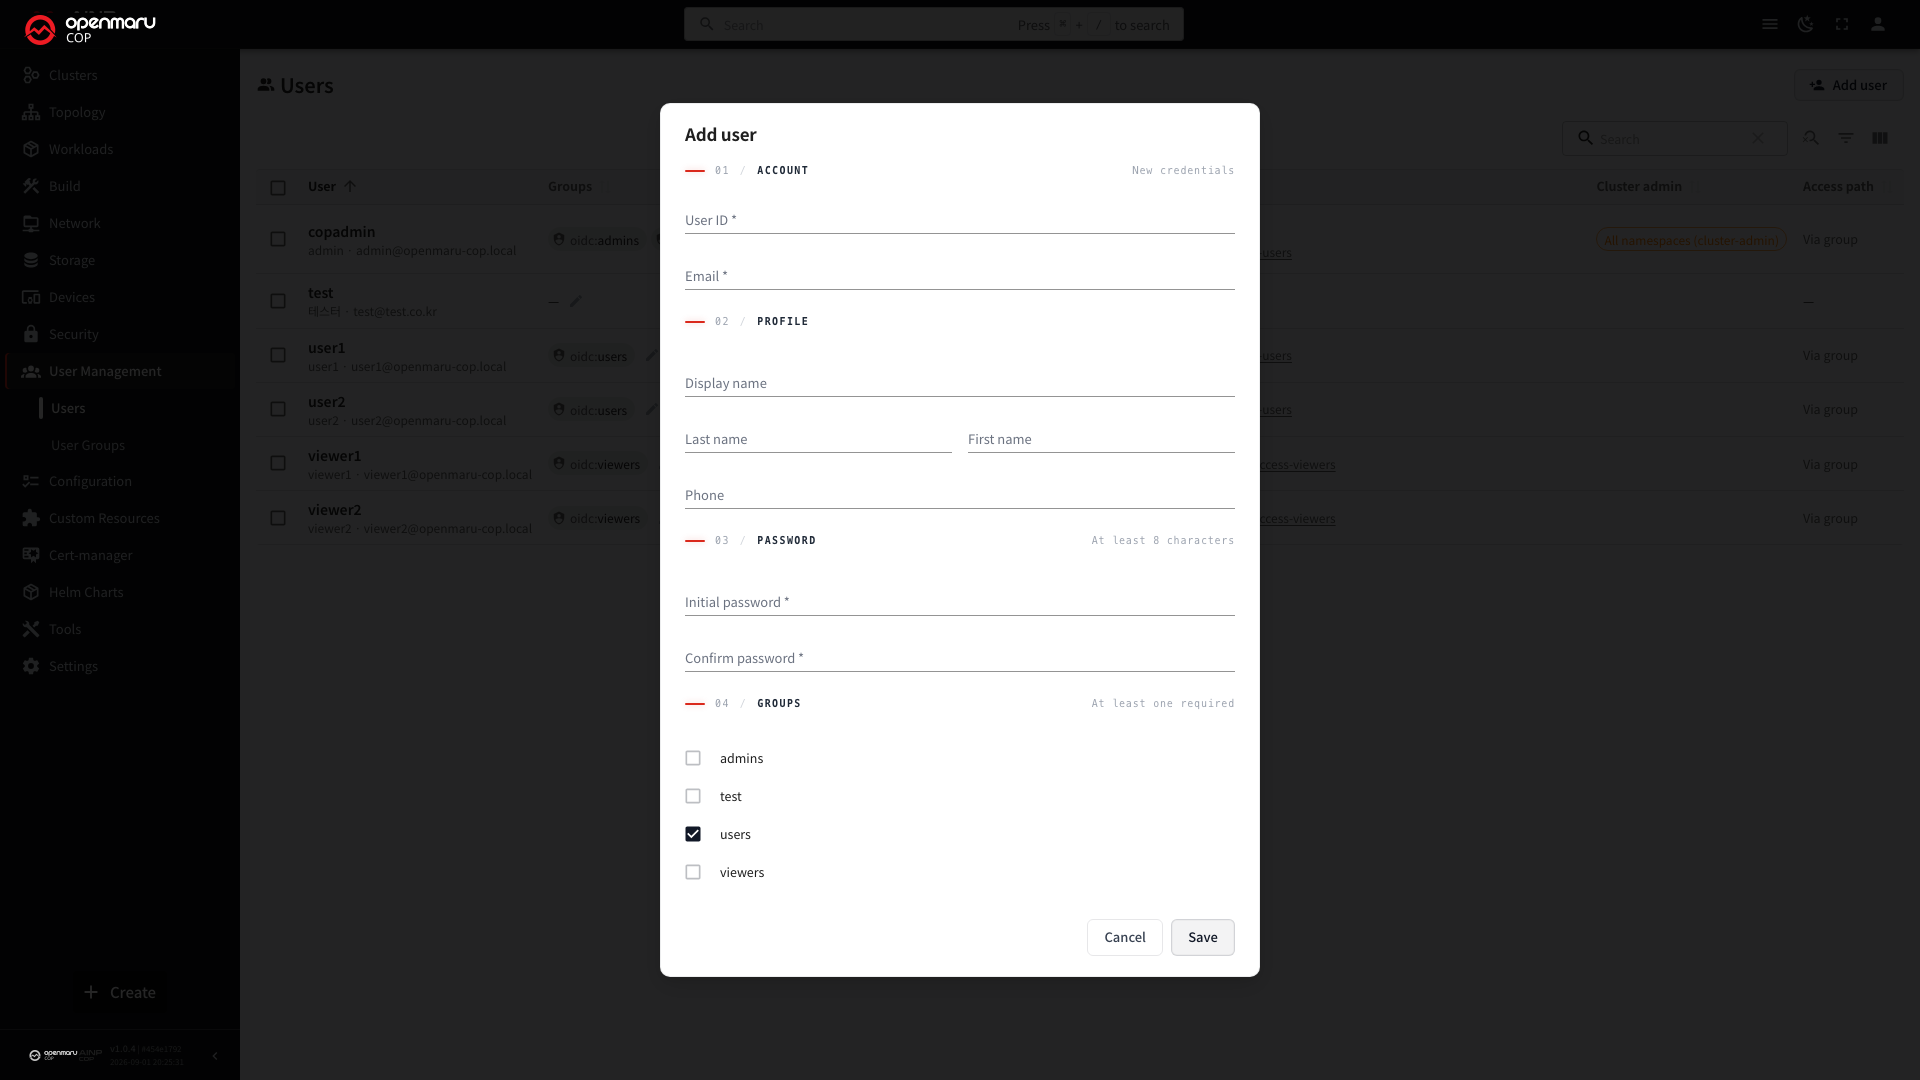
A group is required because the group is the permission. An account with no group can sign in but cannot do anything on the cluster. The person who created it believes an account was granted, while the person who received it sees an empty screen.
| Group | Mapped cluster permission |
|---|---|
admins | cluster-admin (full administrative permission) |
users | cop-cluster-users (editing user) |
viewers | cop-cluster-viewers (read-only user) |
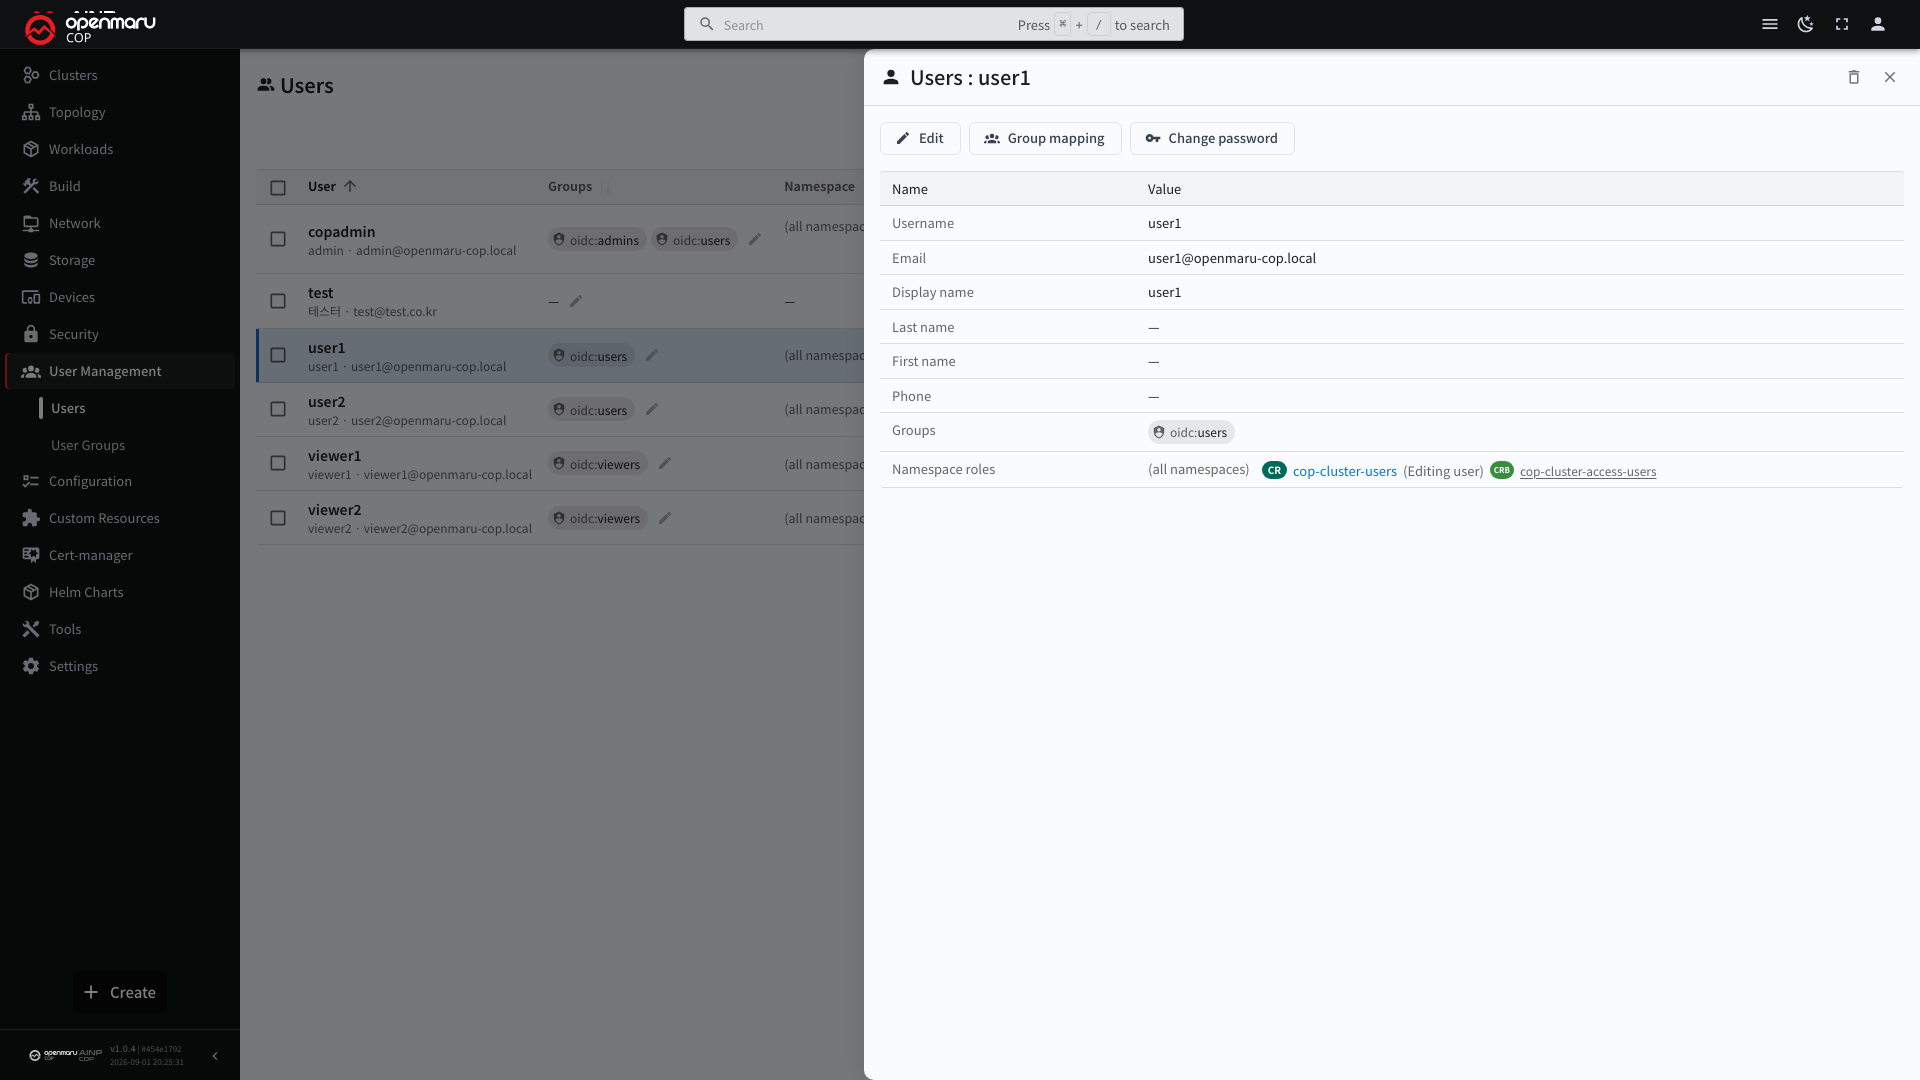
Click a row to open the detail pane, where you can:
- Edit — change the display name, last name, first name, and phone
- Group mapping — change group membership
- Change password — reset the password as an administrator
- Delete icon — remove the account. This cannot be undone, so a confirmation opens first
Your own account, the last administrator, and the account that manages the user directory cannot be deleted, so the delete icon is not shown for them.
ℹ️ No SSO synchronization is needed. After creating an account or changing membership, the console clears the Keycloak user cache by itself. A new account can sign in right away, and a changed permission applies from that user's next sign-in. If the update is delayed, the console says so on screen.
Adding a group
Use Add group on the User Management > User Groups screen to create a group beyond the
three defaults. The name must be 2-32 characters of lowercase letters, digits, or hyphens, and
one permission (editing user or read-only user) must be selected.
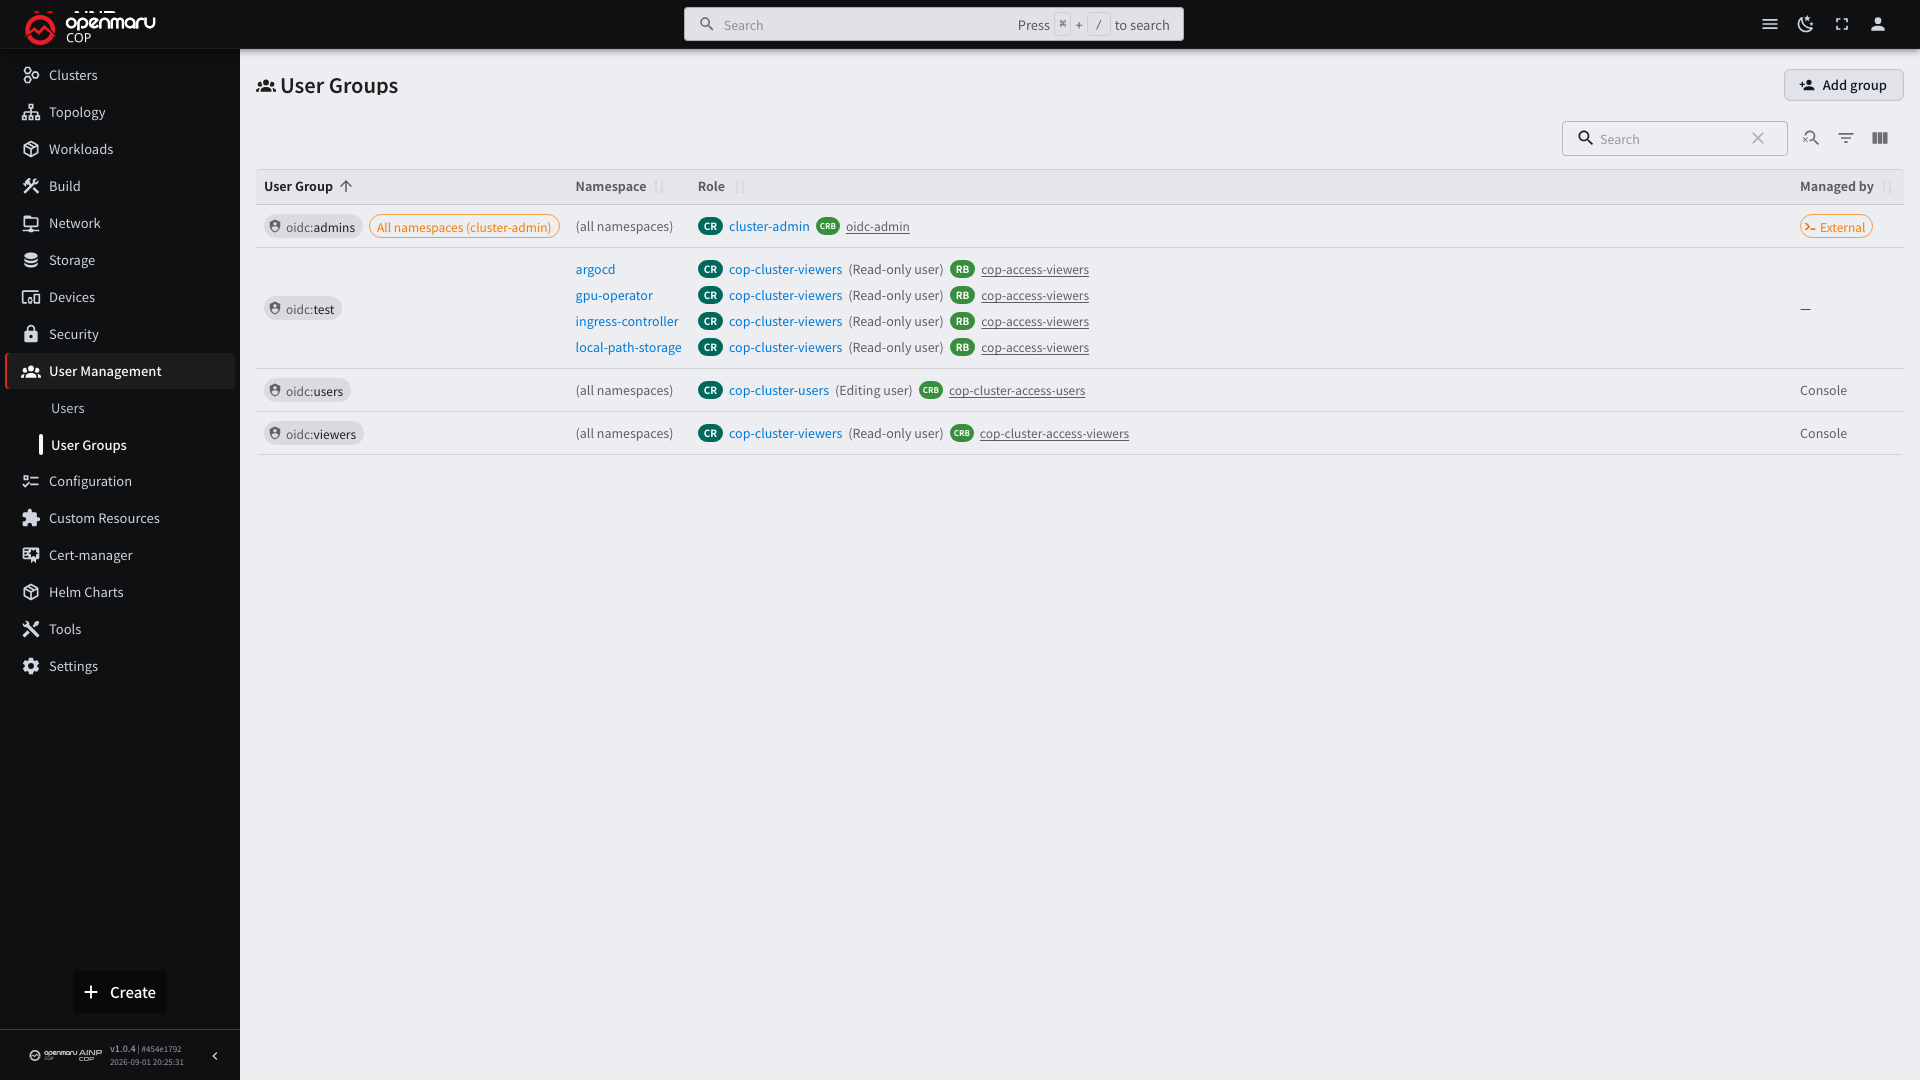
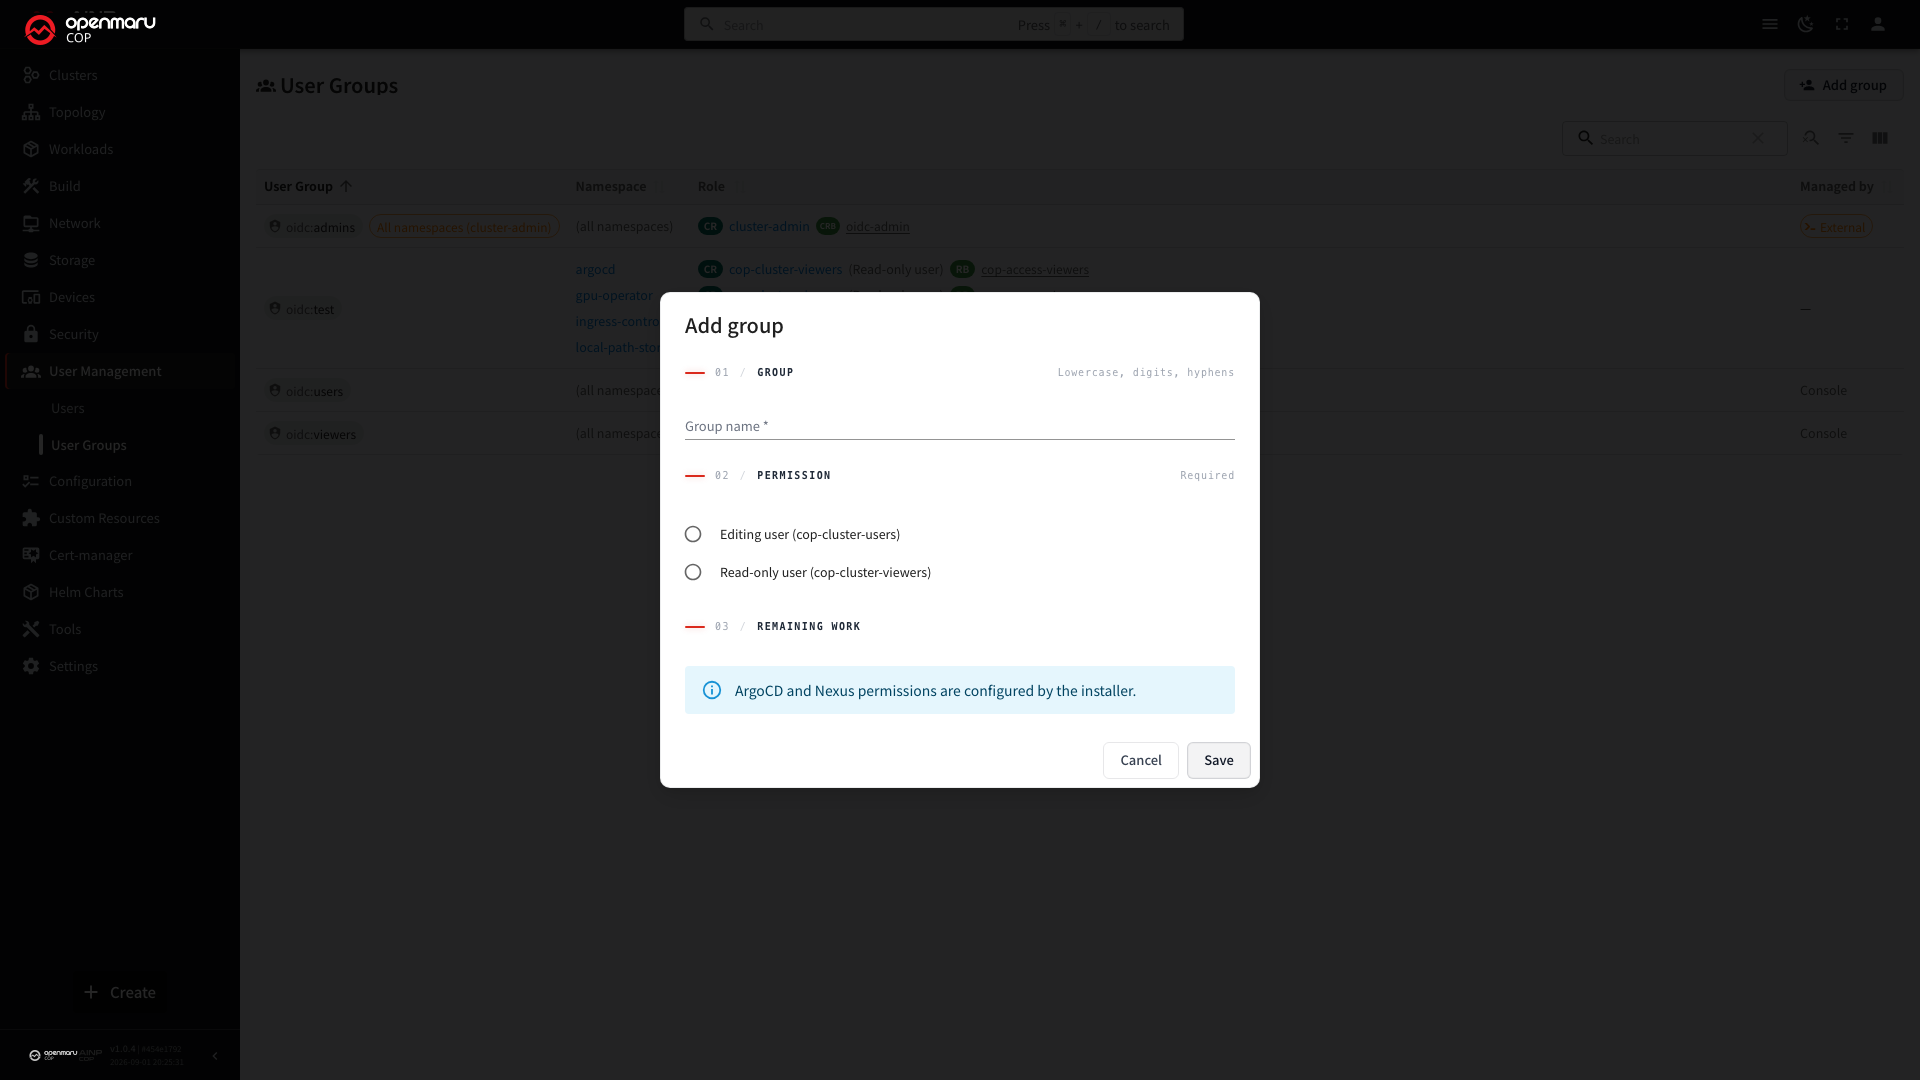
The console sets Kubernetes permissions only. For the new group to have permissions in ArgoCD and Nexus as well, the installation engineer has to configure those separately.
For the full screen walkthrough, see the "COP Console Guide" chapter of the installation guide.
Method 2) Creating a User through the LLDAP Web UI
Use this when the console is not reachable.
-
Sign in to the LLDAP web UI (
https://ldap.{sub_domain}.{domain}.{TLD}) with an administrator account. -
In the Users menu on the left, select Create a user and fill in the following.
Field Value User name The account ID (for example jdoe)Email The address used to sign in (for example jdoe@example.com)Display name The name shown in the list (optional) Password The initial password -
In the Groups menu on the left, open the group to add them to (
admins,users, orviewers). In the dropdown at the bottom of the group detail screen, select the user you just created and press Add to group.
⚠️ This method needs a separate SSO synchronization. Follow "Keycloak Synchronization" below.
Method 3) Creating a User with lldap-cli
Use this when automating with scripts.
# Create a user
lldap-cli user add --username jdoe --email jdoe@example.com

# Set the password
lldap-cli user set-password --username jdoe

# Add the user to a group
lldap-cli group add-member --group users --username jdoe

# List users
lldap-cli user list

# Show user details
lldap-cli user show --username jdoe
⚠️ This method also needs a separate SSO synchronization.
Group Management (CLI)
# Create a group
lldap-cli group add --name developers

# Add or remove a user in a group
lldap-cli group add-user --group developers --username jdoe
lldap-cli group remove-user --group developers --username jdoe

# List groups / show group details
lldap-cli group list
lldap-cli group show --name developers
Keycloak Synchronization
If you used Method 1 (the console), this procedure is not needed. The console clears the cache by itself.
When you change LLDAP directly, as in Methods 2 and 3, Keycloak keeps using the values it has
already read, so your change may not take effect right away. In the Keycloak Admin Console
(https://sso.{sub_domain}.{domain}.{TLD}), select the target realm (openmaru), go to
User federation > ldap, and run Sync all users from the Action dropdown at the top
right. Synchronization also happens when the user attempts a first sign-in.
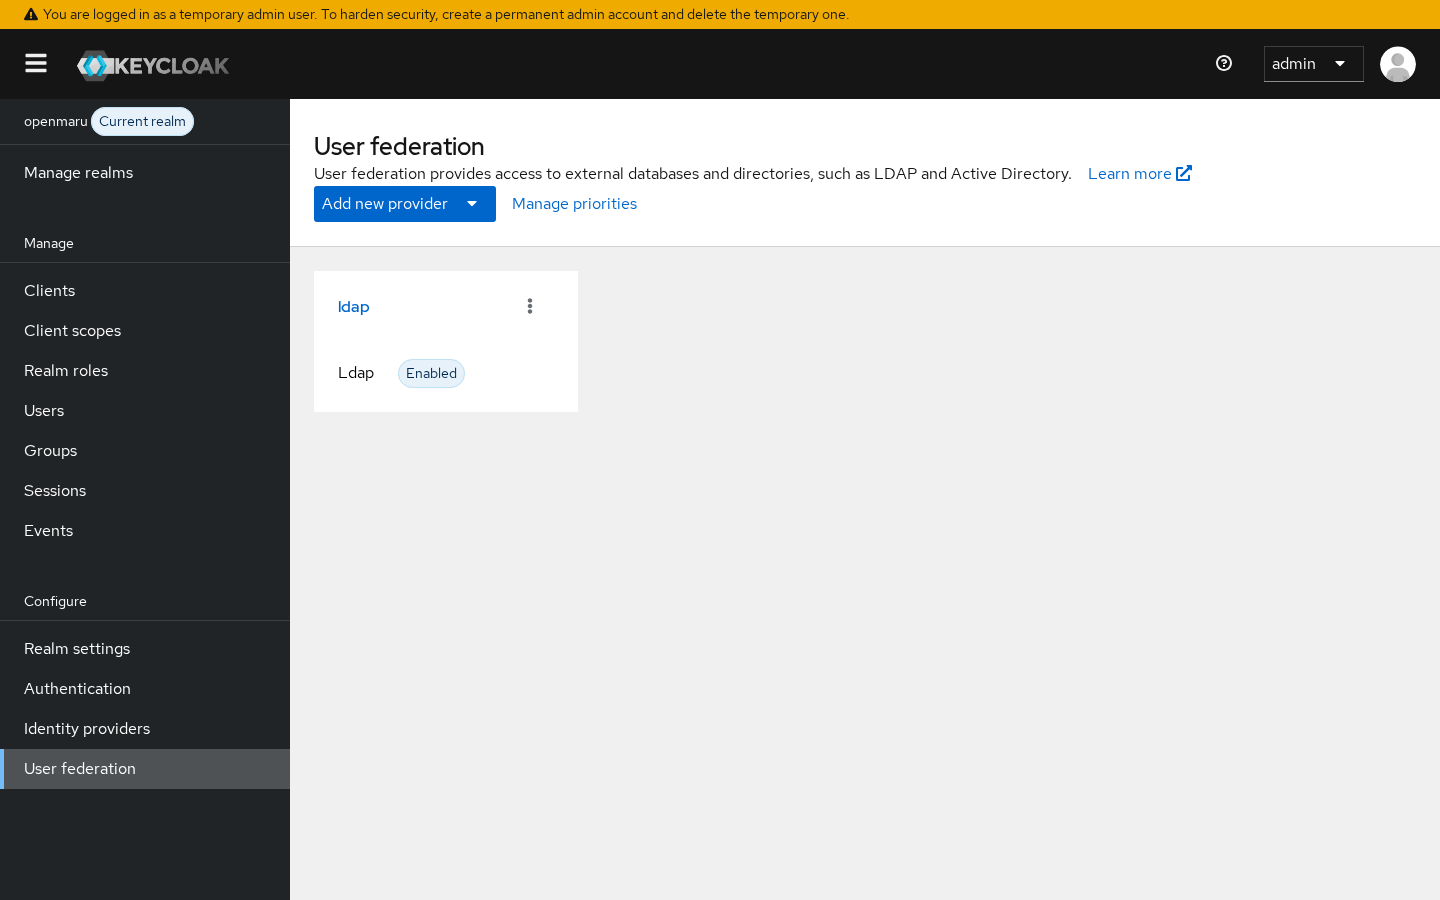
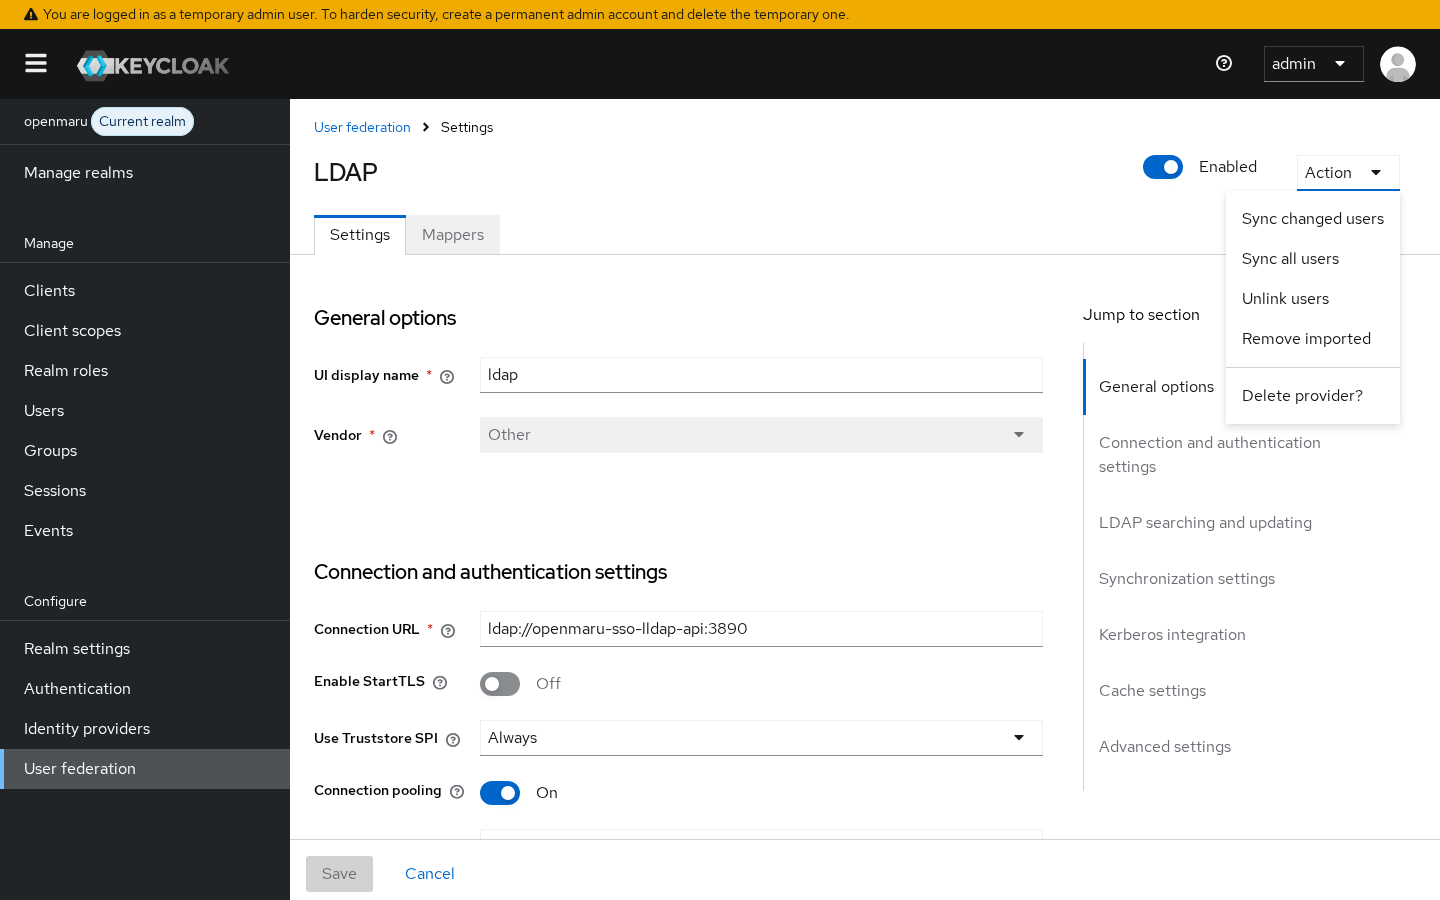
⚠️ Caution: If a newly created user cannot sign in immediately, run a Keycloak full sync manually.
Granting User Permissions
OPENMARU COP grants permissions by combining Kubernetes RBAC (role-based access control) with OIDC group claims.
Group-to-Role Mapping
| LLDAP group | OIDC group claim | ClusterRole |
|---|---|---|
admins | oidc:admins | cluster-admin |
users | oidc:users | cop-cluster-users (custom) |
viewers | oidc:viewers | cop-cluster-viewers (custom) |
Example of a Custom ClusterRoleBinding
apiVersion: rbac.authorization.k8s.io/v1
kind: ClusterRoleBinding
metadata:
  name: oidc-admins-binding
subjects:
  - kind: Group
    name: "oidc:admins"
    apiGroup: rbac.authorization.k8s.io
roleRef:
  kind: ClusterRole
  name: cluster-admin
  apiGroup: rbac.authorization.k8s.io
Granting Permissions per Namespace (Role/RoleBinding)
To grant a particular user or group only limited permissions on a particular namespace, use a Role and a RoleBinding.
apiVersion: rbac.authorization.k8s.io/v1
kind: Role
metadata:
  name: app-developer
  namespace: my-app
rules:
  - apiGroups: ["", "apps"]
    resources: ["pods", "deployments", "services", "configmaps"]
    verbs: ["get", "list", "watch", "create", "update", "patch"]
---
apiVersion: rbac.authorization.k8s.io/v1
kind: RoleBinding
metadata:
  name: app-developer-binding
  namespace: my-app
subjects:
  - kind: Group
    name: "oidc:developers"
    apiGroup: rbac.authorization.k8s.io
roleRef:
  kind: Role
  name: app-developer
  apiGroup: rbac.authorization.k8s.io
Checking Permissions
⚠️ Caution: OPENMARU COP is configured to prefix OIDC user names with
oidc:(--oidc-username-prefix=oidc:). If you pass only the user name to--aswithout the prefix, the lookup is for a user that does not exist and the result is inaccurate.
# List all permissions a particular user has in a particular namespace
kubectl auth can-i --list --as=oidc:jdoe@example.com -n my-app

# Check whether a particular action is possible
kubectl auth can-i create deployments --as=oidc:jdoe@example.com -n my-app

# Check the ClusterRoleBindings tied to OIDC groups
kubectl get clusterrolebindings | grep oidc
Checking in the Console
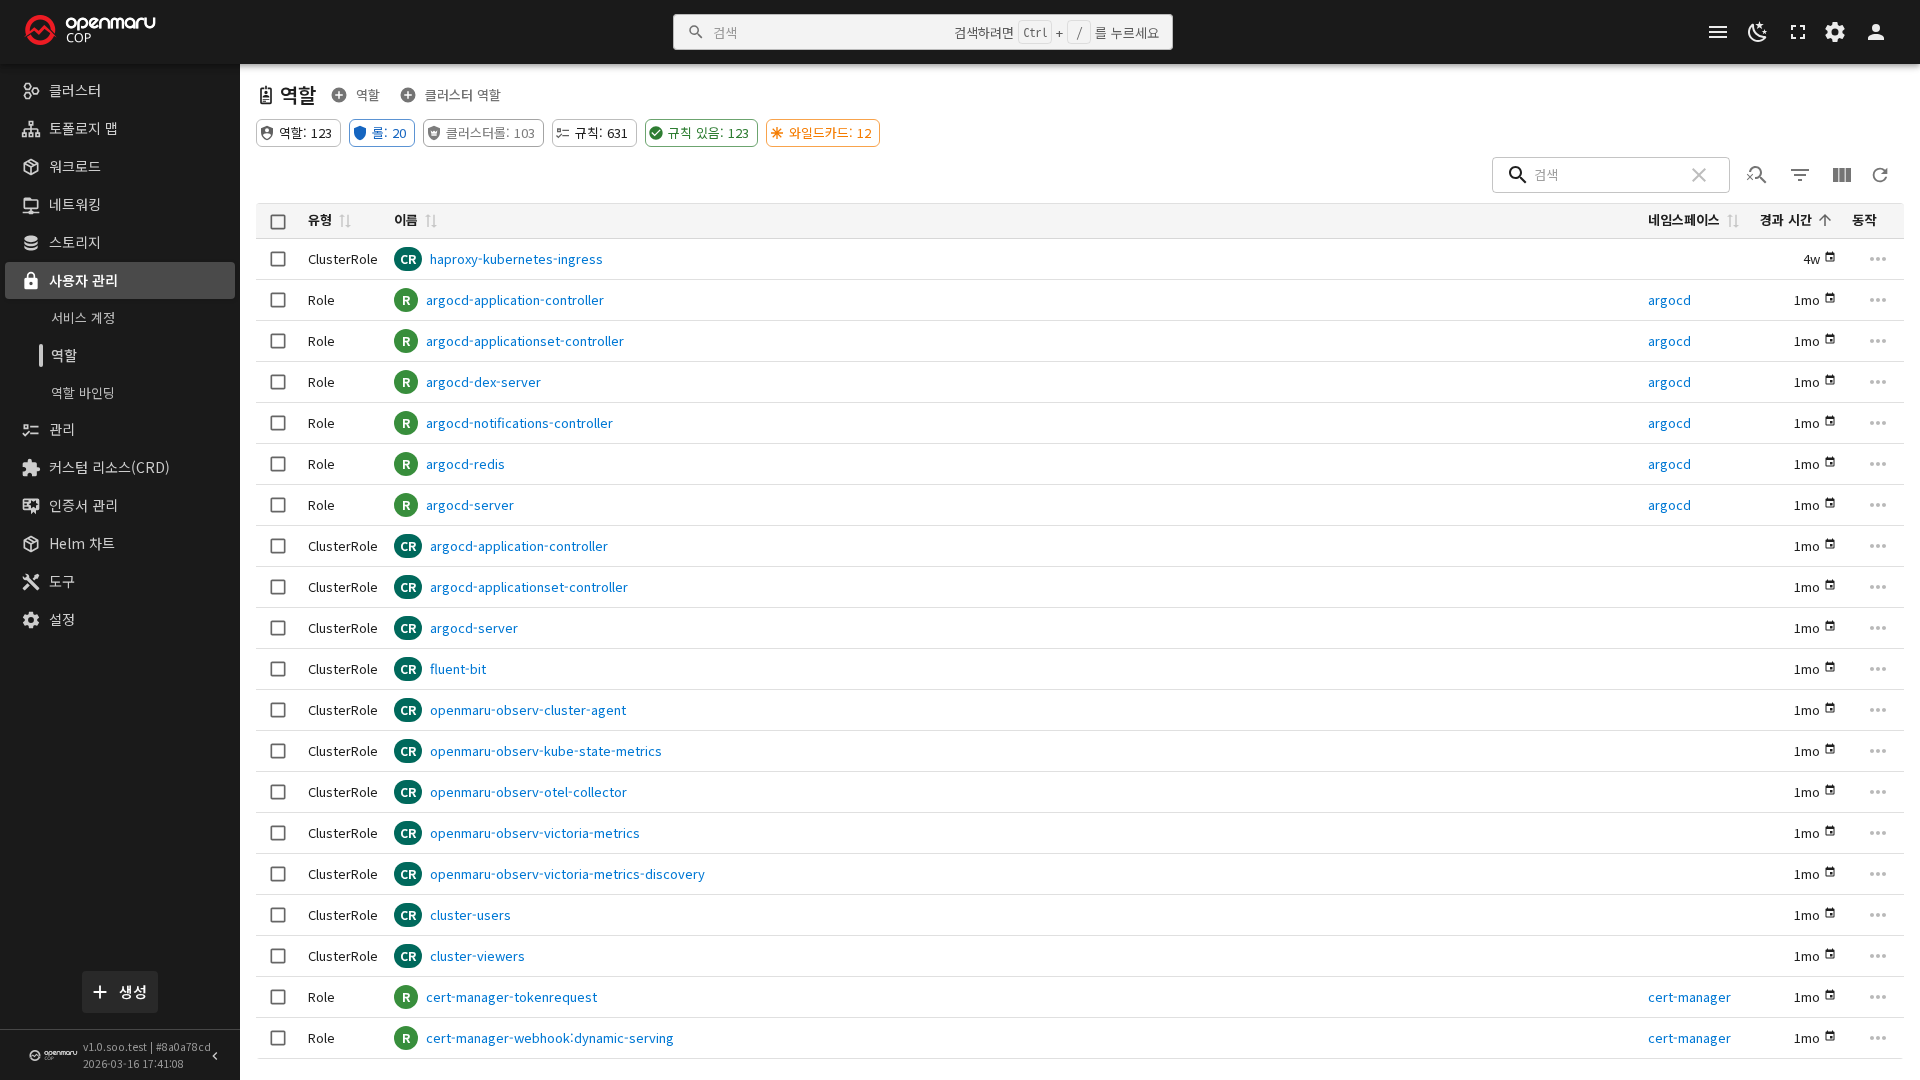
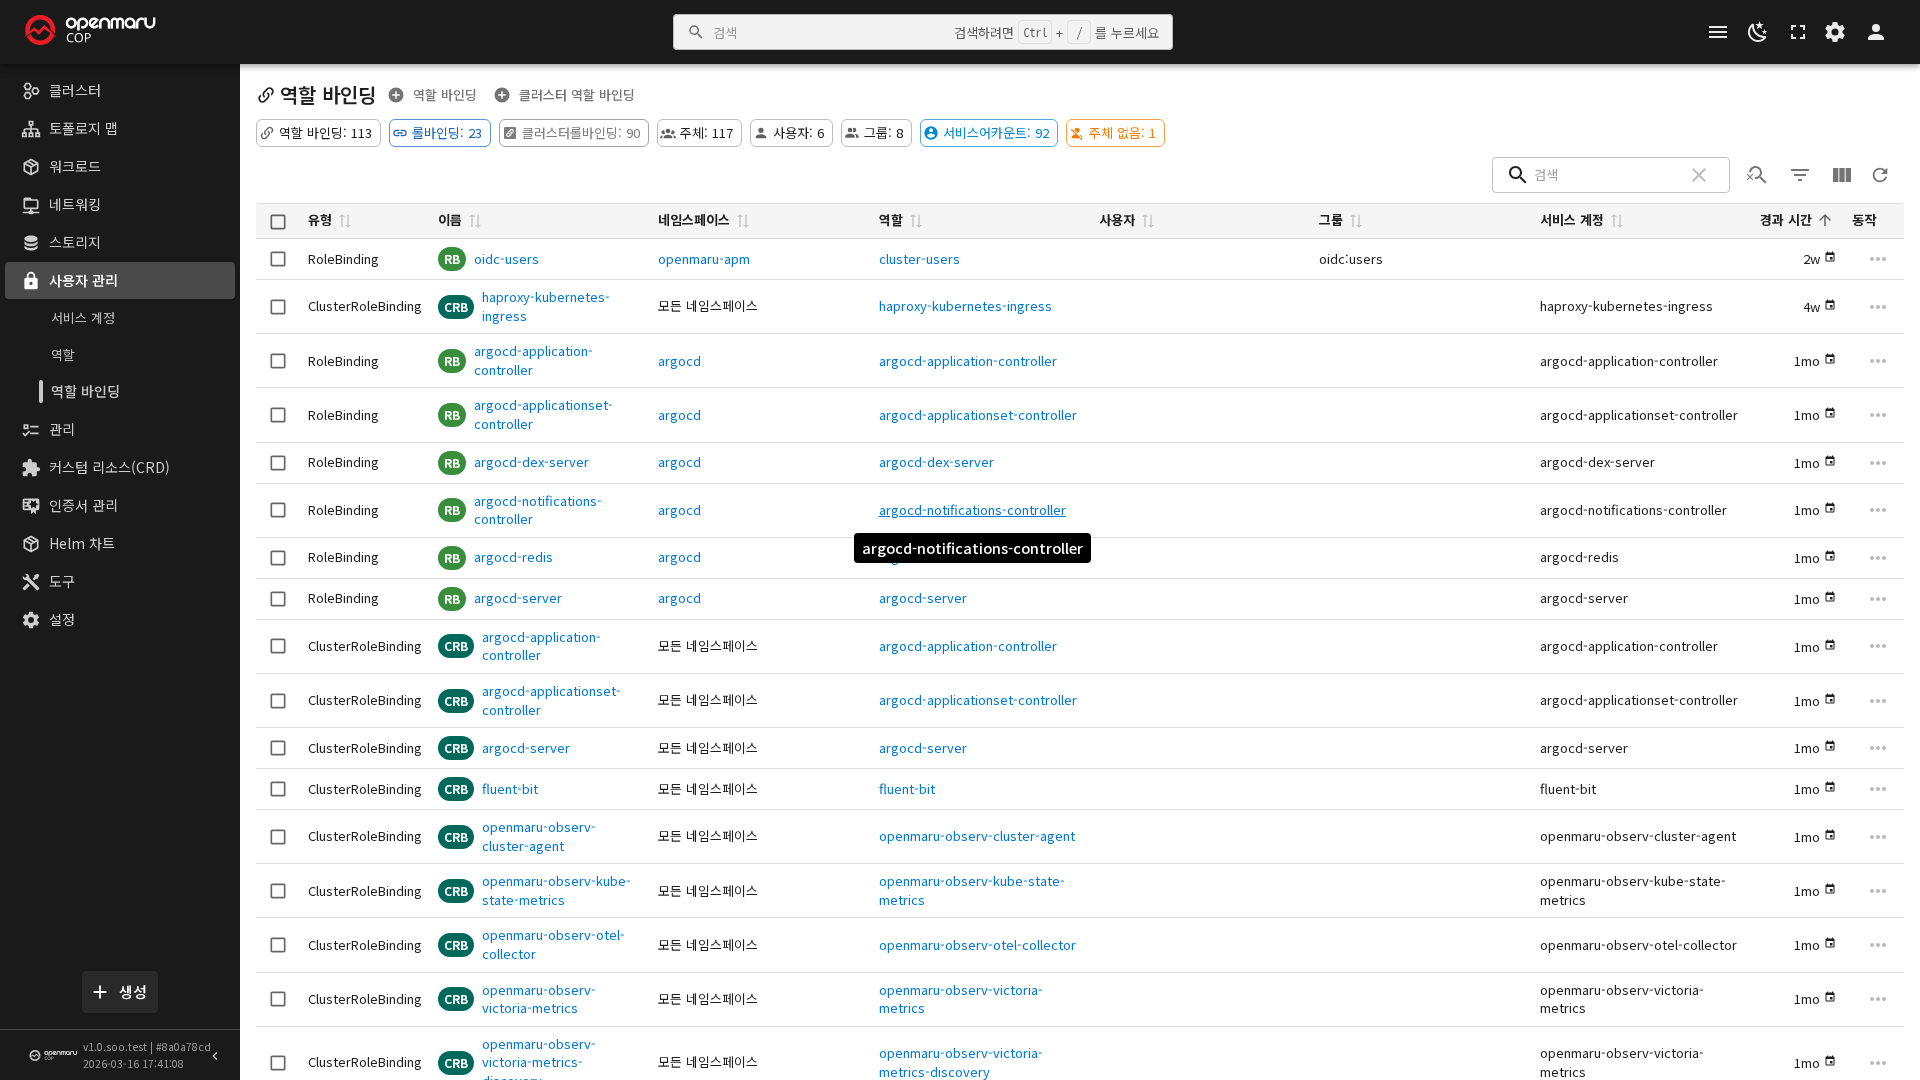
The User Management menu on the left lets you view service accounts, roles (Role/ClusterRole), and role bindings (RoleBinding/ClusterRoleBinding) in the GUI. The role detail screen shows the Resources/Verbs/API Groups rules, and the role binding detail screen shows the list of connected subjects (users and groups).
Creating a Project (Namespace)
In OPENMARU COP a project is implemented as a Kubernetes namespace.
Method 1) Creating It through the OPENMARU COP Console
- Go to Cluster > Namespaces in the left menu.
- Click the Create button.
- Enter the name, labels, and annotations, and create it.
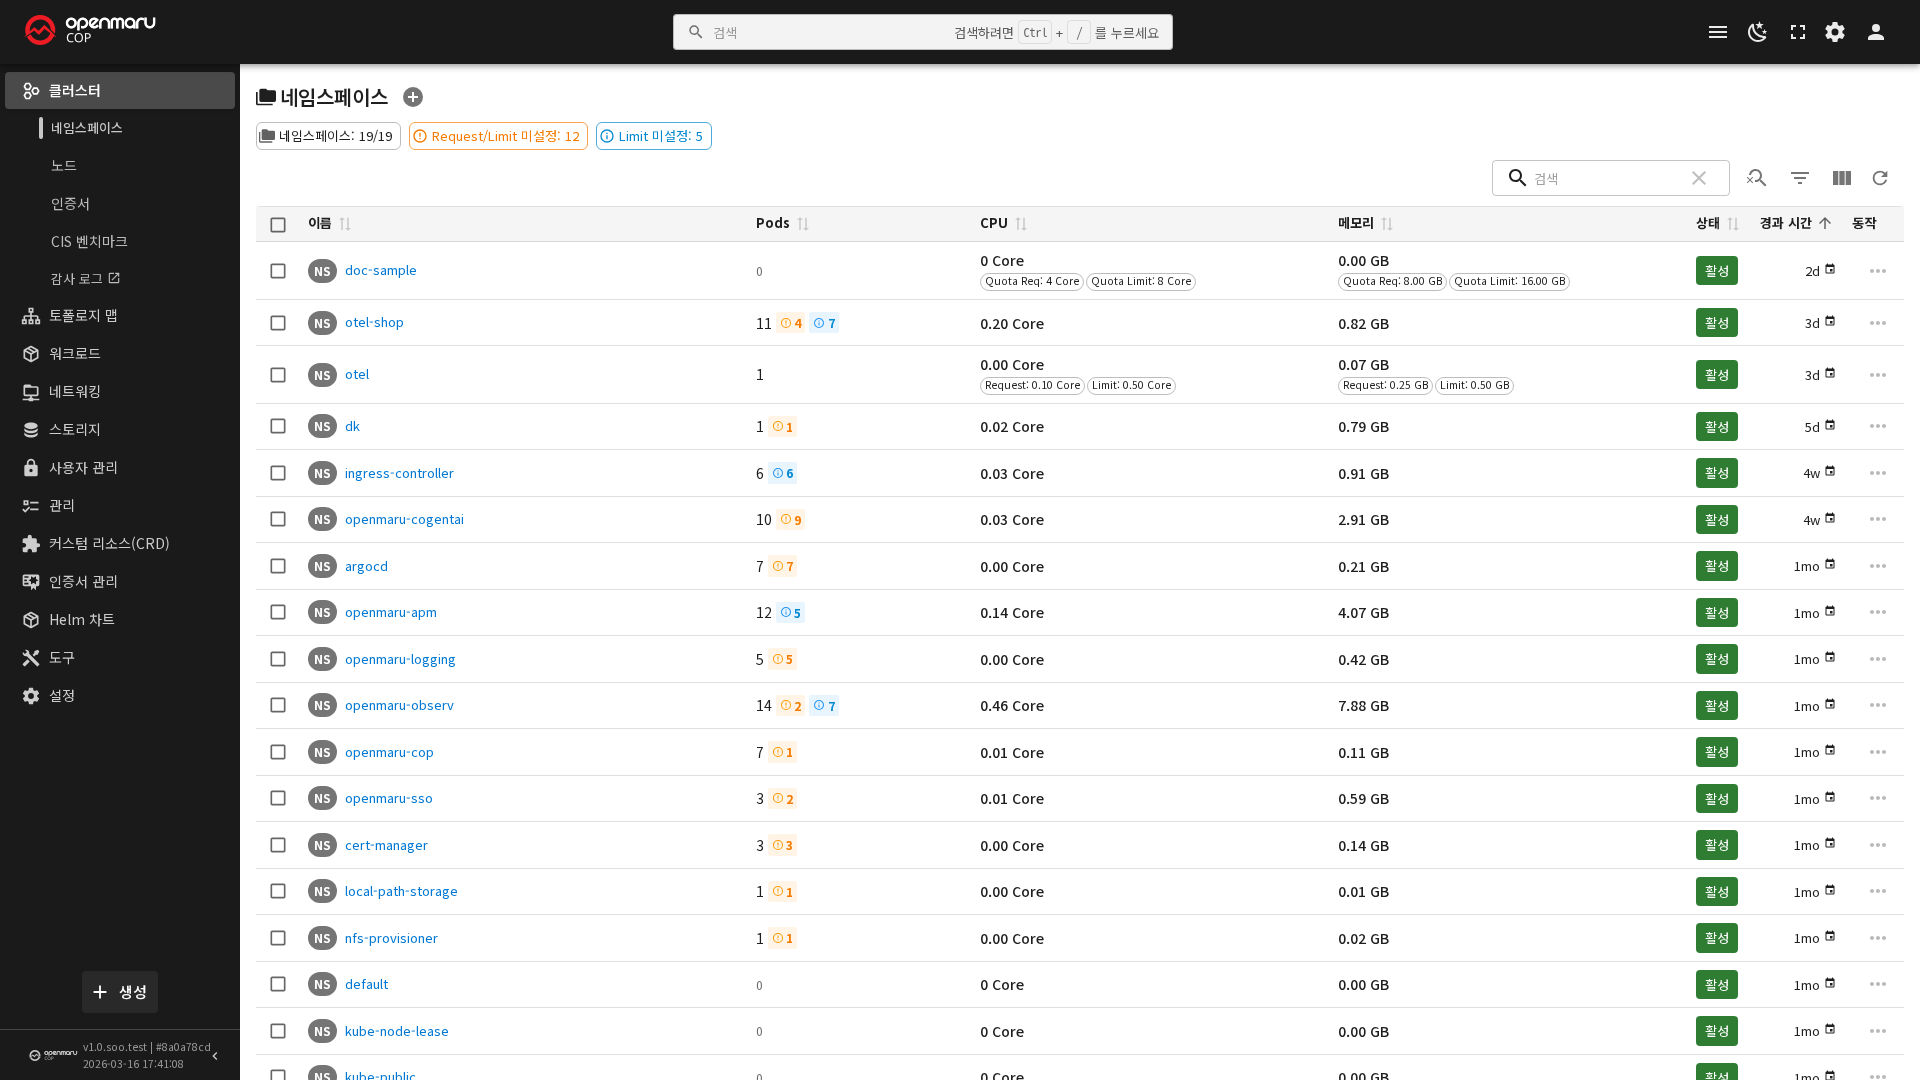
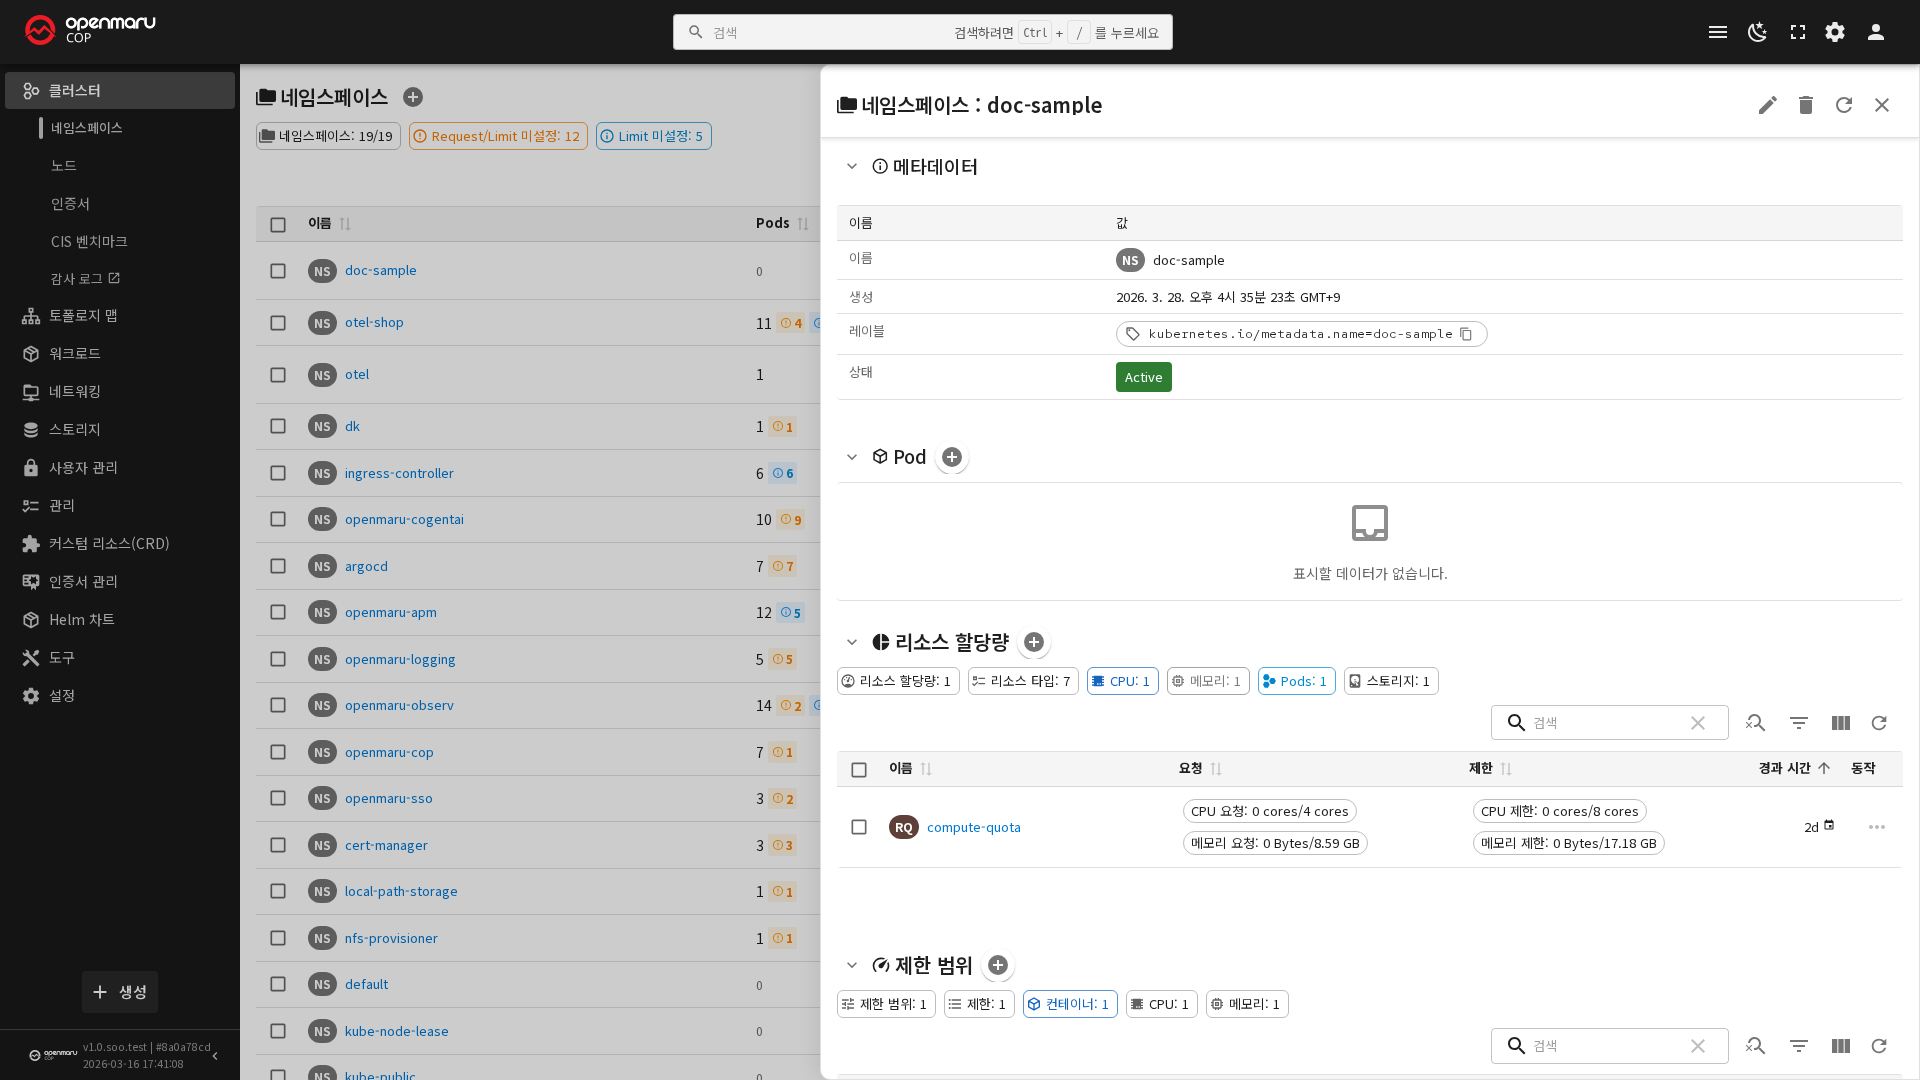
ℹ️ The ownership and connection relationships between the created resources can be seen as a visual graph in the Console Map menu.
Method 2) Creating It with the CLI
kubectl create namespace my-app
Setting a Resource Quota
Setting a limit on resource usage at the same time as creating a new project is recommended.
apiVersion: v1
kind: ResourceQuota
metadata:
  name: my-app-quota
  namespace: my-app
spec:
  hard:
    requests.cpu: "8"
    requests.memory: 16Gi
    limits.cpu: "16"
    limits.memory: 32Gi
    pods: "50"
    services: "20"
    secrets: "50"
    configmaps: "50"
    persistentvolumeclaims: "10"
Specifying the CIS Security Level (Pod Security Standards)
The pod security level can be specified per namespace.
apiVersion: v1
kind: Namespace
metadata:
  name: my-app
  labels:
    pod-security.kubernetes.io/enforce: restricted
| Security level | Description |
|---|---|
privileged | No restrictions |
baseline | Blocks known privilege escalation |
restricted | Applies the highest level of security constraints (recommended for production) |
Creating a New Application Project through Jenkins (Automation)
When deploying a new application together with a CI/CD pipeline, the 00-NEW-PROJECT job in Jenkins can automate everything from namespace creation through creating the Deployment/Service/Ingress to creating the follow-on build and deployment jobs.
| Job parameter | Description |
|---|---|
NAMESPACE | The name of the namespace to create |
DEPLOYMENT | The name of the Deployment to create |
GIT_URL | The URL of the application source repository |
BASE_IMAGE | The S2I builder image to use |
HOST | The domain to connect to the Ingress |
NEXUS_URL | The artifact repository URL |
Autoscaling (HPA/CronHPA) Configuration
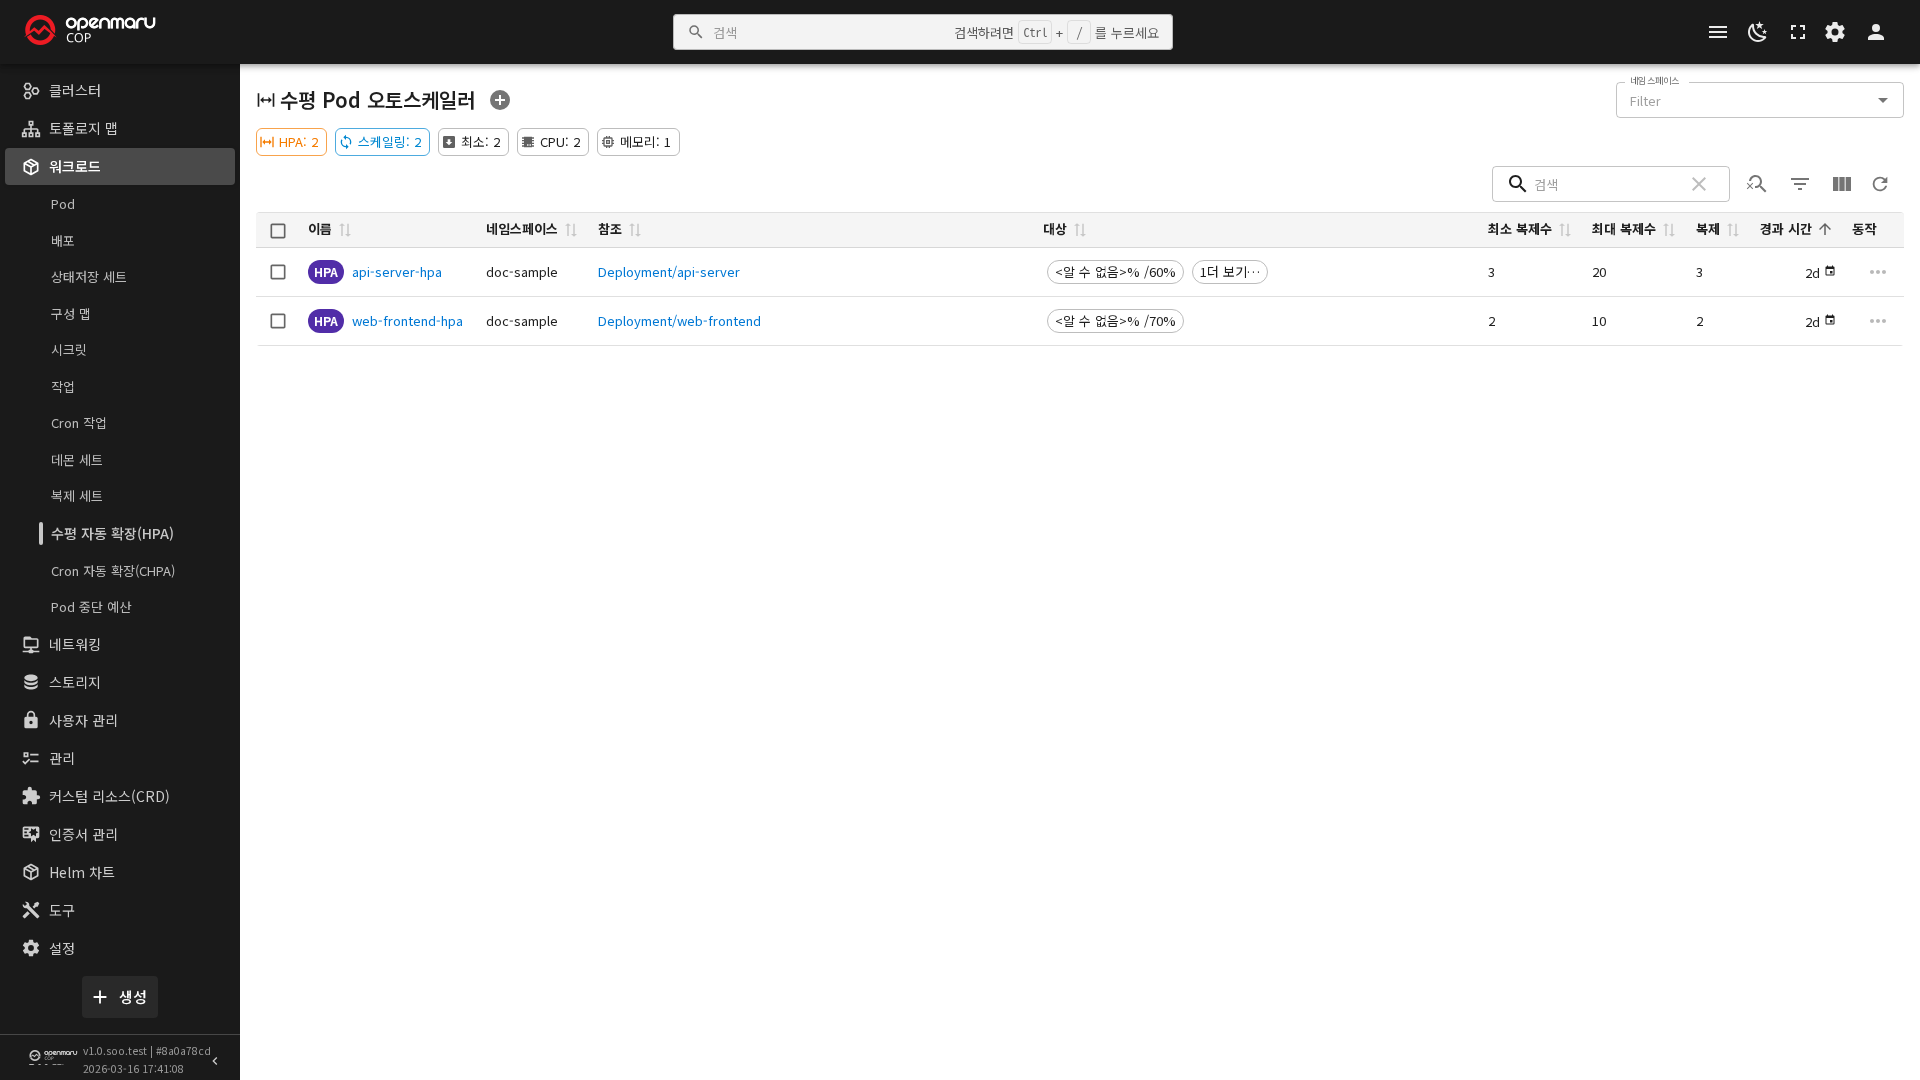
Alongside the standard Kubernetes HPA (Horizontal Pod Autoscaler), OPENMARU COP provides CronHPA, its own autoscaler based on scheduled times.
Standard HPA Configuration
kubectl autoscale deployment my-app --cpu-percent=70 --min=2 --max=10 -n my-app
CronHPA Configuration
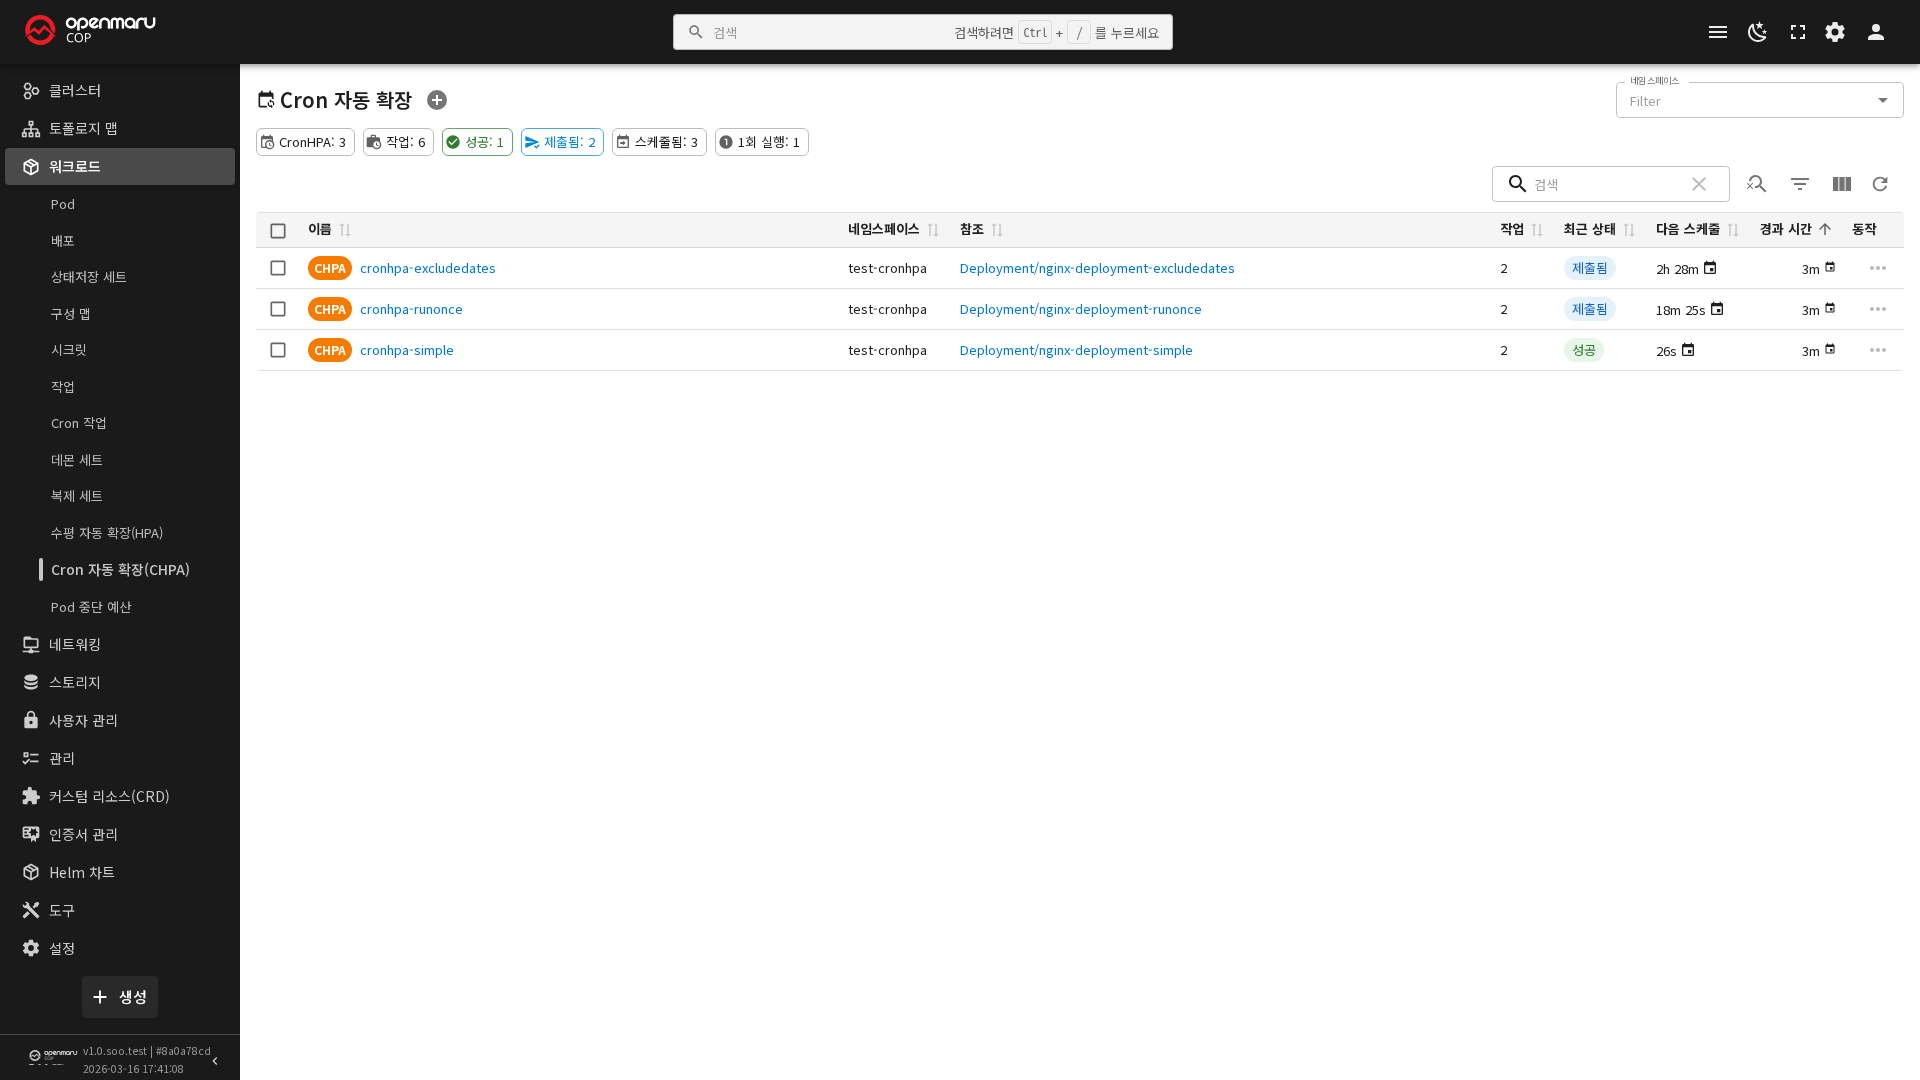
CronHPA uses a six-field cron expression (including seconds), and its controller runs in the openmaru-cronhpa namespace.
apiVersion: autoscaling.openmaru.io/v1
kind: CronHPA
metadata:
  name: my-app-cronhpa
  namespace: my-app
spec:
  scaleTargetRef:
    apiVersion: apps/v1
    kind: Deployment
    name: my-app
  jobs:
    - name: "scale-up-business-hours"
      schedule: "0 0 9 * * *"
      targetSize: 5
    - name: "scale-down-off-hours"
      schedule: "0 0 20 * * *"
      targetSize: 1
| Spec field | Description |
|---|---|
scaleTargetRef | The resource to scale (a Deployment, for example) |
jobs[].schedule | A six-field cron expression in the order second, minute, hour, day, month, weekday |
jobs[].targetSize | The replica count to apply at the specified time |
jobs[].runOnce | Whether to run only once |
excludeDates | The list of dates to exclude from scheduling |
Checking and Troubleshooting
# List CronHPA resources
kubectl get cronhpa -A
kubectl describe cronhpa -n my-app my-app-cronhpa

# Check the controller log
kubectl logs -n openmaru-cronhpa deployment/openmaru-cop-cronhpa
⚠️ Caution: Applying the standard HPA and CronHPA to the same Deployment can make the two controllers conflict at different moments, so having CronHPA's
targetSizeadjust the HPA'sminReplicasis the recommended way to combine them.
Checking in the Console
The Workloads > HPA / CronHPA menu lists the configured autoscalers and their current replica state.
Creating a PVC (Storage)
OPENMARU COP provides two storage classes by default.
| StorageClass | Access modes | Volume expansion | Purpose |
|---|---|---|---|
nfs-client (default) | RWO, RWX | Supported | Data that has to be shared between several pods |
local-path | RWO | Not supported | Data used by a single pod that needs high performance |
PVC Creation Examples
# NFS-based shared volume (RWX)
apiVersion: v1
kind: PersistentVolumeClaim
metadata:
  name: my-app-shared-data
  namespace: my-app
spec:
  accessModes: ["ReadWriteMany"]
  storageClassName: nfs-client
  resources:
    requests:
      storage: 10Gi
---
# Local Path based dedicated volume (RWO)
apiVersion: v1
kind: PersistentVolumeClaim
metadata:
  name: my-app-local-data
  namespace: my-app
spec:
  accessModes: ["ReadWriteOnce"]
  storageClassName: local-path
  resources:
    requests:
      storage: 20Gi
Expanding a Volume
kubectl patch pvc my-app-shared-data -n my-app \
  -p '{"spec":{"resources":{"requests":{"storage":"20Gi"}}}}'
ℹ️ Note: The
local-pathstorage class does not support volume expansion, so usenfs-clientfor data you expect to grow.
Checking in the Console
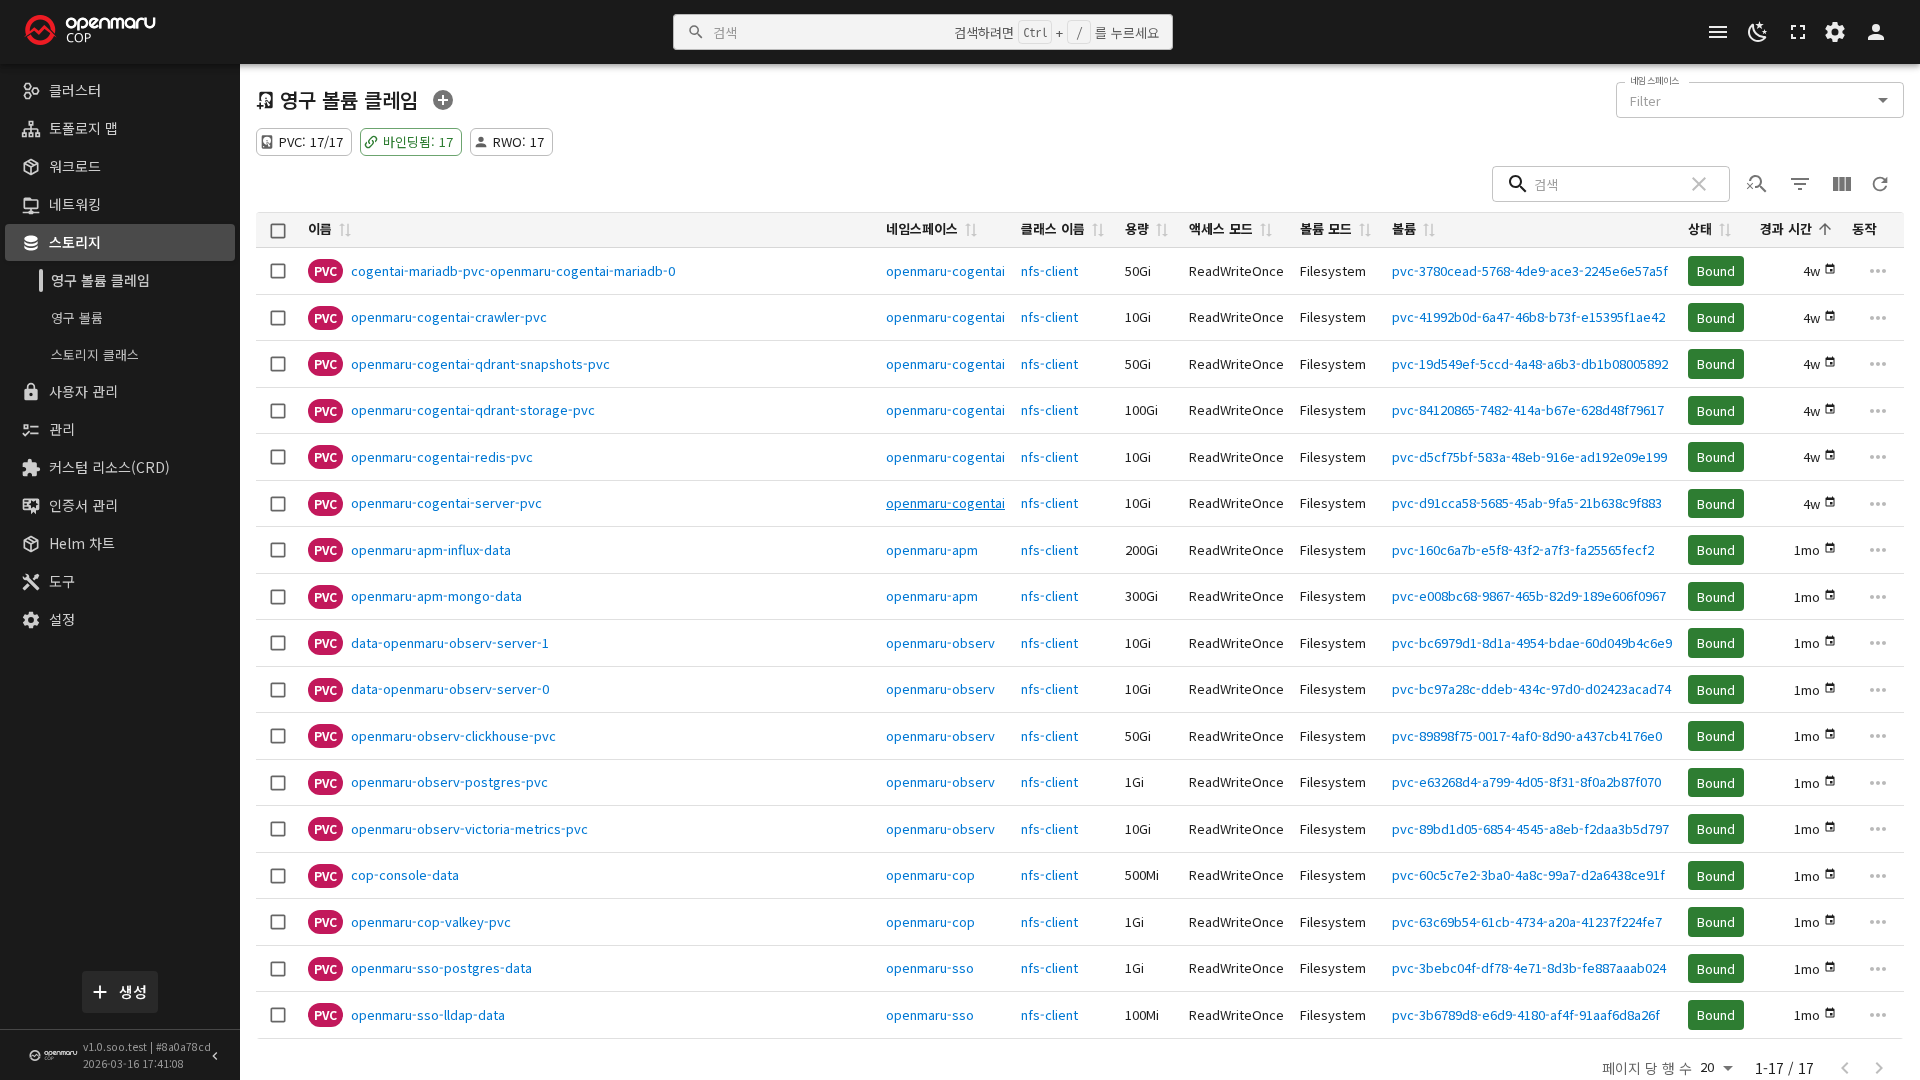
The Storage > Persistent Volume Claims menu shows the state (Bound/Pending/Lost) by color.
Building and Deploying Applications
ℹ️ Note: Source builds are done with the S2I (Source-to-Image) CLI, automated as Jenkins jobs. For the detailed procedure, also refer to the COP build and deployment guide.
S2I (Source-to-Image) Build
s2i build <source_location> <builder_image> <result_image>

# Example: building a Maven project through the Nexus mirror (Tomcat9 + JDK17)
s2i build ${GIT_URL} registry.{sub_domain}.{domain}.{TLD}:8443/images/tomcat9-jdk17-ubi8-s2i-openmaru:9.0 \
  registry.{sub_domain}.{domain}.{TLD}:8443/apps/my-app:1.0.0 \
  -e MAVEN_MIRROR_URL=${NEXUS_URL} \
  -e CPU_LIMIT=2000m \
  -e MEMORY_LIMIT=1Gi
Supported builder images: OpenJDK 8/11/17/21, Tomcat9 + JDK 8/11/17, Node.js 18/20/22, Python 3.9/3.11/3.12, PHP 8.2/8.3, Ruby 3.3, Nginx 1.26, HTTPD 2.4, Varnish 6, MariaDB/MySQL/PostgreSQL/Redis, and others. For the full list, see 4.2. Frequently Used Commands > Private Registry Management.
Automating Build and Deployment with a Jenkins Job or a Bastion Script
Running the scripts provided in the application working directory on the Bastion server handles everything from the S2I build to the deployment in one go. The same behavior is also automated as Jenkins jobs (<namespace>-<app>-build then <namespace>-<app>-deploy).
# Running it directly on the Bastion
cd /data/workspaces/apps/<namespace>/<app>
git -C git pull origin main
./build-app.sh       # S2I build (source to container image)
./build-push.sh      # Push the image to the Harbor registry
./build-deploy.sh    # Update the Deployment image and roll it out
# Example execution log
>> Image Tag : main-4375493
>> Start build : my-app in my-app...
[INFO] BUILD SUCCESS
>> Image push completed: registry.{sub_domain}.{domain}.{TLD}:8443/apps/my-app:main-4375493
>> Start deploy : my-app in my-app
deployment.apps/my-app image updated
>> Waiting for rollout to complete...
deployment "my-app" successfully rolled out
When running it in Jenkins, run the Jenkins > <namespace>-<app>-build job (S2I build and push) first, then deploy with the <namespace>-<app>-deploy job. For the job scheme, refer to the Deploying through the CI/CD Pipeline section below.
Checking in the Console
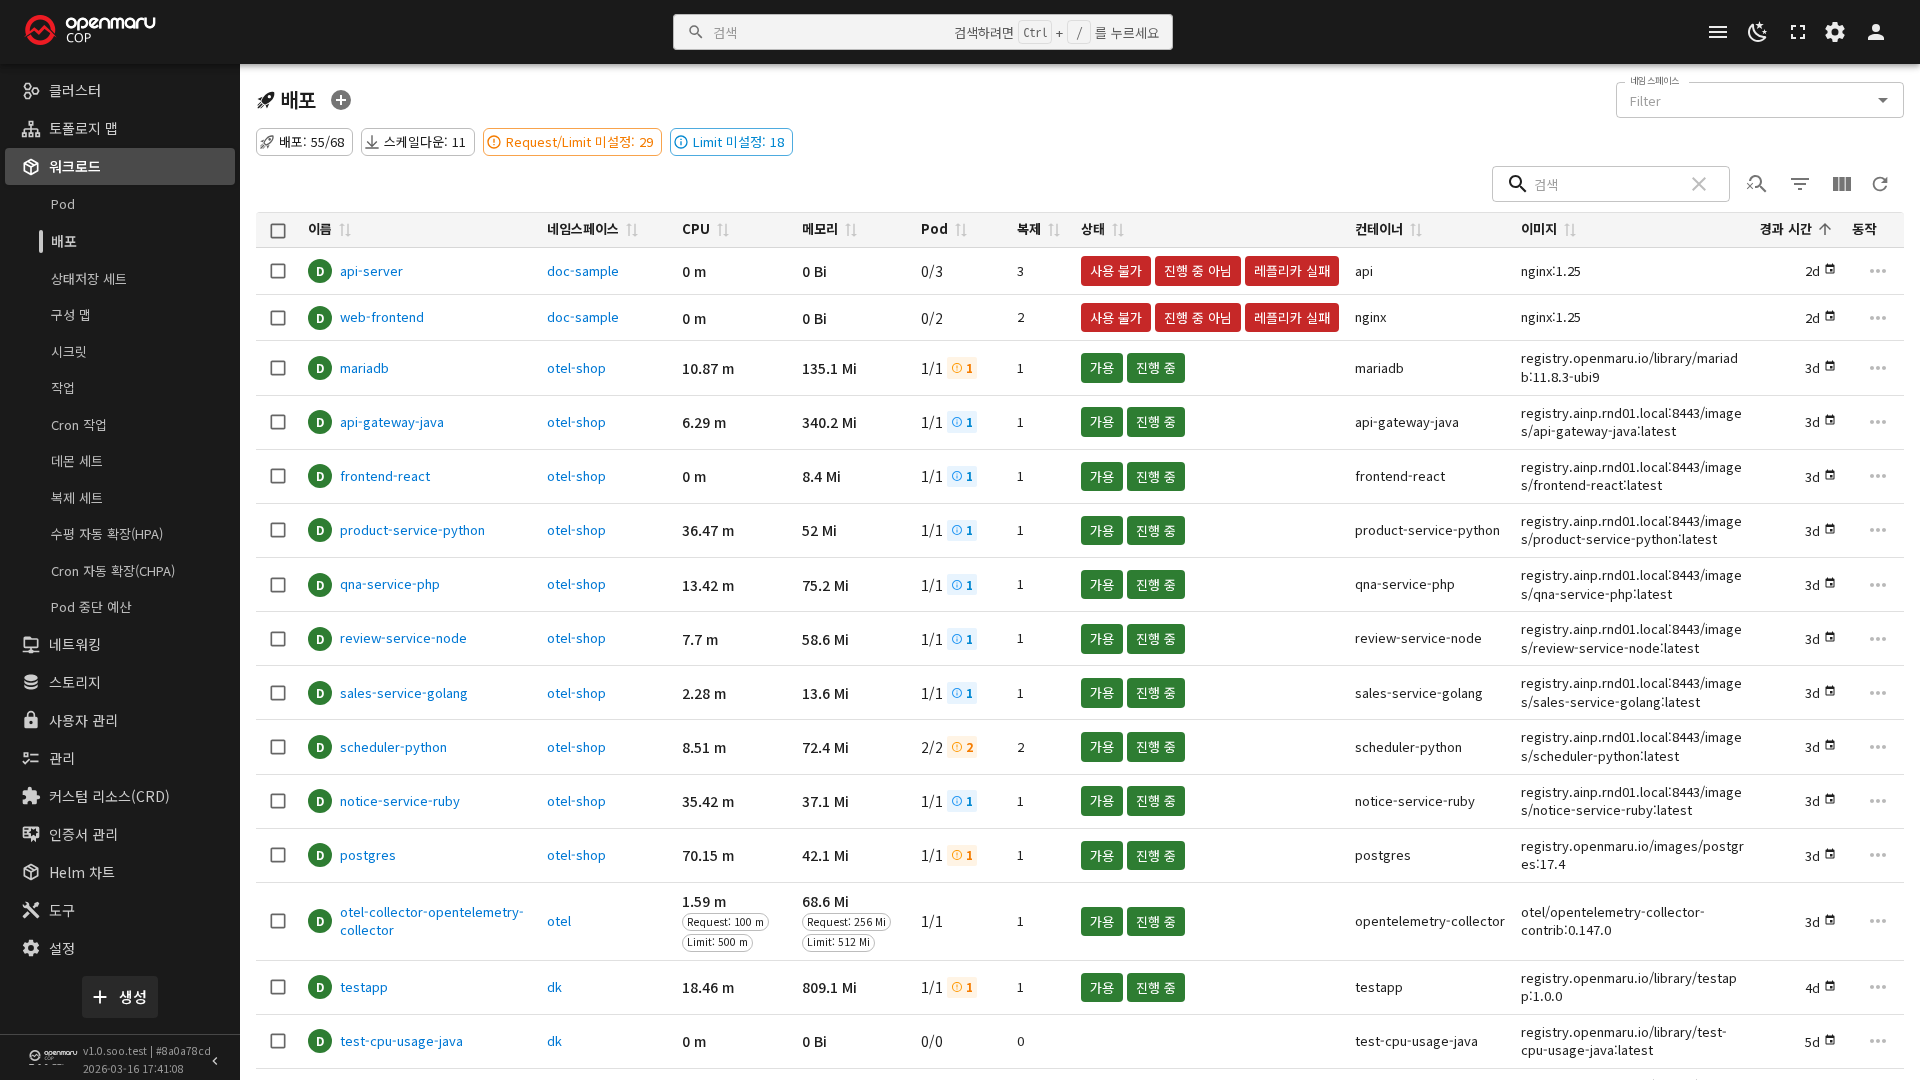
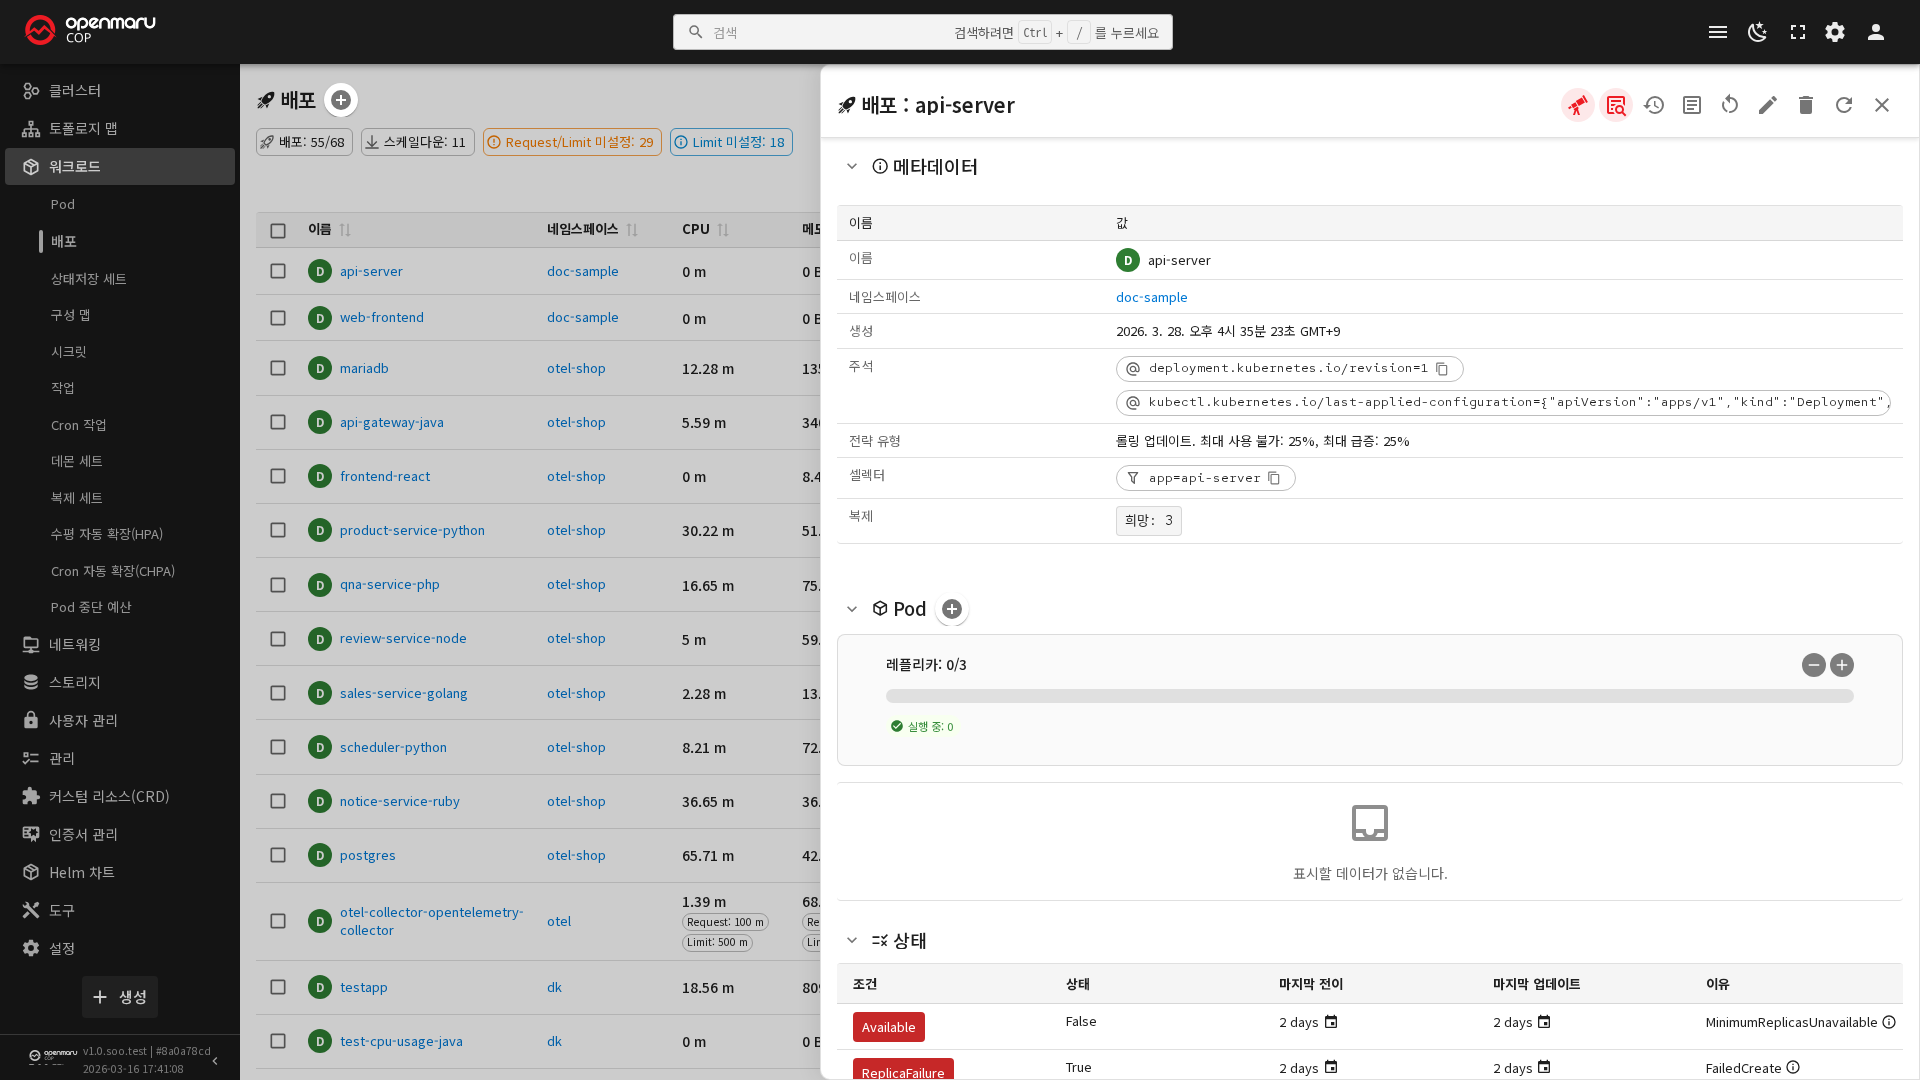
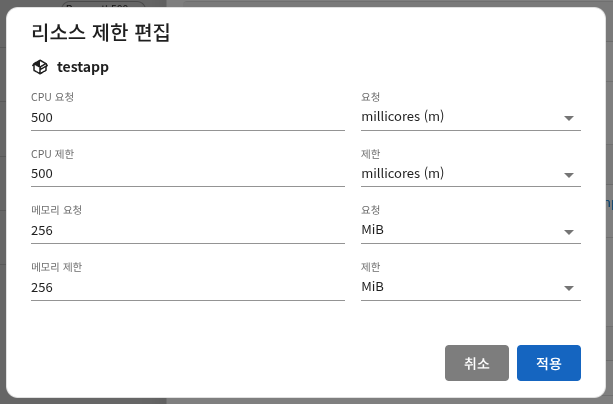
After deployment finishes, the Workloads > Deployment menu shows the rollout state and resource usage. On the detail screen you can adjust the CPU and memory request and limit values directly (Edit Resource Limits), and open the logs and the terminal together in a split view.
Deploying with Helm
helm repo add openmaru http://chartmuseum.{sub_domain}.{domain}.{TLD}:8181
helm repo update

helm install my-app openmaru/my-app-chart \
  --create-namespace -n my-app \
  -f values.yaml

helm upgrade my-app openmaru/my-app-chart -n my-app -f values.yaml
helm rollback my-app 1 -n my-app
helm list -A
helm status my-app -n my-app
helm history my-app -n my-app
helm uninstall my-app -n my-app
Deploying through the CI/CD Pipeline (GitLab to Jenkins to Harbor/Nexus to ArgoCD)
The standard CI/CD pipeline of OPENMARU COP follows this Jenkins job numbering scheme.
| Job | Role |
|---|---|
00-NEW-PROJECT | Creating a new project/namespace |
10-*-helm-install | First installation of a Helm chart |
20-*-build | S2I build and image push |
30-*-deploy | Image deployment |
40-*-rollback | Rolling back to a previous version |
50-*-blue-green | Switching a blue-green deployment |
60-*-hpa | Autoscaling configuration |
70-*-argocd-deploy | ArgoCD GitOps deployment |
99-*-helm-uninstall | Deleting resources |
Example of switching a blue-green deployment:
kubectl patch service my-app -n my-app \
  -p '{"spec":{"selector":{"deployment":"green"}}}'
Checking a GitOps deployment through ArgoCD:
argocd app list --grpc-web
argocd app get my-app --grpc-web
argocd app sync my-app --grpc-web
argocd app history my-app --grpc-web
Updating the Image Tag (Manual Deployment)
kubectl set image deployment/my-app my-app=registry.{sub_domain}.{domain}.{TLD}:8443/apps/my-app:v1.1 -n my-app
kubectl rollout status deployment/my-app -n my-app
Security Context (CIS Profile Compliance)
When deploying to a production environment (a CIS restricted namespace), the following SecurityContext items must be observed. The runAsUser value differs by the type of S2I builder image, so do not fix it arbitrarily -- follow the table below. If the value differs from the actual image UID, the pod can fail to start with errors such as no permission to write files.
| S2I image family | runAsUser | Note |
|---|---|---|
| Java/Tomcat (OpenJDK, Tomcat9) | 185 | The standard UID of SCL OpenJDK/Tomcat |
| Others (Node.js, Python, PHP, Ruby, Nginx, HTTPD) | 1001 | The standard SCL (Software Collections) UID |
# Example: a Java/Tomcat based S2I image
securityContext:
  runAsNonRoot: true
  runAsUser: 185        # Java/Tomcat family. Other runtimes use 1001
  runAsGroup: 0         # The root group (the S2I image standard)
  allowPrivilegeEscalation: false
  readOnlyRootFilesystem: true
  seccompProfile:
    type: RuntimeDefault
  capabilities:
    drop: ["ALL"]
Service/NodePort Configuration
| Service type | Example use |
|---|---|
ClusterIP | For communication inside the cluster only (the default) |
NodePort | Direct access from outside the cluster by node IP and port |
LoadBalancer | Integration with an external load balancer (used only in limited ways in an on-premise environment) |
apiVersion: v1
kind: Service
metadata:
  name: my-app-nodeport
  namespace: my-app
spec:
  type: NodePort
  selector:
    app: my-app
  ports:
    - port: 8080
      targetPort: 8080
      nodePort: 30080
ℹ️ Note: The usable NodePort range is 30000-32767. In a production environment, using an Ingress rather than a NodePort is recommended wherever possible.
Checking in the Console
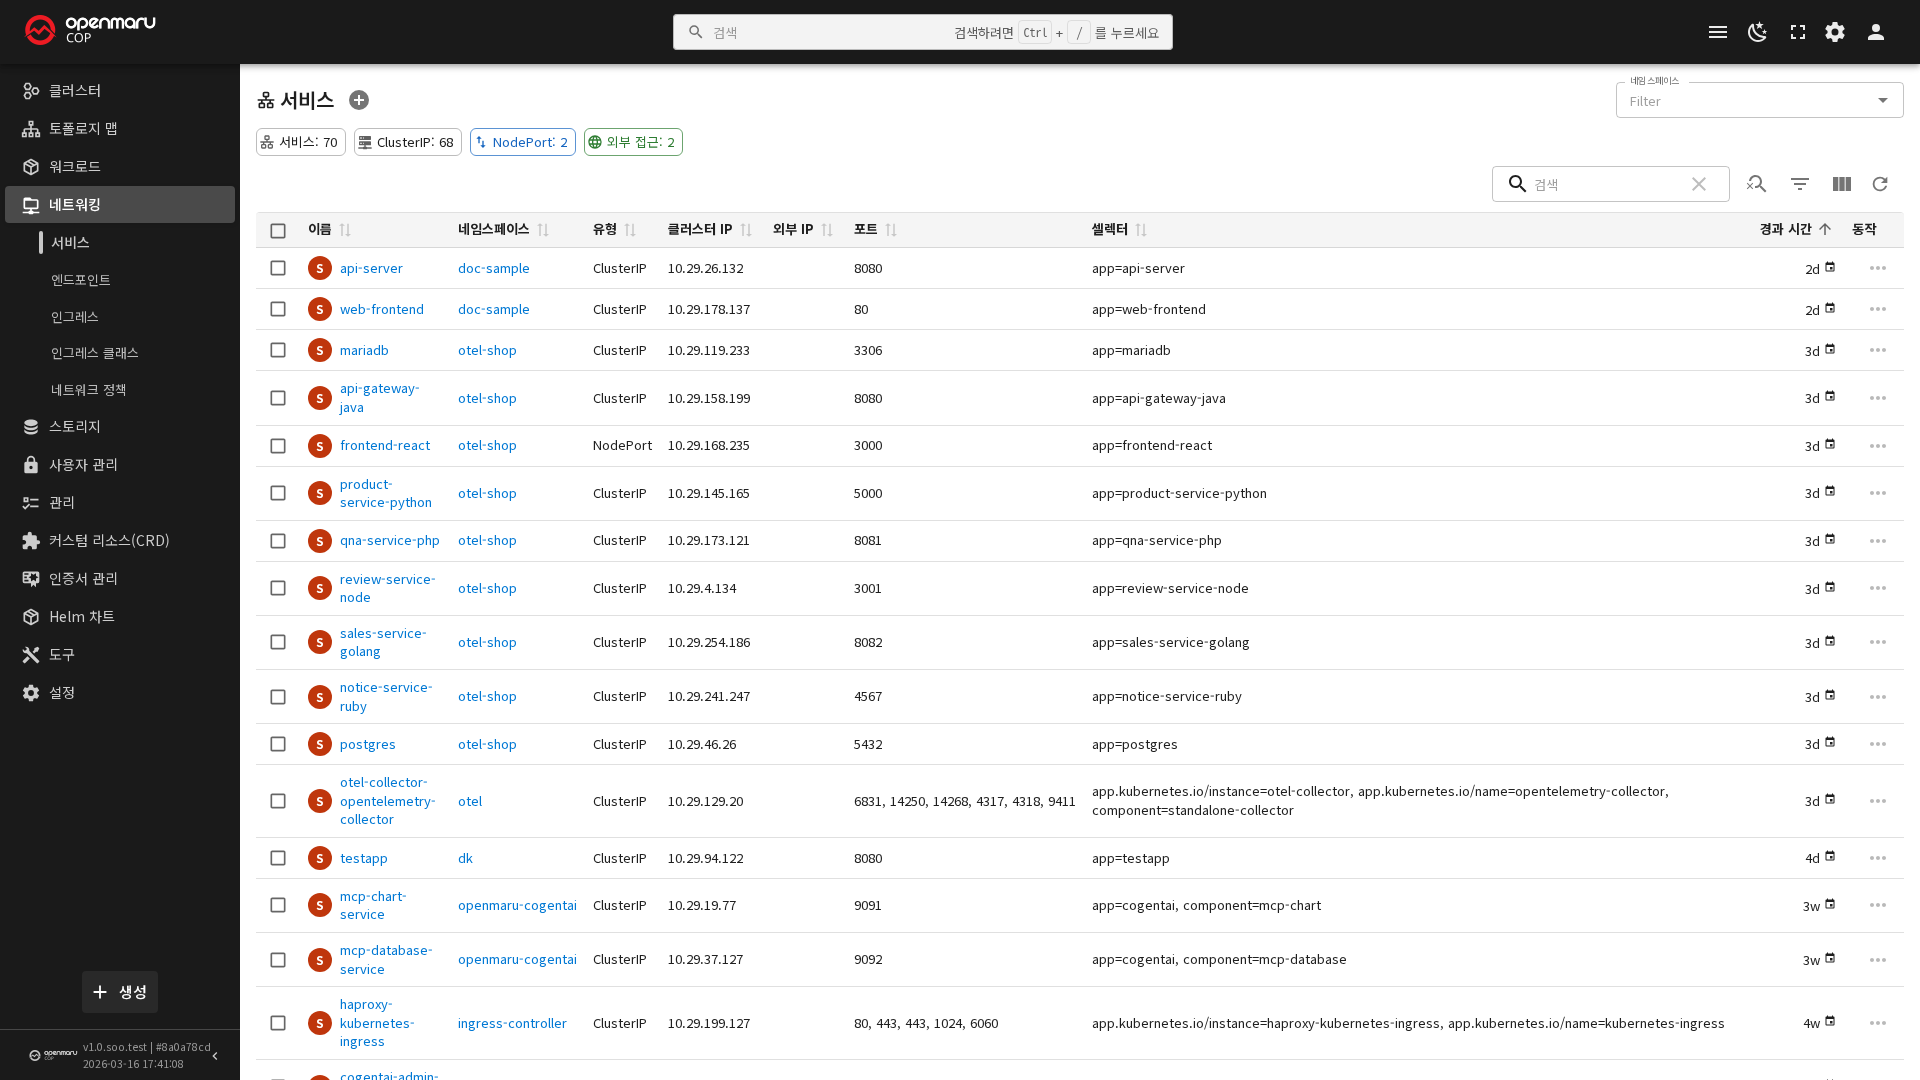
The Network > Services menu lists the services and the state of the endpoints (pods) connected to them.
NetworkPolicy Configuration
Communication between all pods is allowed by default, so restricting traffic with NetworkPolicies per namespace is recommended in a production environment.
# Block all inbound and outbound traffic by default
apiVersion: networking.k8s.io/v1
kind: NetworkPolicy
metadata:
  name: default-deny-all
  namespace: my-app
spec:
  podSelector: {}
  policyTypes: ["Ingress", "Egress"]
---
# Allow communication within the same namespace only
apiVersion: networking.k8s.io/v1
kind: NetworkPolicy
metadata:
  name: allow-same-namespace
  namespace: my-app
spec:
  podSelector: {}
  ingress:
    - from:
        - podSelector: {}
---
# Allow DNS (port 53) traffic
apiVersion: networking.k8s.io/v1
kind: NetworkPolicy
metadata:
  name: allow-dns
  namespace: my-app
spec:
  podSelector: {}
  egress:
    - to: []
      ports:
        - protocol: UDP
          port: 53
ℹ️ Note: OPENMARU COP does not provide a fixed egress IP feature per project or node by default. If a particular project needs a fixed source IP for external communication, it has to be supported at the architecture level through a separate egress gateway (a NAT-only node). Discuss this with the technical support team if it is required.
Checking in the Console
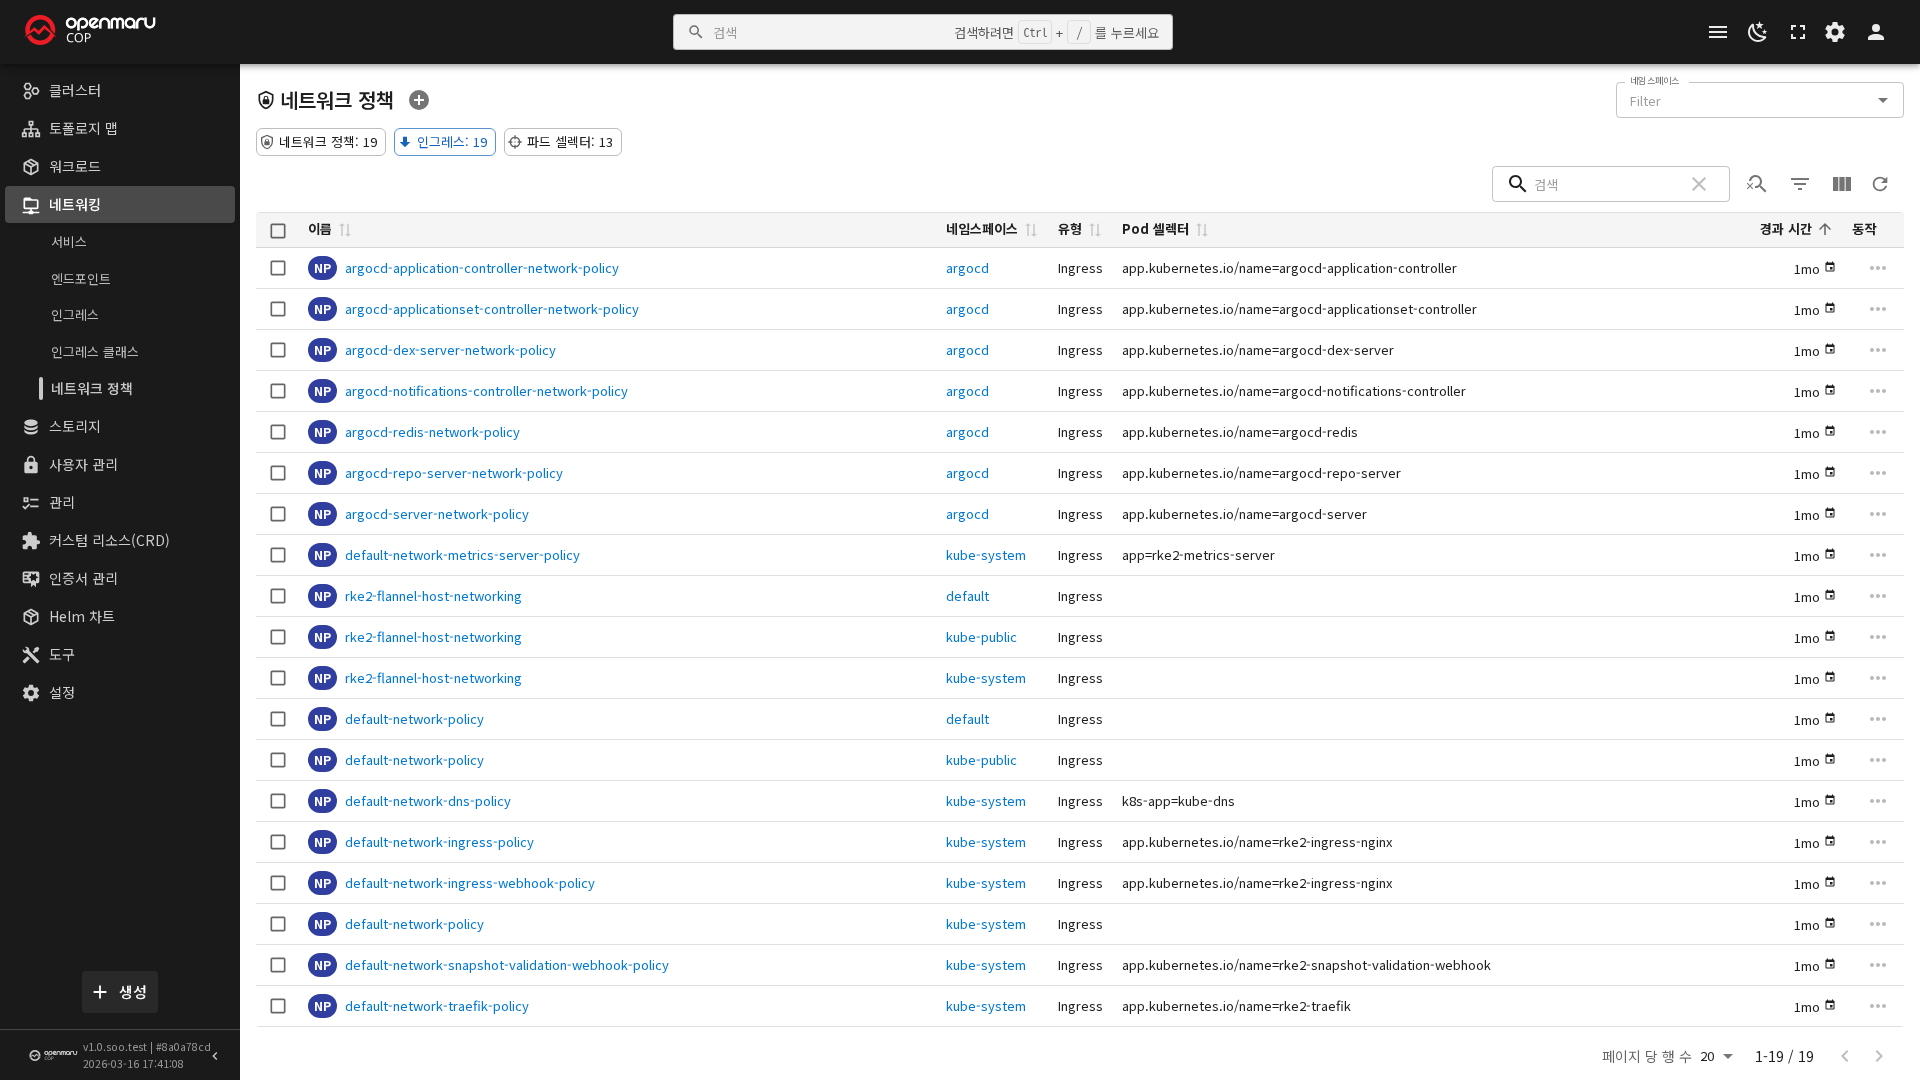
The Network > Network Policies menu shows the from/to/ports rules of the applied NetworkPolicies visually.
Editing a Helm Chart (Template)
OPENMARU COP uses Helm charts as the application deployment template.
# Scaffold a new chart
helm create my-app-chart

# Validate the chart syntax
helm lint my-app-chart

# Package the chart
helm package my-app-chart

# Upload to the in-house ChartMuseum (the openmaru repo)
helm cm-push my-app-chart-1.0.0.tgz openmaru
After editing values.yaml, apply it with helm upgrade.
helm upgrade my-app openmaru/my-app-chart -n my-app -f values.yaml --dry-run
helm upgrade my-app openmaru/my-app-chart -n my-app -f values.yaml
Checking in the Console
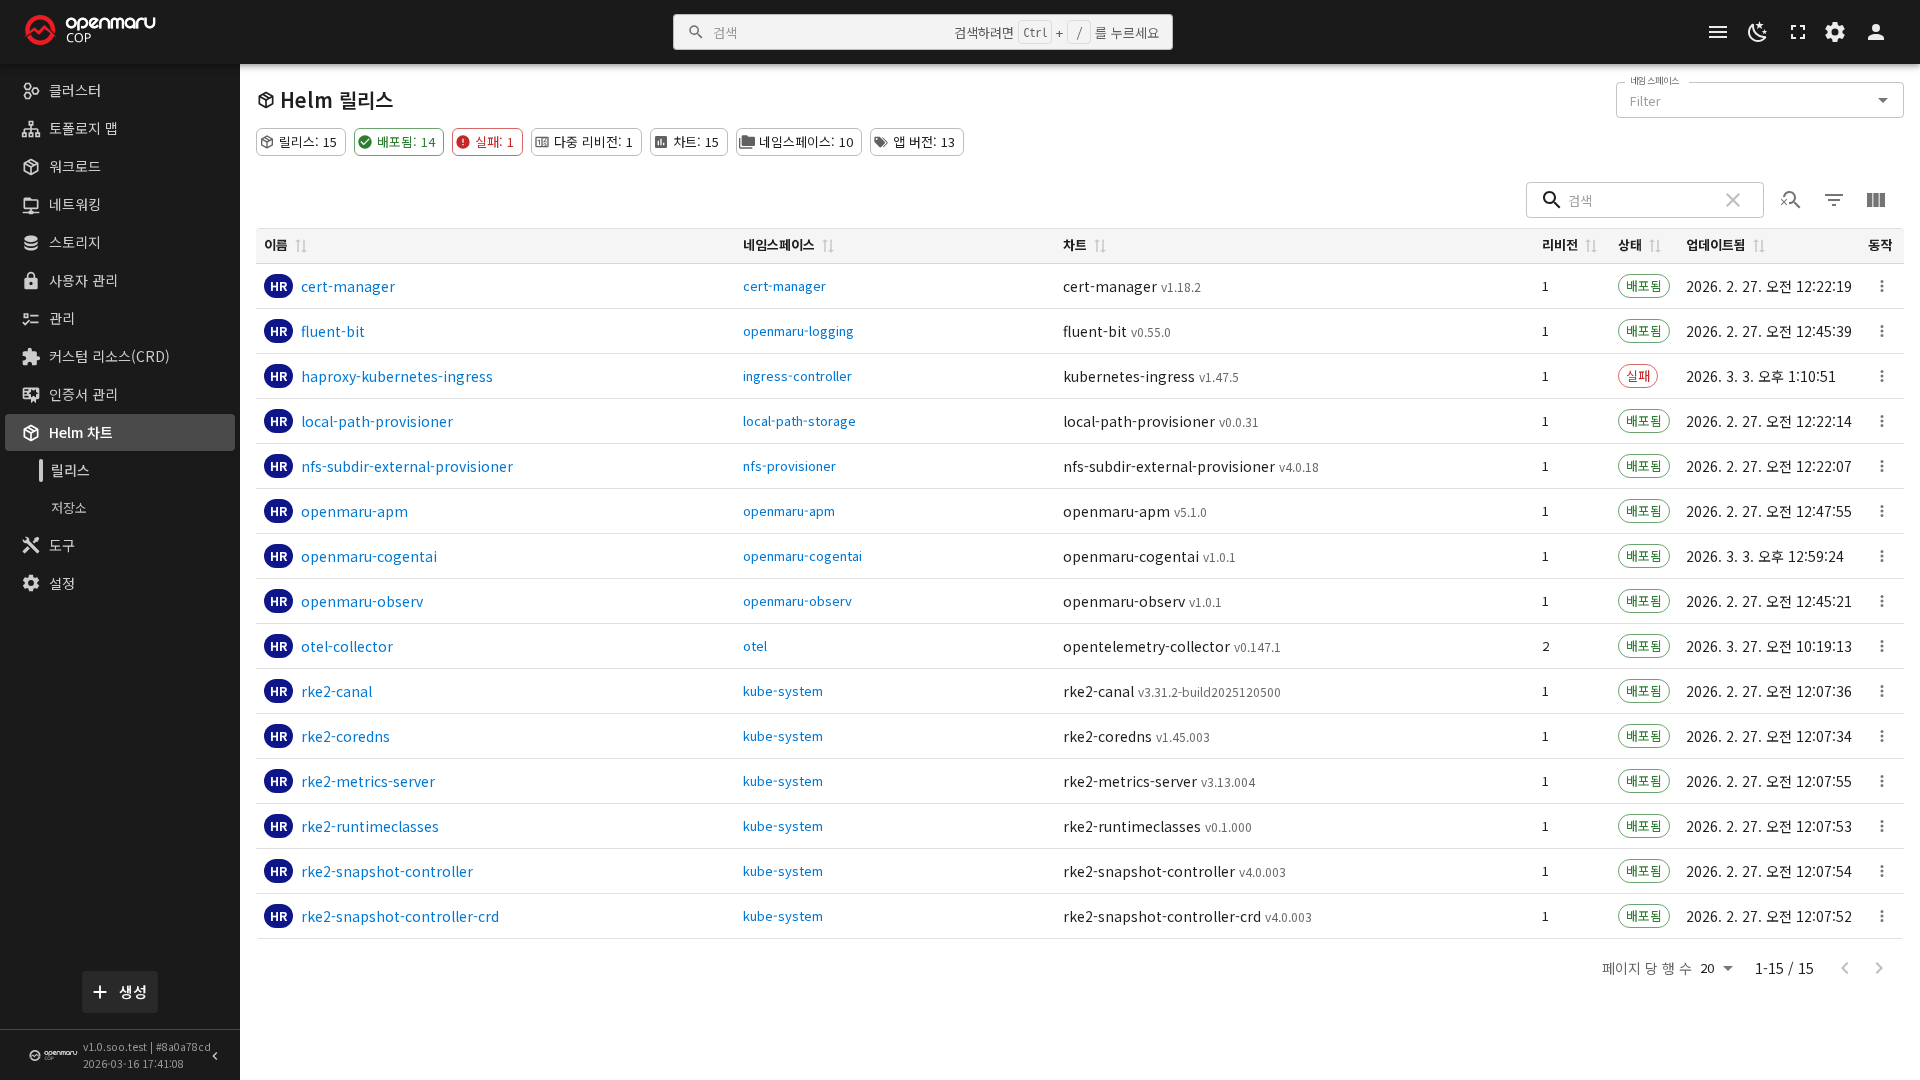
The Helm Charts > Releases menu shows the installed releases and their details (the Summary/Values/Manifests/Notes/Resources/History tabs), and lets you upgrade, roll back, and delete them in the GUI. The Repositories menu registers and manages Helm repositories such as ChartMuseum.
Adding Worker/Infra Nodes
-
Set the host name of the new node
hostnamectl hostname cop-worker-3 -
Add the new node's information to
inventory.iniandenv.yaml -
Distribute the SSH key from the Bastion to the new node
./run-sshkeycopy.sh <new_node_IP> -
Apply the basic configuration to the new node
./run-playbook.sh openmaru-cop-system-setup.yaml --limit cop-worker-3./run-playbook.sh openmaru-cop-system-dns.yaml --limit cop-worker-3 -
(For a GPU node) Pre-install the GPU driver
./120-gpu-preinstall.sh./140-gpu-install.sh -
Install RKE2 and join the cluster
./run-playbook.sh openmaru-cop-rke2-install.yaml./run-playbook.sh openmaru-cop-rke2-post-install.yaml --limit cop-worker-3./run-playbook.sh openmaru-cop-rke2-private-registry.yaml --limit cop-worker-3 -
(For a GPU node) Install the GPU Operator
./450-gpu-operator-install.sh
Node Removal Procedure
kubectl cordon cop-worker-3
kubectl drain cop-worker-3 --ignore-daemonsets --delete-emptydir-data

# Run on the target node
systemctl stop rke2-agent
systemctl disable rke2-agent

# Run on the Bastion or a Master node
kubectl delete node cop-worker-3

# Run on the target node (complete removal of RKE2)
rke2-uninstall.sh
⚠️ Caution: Always cordon and drain before removing a node, so the workloads on it move (are rescheduled) safely to other healthy nodes.
Checking in the Console
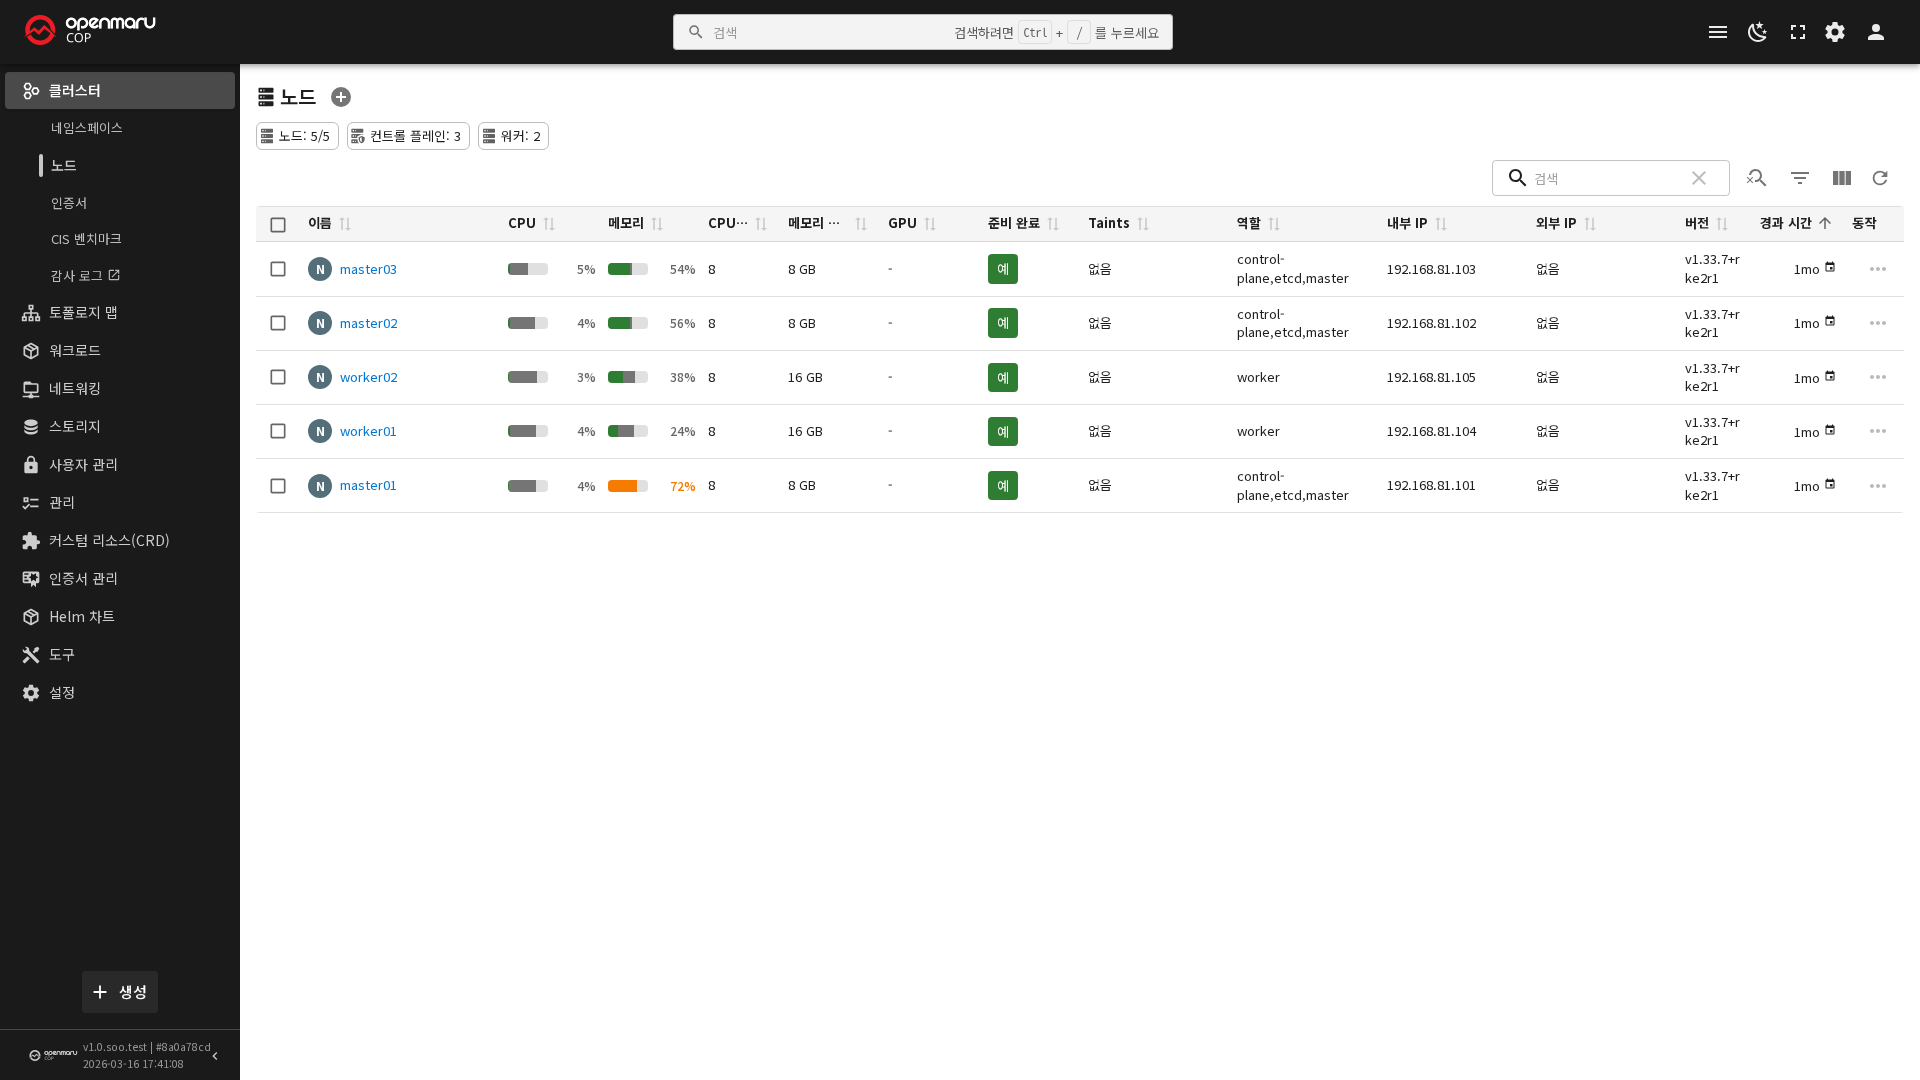
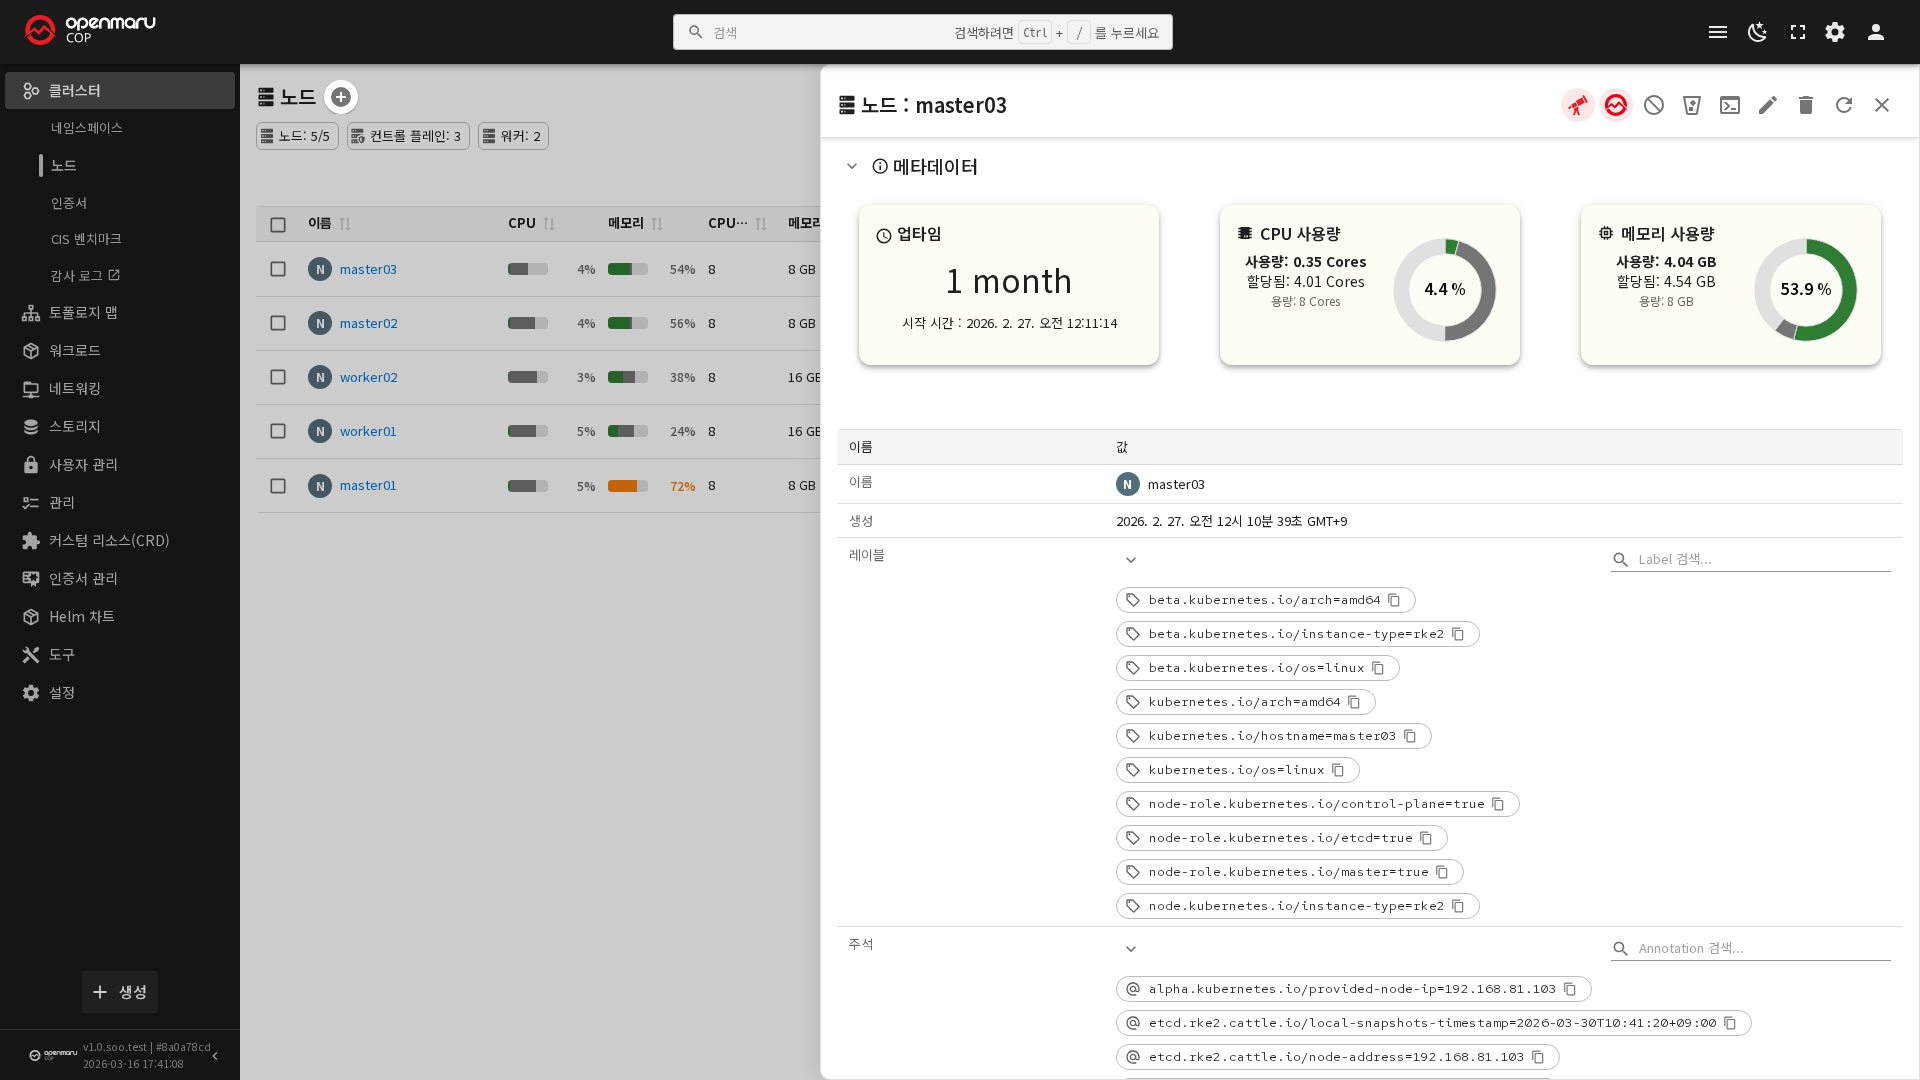
The Cluster > Nodes menu lists nodes and shows their details (specifications, allocated resources, conditions), and lets you cordon, uncordon, and drain with GUI buttons. The Node Shell feature opens a terminal to the node directly in the browser through a privileged debug pod.
Private Registry Management
OPENMARU COP uses Harbor as the container image repository and Nexus as the build artifact repository.
Harbor Sign-in and Image Push/Pull
docker login registry.{sub_domain}.{domain}.{TLD}:8443 -u admin -p ${HARBOR_PASSWORD}

docker tag my-app:v1.0 registry.{sub_domain}.{domain}.{TLD}:8443/apps/my-app:v1.0
docker push registry.{sub_domain}.{domain}.{TLD}:8443/apps/my-app:v1.0
docker pull registry.{sub_domain}.{domain}.{TLD}:8443/apps/my-app:v1.0
Harbor Project Structure
| Project | Visibility | Purpose |
|---|---|---|
library | Public | Shared base images |
images | Public | S2I builder images |
apps | Private | Customer application images |
Creating an ImagePullSecret
kubectl create secret docker-registry harbor-secret \
  --docker-server=registry.{sub_domain}.{domain}.{TLD}:8443 \
  --docker-username=admin \
  --docker-password=${HARBOR_PASSWORD} \
  -n my-app
Image Vulnerability Scanning
Harbor supports automatic vulnerability scanning on push with its built-in Trivy scanner. Automatically scan on push and Vulnerability severity threshold (Critical) can be specified in the project settings.
Garbage Collection
Under Administration > Garbage Collection in the Harbor management console, you can set a schedule (daily, for example) for regularly deleting unused (untagged) images.
ℹ️ Note: The Tools menu of the OPENMARU COP Console links directly to the integrated DevOps tools -- Harbor, GitLab, Jenkins, ArgoCD, Nexus, and others.
Graceful Shutdown of a Worker Node
When a particular Worker node has to be shut down safely for scheduled maintenance, an OS patch, or similar, follow this three-step procedure.
| Step | Command | Effect |
|---|---|---|
| 1. Cordon | kubectl cordon <node-name> | Blocks scheduling of new pods (existing pods stay) |
| 2. Drain | kubectl drain <node-name> --ignore-daemonsets --delete-emptydir-data | Safely relocates the existing pods to other nodes |
| 3. Uncordon (after the work) | kubectl uncordon <node-name> | Resumes scheduling |
# Step 1: block scheduling
kubectl cordon cop-worker-2

# Step 2: safely move the workloads (waits up to 300 seconds; use --force if needed)
kubectl drain cop-worker-2 --ignore-daemonsets --delete-emptydir-data --timeout=300s

# Carry out the maintenance work (OS patch, restart, and so on)

# Step 3: resume scheduling after the work
kubectl uncordon cop-worker-2
| Scenario | Recommended procedure |
|---|---|
| Applying an OS patch | Cordon, drain, patch, restart, uncordon |
| Urgent inspection | Cordon, drain, inspect, uncordon |
| Hardware replacement | Cordon, drain, remove the node (see Adding Worker/Infra Nodes) |
| Rebalancing load | Cordon (blocks new scheduling only) |
When several nodes have to be inspected in turn, the Ansible automation playbook can carry out a rolling restart including cordon and drain in one run.
./run-playbook.sh openmaru-cop-rke2-rolling-restart.yaml \
  -e "target_group=workers" \
  -e "cordon_nodes=true" \
  -e "drain_nodes=true"
Operating GPU Resources
This is the procedure for checking GPU allocation in an environment with GPU nodes, and for having several workloads share one card.
GPU Allocation Method
From COP 1.0.3 onwards, DRA (Dynamic Resource Allocation) is the default method. Instead of requesting the nvidia.com/gpu extended resource directly, a workload requests a device with a ResourceClaim.
| Method | Request | Advertised by | Sharing across projects |
|---|---|---|---|
| DRA (default) | ResourceClaim | The DRA driver | Possible |
| Time-slicing | nvidia.com/gpu | device-plugin | Works per node |
Caution: Do not use both methods together. If two paths each allocate the same GPU, neither knows about the other's use and the actual usage exceeds the physical capacity.
Checking the Current State
# The physical GPU list per node -- published by the driver
kubectl get resourceslices

# Details of each device (whether it can be shared, and its capacity)
kubectl get resourceslices -o custom-columns=\
NODE:.spec.nodeName,DRIVER:.spec.driver,\
SHARED:.spec.devices[*].allowMultipleAllocations

# Which workload is holding a GPU
kubectl get resourceclaims -A
Note: The GPU count on the node screen and the number of devices in
resourceslicescan differ. With time-slicing on, the node showsphysical cards x replicas, butresourceslicesshows only the physical device count. Look at the latter to check the actual number of devices.
Checking GPU Usage
# Check from inside a pod that is using the GPU
kubectl exec -n <namespace> <pod> -- \
  nvidia-smi --query-gpu=name,memory.total,memory.used,memory.free --format=csv
Caution: GPU memory is only accounted for by the scheduler; it is not physically divided. If one workload uses all the memory, the other workloads on the same GPU are terminated. Manage things so that the total memory of the workloads running together does not exceed the physical capacity.
Having Several Workloads Share One GPU
The approach is to create the ResourceClaim in advance and have several pods reference it by name.
apiVersion: resource.k8s.io/v1
kind: ResourceClaim
metadata:
  name: shared-gpu
  namespace: <namespace>
spec:
  devices:
    requests:
      - name: gpu
        exactly:
          deviceClassName: gpu.nvidia.com
          allocationMode: ExactCount
          count: 1
On the pod side, reference this claim by name.
spec:
  resourceClaims:
    - name: gpu
      resourceClaimName: shared-gpu      # a name reference, not a template
  containers:
    - name: app
      resources:
        claims:
          - name: gpu
Caution: With
resourceClaimTemplateName, a new claim is created for each pod and each holds a device separately. On a node with one GPU, the second pod staysPending. When the aim is sharing, always use a name reference.
Check which pod the claim is assigned to as follows.
kubectl get resourceclaim -n <namespace> shared-gpu \
  -o jsonpath='{range .status.reservedFor[*]}{.name}{"\n"}{end}'
Sharing a GPU across Projects
When device partitioning is on, workloads in different projects (namespaces) can also use the same GPU. A ResourceClaim is an object at project scope, so each is created separately, but they are assigned to the same physical device.
# Whether the device allows multiple allocations -- this must be True
kubectl get resourceslices \
  -o jsonpath='{range .items[*]}{.spec.nodeName}{"  "}{.spec.devices[*].allowMultipleAllocations}{"\n"}{end}'

# If the value is empty, check the cluster feature gate (1 means it is on)
kubectl get --raw /metrics | grep DRAConsumableCapacity
Maintenance on GPU Nodes
GPU nodes follow the same procedure as Graceful Shutdown of a Worker Node. Check the following first, though.
| Check | Reason |
|---|---|
| GPU work in progress | Training and inference work may have to start over if it is cut off partway |
| Spare capacity on the other GPU nodes | There has to be somewhere to relocate to after the drain. Without it, the pods stay Pending |
# Check the pods using GPUs on that node
kubectl get pods -A --field-selector spec.nodeName=<node> -o json \
  | jq -r '.items[] | select(.spec.resourceClaims != null) | "\(.metadata.namespace)/\(.metadata.name)"'
Raising the GPU Driver Version
The driver is skipped if it is already installed. Raising the version alone does not update the node, so it has to be removed and reinstalled. For the procedure, refer to the GPU environment configuration chapter of the installation guide.