17.4 CLI
CLI 실행 방법이나 조작 방법에 대해 설명한다.
CLI 실행 방법
CLI는 서버(스탠드얼론 서버 또는 도메인 컨트롤러)가 시작된 상태에서 실행하여 대상 서버에 접속해 각종 관리 명령을 실행한다.
CLI 시작
CLI의 실행은 $JBOSS_HOME/bin 폴더에서 jboss-cli.sh의 스크립트를 실행하면 된다.
아래와 같은 명령을 실행하면 CLI의 파라미터 목록이 표시된다.
$./jboss-cli.sh --help

Usage: jboss-cli.sh/jboss-cli.bat [--help] [--version] [--controller=host:port]

……
jboss-cli.sh 주요 옵션들은 다음과 같다.
| 옵션 | 설명 |
|---|---|
--help(-h) | jboss-cli 도움말 표시한다. |
--version | OS, JVM, JBoss의 버전 정보와 환경 변수를 표시한다. |
--controller | --connect의 명령으로 접속할 호스트명과 포트 번호를 지정한다. --controller=IP주소:포트 형식으로 입력한다. 생략시 localhost:9999가 사용된다. |
--connect(-c) | CLI를 시작하면 바로 서버에 접속한다. |
--gui | GUI 모드로 시작한다. |
--file | 배치 모드로 실행할 경우, 명령어와 오퍼레이션을 포함한 파일 경로를 지정한다. |
--command | 실행할 명령어 또는 오퍼레이션을 지정한다. |
--commands | 실행할 여러 개의 명령어 또는 오퍼레이션을 컴마로 구분하여 지정한다. |
--user | JBoss 관리자 아이디 |
--password | JBoss 관리자 패스워드 |
서버 접속
CLI를 시작한 후 connect 명령어를 실행하면 서버(기본값 localhost:9999)에 접속한다.
$ ./jboss-cli.sh
You are disconnected at the moment. Type 'connect' to connect to the server or 'help' for the list of supported commands.
[disconnected /] connect
[standalone@localhost:9999 /]
또, jboss-cli.sh 스크립트를 실행할 때 ‘--connect’ 나 ‘-c’ 옵션을 사용하여 CLI를 시작하면 곧바로 관리 서버에 접속하는 것도 가능하다. 특정 컨트롤러에 접속하려면 jboss-cli.sh 시작 시 --connect 옵션의 뒤에 --controller=[host][:port]를 지정한다.
$ ./jboss-cli.sh --connect --controller=localhost:9999
[standalone@localhost:9999 /]
connect 명령의 파라미터로 접속할 서버의 IP주소와 포트 번호를 지정하여 접속할 수 있다.
$ ./jboss-cli.sh
You are disconnected at the moment. Type 'connect' to connect to the server or 'help' for the list of supported commands.
[disconnected /] connect localhost:9999
[standalone@localhost:9999 /]
CLI 실행 모드
jboss-cli.sh 스크립트의 실행 모드는 일반적인 쉘(Shell)과 같이 프롬프트에 명령을 입력하면 실행 결과를 출력하는 대화형 모드와 jboss-cli.sh의 파라미터로 명령을 직접 지정해 실행하는 비대화형 모드가 있다.
-
대화형 모드
$ ./jboss-cli.shYou are disconnected at the moment. Type 'connect' to connect to the server or 'help' for the list of supported commands.[disconnected /] connect[standalone@localhost:9999 /] cd /core-service=management[standalone@localhost:9999 core-service=management] lsldap-connection management-interface security-realm[standalone@localhost:9999 core-service=management]
비대화형 모드는 접속할 때 사용하는 --connect(-c) 옵션과 실행할 명령을 지정하는 --command, --commands 나 --file 옵션을 사용한다.
다음은 비대화형 모드 실행 예로 cd 명령으로 /core-service=management 노드로 이동하여, ls명령으로 하위 자원이나 속성들을 표시하는 예제이다. 그런데 비대화형 모드의 --command는 하나의 명령만 지정할 수 있기 때문에 cd명령어를 사용하지 않고 루트 디렉터리에서 ls 명령을 실행하였다.
-
비대화형 모드
-
--command 옵션(ls명령만 실행)
$ ./jboss-cli.sh -c command="ls"core-servicedeploymentdeployment-overlayextensioninterfacepath… 생략 …$
-
-
--commands 옵션
$ ./jboss-cli.sh -c --commands="cd /core-service=management, ls"ldap-connectionmanagement-interfacesecurity-realm[jboss@rhel63pc bin]$ -
--file 옵션
다음과 같이 sample.cli 파일을 작성한다.
$ vi sample.clicd /core-service=managementls작성한 파일을 CLI에서 --file 옵션에 지정하여 실행한다.
$ ./jboss-cli.sh -c --file=sample.clildap-connectionmanagement-interfacesecurity-realm
CLI 인증
JBoss 매니지먼트에는 보안 Realm으로 ManagementRealm이 적용되어 로컬 호스트 이외의 원격접근에는 관리자 아이디와 패스워드를 입력해야 한다.
-
로컬 호스트 인증
로컬 호스트에서 접근은 ManagementRealm 설정에 있는 local 이 설정되어 있어 인증없이 접근할 수 있다. 이 인증 기능을 사일런트 인증이라 하며, 로컬 호스트에서의 접근도 ManagementRealm을 적용하여 인증하도록 설정하는 것도 가능하다. 사일런트 인증을 사용하지 않으려면 아래와 같이 실행하여 local 설정을 제거하면 된다.
[standalone@localhost:9999 /] /core-service=management/security-realm=ManagementRealm/authentication=local:remove{"outcome" => "success","response-headers" => {"operation-requires-reload" => true,"process-state" => "reload-required"}}[standalone@localhost:9999 /] :reload{"outcome" => "success"}
CLI 종료
CLI를 종료하려면 Ctrl+D 나 quit(혹은 q)를 입력한다.
비대화형 모드에서는 지정된 명령을 실행한 후 자동으로 종료한다.
CLI 명령어
CLI의 명령은 크게 관리 자원의 오퍼레이션 실행과 그 외의 일반 명령으로 나눌 수 있다. 관리 자원의 오퍼레이션 실행 명령과 보조 명령어로 cd, ls, pwn(pwd)등 일반 명령어가 있다.
CLI 명령어 사용법
CLI로 입력할 수 있는 명령어는 CLI 공통 명령어와 관리 대상 서버에 따라 사용할 수 있는 명령이 다른 명령어가 있다. 사용할 수 있는 명령의 목록은 관리 대상 서버(스탠드얼론 또는 도메인 컨트롤러)에 접속한 상태에서 help 명령을 실행하면 명령어에 대한 도움말이 출력된다.
$ ./jboss-cli.sh -c
[standalone@localhost:9999 /] help
Usage:
jboss-cli.sh/jboss-cli.bat [--help] [--version] [--controller=host:port]
{empty}[--connect] [--file=file_path]
{empty}[--commands=command_or_operation1,command_or_operation2...]
{empty}[--command=command_or_operation]
{empty}[--user=username --password=password]
{empty}[--timeout=timeout]
--help (-h) - prints (this) basic description of the command line utility.
--version - prints the version info of the JBoss AS release, JVM and system environment.
--controller - the default controller host and port to connect to when --connect option (described below) is specified or when the connect command is issued w/o the arguments. The default controller host is localhost and the port is 9999.
--connect (-c) - instructs the CLI to connect to the controller on start-up (to avoid issuing a
separate connect command later).
--gui - GUI built on top of the CLI, the only difference is that it brings up a GUI instead
of a command line. In this mode, the CLI will automatically connect during start-up.
You can optionally specify --controller, if necessary.
--file - specifies a path to a file which contains commands and operations (one per line) that
should be executed (in a non-interactive mode). The CLI will terminate the session
immediately after the last command has been executed or if some command
or operation failed.
… 생략 …
각각의 명령에 대해 명령어 파라미터에 '--help’를 지정하면 상세 정보가 표시된다.
[standalone@localhost:9999 /] command --help
SYNOPSIS
command [add --node-type=node_path_to_the_type
[--property-id=identifying_property]
--command-name=name_for_the_command |
remove --command_name=command_to_remove |
list]
DESCRIPTION
Allows to add new, remove and list existing generic type commands.
A generic type command is a command that is assigned to a specific node type
and which allows to perform any operation available for an instance of that
type and/or modify any of the properties exposed by the type on any existing
instance of that type.
For example, suppose there is a generic type command assigned to type
… 생략 …
다음은 CLI의 기본 명령어들은 다음과 같은 것이 있다.
| 명령어 | 설명 |
|---|---|
| batch | 배치 모드 시작 |
| cn (or cd) | 노드 경로를 입력하여 위치를 변경(디렉터리 변경과 유사) |
| connect | 서버 인스턴스에 접속 |
| command | 일반 명령의 추가, 삭제 |
| deploy | 애플리케이션 배포 |
| help (or h) | 도움말 표시 |
| history | 명령어 히스토리를 표시 |
| ls | 현재 노드의 자원 목록을 표시한다. 파라미터 ‘-l’을 사용하면 attribute와 child 자원이 표시된다. |
| pwn (or pwd) | 현재 노드 위치를 표시 |
| quit (or q) | CLI를 종료한다. |
| read-attribute | 노드의 속성 정보를 표시한다. |
| read-operation | 오퍼레이션의 설명 및 목록을 표시한다. |
| deploy | 애플리케이션을 배포한다. |
| version | 버전 정보를 표시한다. |
탭 자동완성
CLI 명령어 입력시 Linux의 쉘과 같이 탭 자동완성(Tab-completion)을 사용할 수 있다. 대화형 모드로 명령어나 노드 경로, 오퍼레이션, 명령어나 오퍼레이션의 파라미터 등 모든 입력에 대해서 동작한다. 대상 후보가 하나일 경우엔 자동으로 입력 문자가 채워지고, 대상 후보가 여러 개일 경우엔 리스트로 표시한다.
명령어 히스토리
Linux 쉘과 마찬가지로 CLI 는 실행한 명령어에 대한 히스토리(history) 기능을 제공한다. 대화형 모드에서 위, 아래 화살표 키를 눌러 사용한 명령어 히스토리의 전/후를 확인하고 다시 실행하거나 편집하여 실행할 수 있다. 명령어 히스토리는 메모리와 파일에 보관하여 있어 CLI를 재 시작하더라도 명령어 히스토리를 참조할 수 있다. 히스토리가 저장되는 파일명은 사용자 홈디렉터리에 있는 ‘.jboss-cli-history’파일이다. 히스토리 기능을 변경하려면 history 명령어를 사용한다. 파라미터 없이 실행하면, 메모리상에 보관하고 있는 모든 히스토리(최댓값 500개)이 출력된다.
[standalone@localhost:9999 /] history
connect 192.168.0.11:10099
connect localhost:9999
connect
cd /core-service=management
ls
exit
command --help
history
(The history is currently enabled)
[standalone@localhost:9999 /]
history 명령어는 아래와 같은 3개의 파라미터를 사용할 수 있다.
- disable : 히스토리를 사용하지 않는다. 기존의 히스토리도 삭제한다.
- enabled : 히스토리의 기록을 사용한다.
- clear : 메모리상의 히스토리를 삭제한다. 파일의 히스토리는 삭제하지 않는다.
배치 모드
배치 모드는 명령어나 오퍼레이션들을 차례대로 일괄 실행한다. 배치 순서 내에서 명령어나 오퍼레이션 중의 하나가 실패할 경우 롤백 한다. 기본적인 이용 방법은 아래와 같다.
- batch 명령을 입력하면 배치 모드가 시작되고, 프롬프트에 ’#’가 표시된다.
- 명령어나 오퍼레이션을 입력해 배치 실행할 순서를 작성한다. 입력순서 따라 배치 순서에 추가되어 #1, #2와 같이 번호가 붙는다.
- 모든 명령어 및 오퍼레이션을 입력한 후, run-batch 명령어를 사용해 배치를 실행한다.
데이터소스 삭제와 JDBC 드라이버를 삭제하는 배치 모드 실행 예제는 다음과 같다.
$ ./jboss-cli.sh -c
[standalone@localhost:9999 /] batch
[standalone@localhost:9999 / #] /subsystem=datasources/data-source=ExampleDS/:remove
#1 /subsystem=datasources/data-source=ExampleDS:remove
[standalone@localhost:9999 / #] /subsystem=datasources/jdbc-driver=h2/:remove
#2 /subsystem=datasources/jdbc-driver=h2:remove
[standalone@localhost:9999 / #] run-batch
The batch executed successfully
[standalone@localhost:9999 /]
배치 모드에서 자원을 추가하면, 현재 실행중인 배치 내에서는 추가한 자원에 cd명령으로 이동할 수 없으므로 주의하여 작성하여야 한다.
CLI 오퍼레이션
관리 자원에 대한 오퍼레이션 실행은 주소(node_path), 오퍼레이션 이름(operation_name)과 파라미터 리스트(parameter_list)의 3개 요소로 구성된다. CLI 명령어의 오퍼레이션 형식은 아래와 같다.
[node_path]:opration_name[parameter_list]
| 항목 | 설명 |
|---|---|
| 주소(node_path) | 주소 형식은 아래와 같다. /node-type=node-name(/node-type=node-name)* * node-type:resource node 타입 * node-name:resource node명 node-type=node-name로 트리 구조의 하나의 노드를 나타낸다. 루트 자원은 ‘/’만으로 표시한다. 또, 트리 구조의 각 노드를 ‘/’로 구분하여, 트리 구조의 각 레벨을 나타낸다. |
| 오퍼레이션 이름 (operation_name) | 오퍼레이션 이름의 형식은 아래와 같다. 오퍼레이션 이름 앞에 오퍼레이션을 나타내는 ‘:’을 지정한다. 오퍼레이션 이름은 주소로 지정된 노드 자원이 가지는 오퍼레이션을 지정한다. :operation_name |
| 오퍼레이션 파라미터 리스트 (parameter_list) | 오퍼레이션 이름으로 지정한 오퍼레이션 파라미터를 지정한다. ([parameter-name=parameter-value(parameter-name=parameter-value)*]) * parameter-name:오퍼레이션 파라미터 이름 * parameter-value:파라미터 설정 값 |
주소 이동
CLI에서 관리 자원 노드들은 트리 형식으로 마치 파일 시스템과 같다. 각 노드의 패스는 디렉터리와 같다. 노드에 접근하려면, cd명령으로 현재 노드를 변경하는 것으로 상대 경로나 절대 경로를 사용하여 이동할 수 있다.
상대 경로로 접근할 때는, 파일 시스템과 같이 ‘. ‘는 현재 노드를, ‘..’은 부모 노드를 나타낸다.
또, pwn(pwd) 명령은 현재 노드의 경로 주소를 표시하고, ls명령으로 노드의 속성(attirbute)과 자식 자원(children-types)의 형태를 표시한다.
-
pwd명령어 실행 예
[standalone@localhost:9999 subsystem=web] pwd/subsystem=web[standalone@localhost:9999 subsystem=web] -
ls명령어 실행 예
[standalone@localhost:9999 subsystem=web] lsconfiguration default-virtual-server=default-hostconnector instance-id=undefinedvalve native=falsevirtual-server[standalone@localhost:9999 subsystem=web] -
ls -l 명령어 실행
ls 명령에 파라미터 ‘-l’를 붙여서 노드의 속성(attirbute)과 자식 자원(children-types)의 형태를 상세하 표시할 수 있다.
[standalone@localhost:9999 subsystem=web] ls -lATTRIBUTE VALUE TYPEdefault-virtual-server default-host STRINGinstance-id undefined STRINGnative false BOOLEANCHILD MIN-OCCURS MAX-OCCURSconfiguration n/a n/aconnector n/a n/avalve n/a n/avirtual-server n/a n/a[standalone@localhost:9999 subsystem=web]
오퍼레이션
오퍼레이션의 타입은 모든 노드에 대해서 실행 가능한 공통 오퍼레이션과 특정 노드에 대해서만 실행 가능한 고유 오퍼레이션으로 나뉜다.
| 오퍼레이션 | 설명 | 파라미터 |
|---|
./<resource type>=<신규 자원명>:add
| add | 새로운 자원을 추가한다. 사용법은 다음과 같이 자원의 유형과 이름을 입력하고 :add 오퍼레이션을 지정한다. | 추가하는 자원에 따라 파라미터가 달라진다. | | read-attribute | 속성값을 표시한다. | * name: 속성명(필수) * include-defaults: 기본값 false. true로 설정하면 속성의 기본값을 표시한다. + | | read-children-names | 지정된 타입의 자식 자원명을 표시한다. | * child-type: 자식 자원의 resource type를 지정(필수) + | | read-children-resources | 지정된 타입의 모든 자식 자원 정보를 표시> 표시 내용은 자식 자원은 각각에서 read-resource 오퍼레이터를 실행한 것과 같다. | * child-type: 자식 자원의 resource type를 지정(필수) * recursive: 기본값 false, 재귀적으로 자식 자원에 관한 상세 정보를 표시할지 설정 * recursive depth: recursive가 true일 경우, 재귀적으로 표시하는 깊이를 지정 * proxies: 기본값 false, 재귀적인 호출 시 원격 자원을 포함할지 지정 * include-runtime: 기본값 false, 런타임 속성을 포함할 것인지 지정. 부하가 발생할 가능성이 있기 때문에, recursive가 true일 경우는 무시됨 * include-defaults: 기본값 false, 속성의 기본값을 표시할지 지정 | | read-children-types | 자식 자원의 종류를 목록으로 표시 | | | read-operation-description | 오퍼레이션이나 지정 가능한 파라미터에 대한 설명을 표시 | * name: 오퍼레이션 이름(필수) * locale: 파라미터 설명의 로케일을 지정. null이면 기본 로케일 | | read-operation-names | 자원이 지원하는 오퍼레이션 이름들을 출력 | | | read-resource | 자원이 지원하는 속성이나 자식 자원의 목록을 표시 | * recursive: 기본값 false, 재귀적으로 자식 자원에 관한 상세한 정보를 표시할 지 설정 * recursive depth : recursive가 true일 경우, 재귀적으로 표시하는 깊이를 지정 * proxies: 기본값 false, 재귀적인 호출 시에 원격 자원을 포함할 것인지 지정 * include-runtime: 기본값 false, 런타임 속성을 포함할 것인지 지정. 부하가 발생할 가능성이 있기 때문에, recursive가 true일 경우는 무시됨 * include-defaults: 기본값 false, 속성의 기본값을 표시할지 지정 | | read-resource-description | 자원이 지원하는 속성이나 자식 자원, 오퍼레이션의 상세 설명을 표시한다 | * operations:기본값 false, 오퍼레이션의 설명을 포함할지 지정 * inherited: 기본값 true, 부모 자원으로부터 상속한 오퍼레이션의 설명을 포함할 것인지 지정 * recursive: 기본값 false, 재귀적으로 자식 자원에 관한 상세한 정보를 표시할지 설정 * recursive depth: recursive가 true일 경우, 재귀적으로 표시하는 깊이를 지정 * proxies: 기본값 false, 재귀적인 호출 시에 원격 자원을 포함할지 지정 * locale: 오퍼레이션 상세 설명의 로케일을 지정. null이면 기본 로케일을 사용함 | | remove | 자원을 삭제 | | | write-attribute | 속성 값을 기록한다 | |
대상 노드에서 사용할 수 있는 고유 오퍼레이션은 ‘:read-operation-names’ 오퍼레이션을 실행하여 확인할 수 있다. 다음은 datasource 자원의 오퍼레이션 목록을 확인하는 예제이다.
[standalone@localhost:9999 /] /subsystem=datasources:read-operation-names
{
  "outcome" => "success",
  "result" => [
    "add",
    "get-installed-driver",
    "installed-drivers-list",
    "read-attribute",
    "read-children-names",
    "read-children-resources",
    "read-children-types",
    "read-operation-description",
    "read-operation-names",
    "read-resource",
    "read-resource-description",
    "remove",
    "undefine-attribute",
    "whoami",
    "write-attribute"
  ]
}

[standalone@localhost:9999 /]
datasource 자원에서 ‘get-installed-driver’, ‘installed-drivers-list’라는 2개의 추가 오퍼레이션을 제공하고 있는 것을 확인할 수 있다.
추가된 오퍼레이션에 대한 보다 자세한 정보는 ‘read-operation-description’ 명령으로 확인할 수 있다.
[standalone@localhost:9999 core-service=management] /subsystem=datasources:read-operation-description(name=get-installed-driver)
{
  "outcome" => "success",
  "result" => {
    "operation-name" => "get-installed-driver",
    "description" => "Get a description of an installed driver",
    "request-properties" => {"driver-name" => {
      "type" => STRING,
      "description" => "Driver name",
      "expressions-allowed" => false,
      "required" => true,
      "nillable" => false,
      "min-length" => 1L,
      "max-length" => 2147483647L
    }},
    "reply-properties" => { [standalone@localhost:9999 /]
    "type" => OBJECT,
    "value-type" => {
    "driver-minor-version" => {
      "type" => INT,
      "description" => "Minor driver version",
      "expressions-allowed" => true,
      "required" => false,
      "nillable" => true
    },

… 생략 …
자원 추가
CLI로 add 오퍼레이션을 사용하여 자원을 추가하는 순서를 설명한다.
/subsystem=datasources 하위에 있는 리소스 타입이 data-source인 자원을 추가하는 예제를 설명한다.
-
필수 파라미터 확인
자원을 추가할 때를 먼저 필수 파라미터가 있는지 확인해야 한다. 필수 파라미터는 자원의 종류에 따라 달라서 CLI를 사용하여 확인하는 것이 좋다.
read-operation-description 오퍼레이션을 사용해 확인할 수 있다.
우선 이미 존재하는 자원의 노드에서 read-operation-description(name=add)를 실행하면, 자원을 추가하는 경우 필요한 파라미터 목록과 그 설명이 표시된다. 그 속성 중에서 required라는 항목이 있으면, 필수 파라미터로 지정하여야 한다.
[standalone@localhost:9999 /] /subsystem=datasources/data-source=ExampleDS:read-operation-description(name=add){"outcome" => "success","result" => {"operation-name" => "add","description" => "Add a new data-source","request-properties" => {"share-prepared-statements" => {"type" => BOOLEAN,… 생략 …"jndi-name" => {"type" => STRING,"description" => "Specifies the JNDI name for the datasource","expressions-allowed" => true,"required" => true,"nillable" => false},… 생략 …"driver-name" => {"type" => STRING,"description" => "Defines the JDBC driver the datasource should use. It is a symbolic name matching the the name of installed driver. In case the driver is deployed as jar, the name is the name of deployment unit","expressions-allowed" => true,"required" => true,"nillable" => false,"min-length" => 1L,"max-length" => 2147483647L},… 생략 …"connection-url" => \{"type" => STRING,"description" => "The JDBC driver connection URL","expressions-allowed" => true,"required" => true,"nillable" => false,"min-length" => 1L,"max-length" => 2147483647L},필수 파라미터 확인 방법으로 /subsystem=datasources 하위 노드에 data-source의 자원을 추가하려면, 필수 파라미터로 connection-url, jndi-name, driver-name를 지정하여야 한다는 것을 알 수 있다.
-
자원 추가
위에서 확인한 필수 파라미터들을 설정하여 자원을 추가하려면 아래와 같이 resource type과 이름을 지정한 후, add 오퍼레이션을 실행한다.
[standalone@localhost:9999 /] /subsystem=datasources/data-source=NewDS:add(connection-url="jdbc:h2:mem:test;DB_CLOSE_DELAY=-1", jndi-name=java:jboss/datasources/NewDS, driver-name=h2){"outcome" => "success"} -
리로드
CLI로 add나 remove, write-attibuten등 수정하는 오퍼레이션을 실행하면, process-state 속성에 ‘reload-required’가 반환되는 경우가 있다. 이 경우 설정 내용이 반영되기 위해서는 루트에서 reload 오퍼레이션을 실행해야 한다.
{"outcome" => "success","response-headers" => {"operation-requires-reload" => true,"process-state" => "reload-required"}}
리로드의 실행 방법은 다음과 같다.
[standalone@localhost:9999 /] /:reload
{"outcome" => "success"}
리로드를 실행하면, 서비스가 재 시작되기 때문에 운영환경에서는 서비스의 영향을 고려하여 명령을 실행하여야 한다.
CLI 일반 명령어
일반 명령어는 특정 resource type에 대한 오퍼레이션을 간략하게 실행하기 위한 간단 명령어이다. 일반 명령어를 사용하면 자원 경로에 신경 쓰지 않고 특정의 resource type로 실행 가능한 공통 오퍼레이션의 일부(add, remove, read-resource, write-attribute)나 자원 고유의 오퍼레이션을 실행할 수 있다.
일반 명령어는 다음과 같은 것들이 있다.
| 명령어 | 해당 리소스 타입 | 설명 |
|---|---|---|
| data-source | /subsystem=datasources/data-source | * Non-XA데이터소스 생성 * 데이터베이스 접속 테스트 * 데이터소스 삭제 가능. |
| xa-data-source | /subsystem=datasources/xa-data-source | * XA데이터소스의 생성 * XA데이터베이스 접속 테스트 * XA데이터소스의 삭제 등이 가능. |
| jms-queue | /subsystem=messaging/hornetq-server=default/ | * JMS 큐 생성 * JMS 큐 삭제 등이 가능 |
| jms-topic | jms-queue | * JMS토픽 생성 * JMS 토픽 삭제등이 가능 |
| connection-factory | /subsystem=messaging/hornetq-server=default/ | * JMS Connection 팩토리 생성 * JMS Connection 팩토리 삭제 등이 가능 |
일반 명령어를 실행하려면 다음과 같은 항목들을 지정한다.
<generic_command>: 일반 명령어 이름 지정<sub_command>:write-attribute이외의 오퍼레이션 이름을 지정<property-id>: 대상의 자원을 식별하기 위한 ID를 지정<property>: 대상이 되는 자원이 가지는 속성(attribute) 명을 지정<parameter>: 오퍼레이션의 파라미터 명을 지정
일반 명령어는 오퍼레이션의 write-attribute를 실행하는 경우와 파라미터 이름이 약간 다를 수 있다. 도메인 모드에서는 --profile으로 프로파일을 지정하여야 한다.
- 오퍼레이션
write-attribute를 실행하는 경우<generic_command>(--profile=<프로파일명>)domain <property-id>=<인스턴스명>(--<property>=<설정값>)
여러 개 항목을 지정하는 경우는 공백으로 구분하여 항목을 지정한다.
- 그 외의 오퍼레이션을 실행하는 경우
<generic_command> <sub_command> (--profile=<프로파일명>) domain <property-id>=<인스턴스명> (--<parameter>=<설정값>)
일반 명령어의 사용 방법은 아래와 같이 --help 도움말 옵션을 사용하여 확인할 수 있다.
-
<generic_command>의 설명을 표시<generic_command> --help -
<sub_command>의 목록을 출력<generic_command> --help --commands -
<sub_command>의 상세 설명을 표시<generic_command> <sub_command> --help<sub_command>지정한 오퍼레이션의 상세 설명을 표시한다.지정한 오퍼레이션의 설명이나
<parameter>로 지정 가능한 항목을 필수 파라미터(REQUIRED), 추가로 지정할 수 있는 파라미터(OPTIONAL)로 표시한다. -
<property>의 목록과 설명을 표시<generic_command> --help --properties<property>로 지정 가능한 속성(attribute) 의 목록과 그 설명을 표시한다.실제로 일반 명령어
data-source를 사용하여 자원 추가, 설정 변경, 설정 확인, 자원을 삭제하는 예제를 살펴보자. -
자원 추가
[standalone@localhost:9999 /] data-source add --name=testDS --connection-url="jdbc:h2:mem:test;DB_CLOSE_DELAY=-1" --jndi-name=java:jboss/datasources/testDS --driver-name=h2
resource type/subsystem=datasources/data-source의 자원을 추가한다. <property-id> name의 경우는 인스턴스 이름으로 자원의 이름을 지정한다. 또, 자원추가 시 필수 파라미터인 connection-url, jndi-name, driver-name를 <parameter>로 지정한다.
위의 예제를 오퍼레이션으로 실행하면 아래와 같다.
- 설정 변경
[standalone@localhost:9999 /] data-source --name=testDS --user-name=sa --password=sa
[standalone@localhost:9999 /]
<property-id>의 name으로 지정한 자원 <property>인 user-name과 password의 설정을 변경한다. 위 예제를 오퍼레이션으로 실행하면 아래와 같다.
[standalone@localhost:9999 /] cd /subsystem=datasources/data-source=testDS
[standalone@localhost:9999 data-source=testDS] :write-attribute(name=user-name, value=sa)
{"outcome" => "success"}
[standalone@localhost:9999 data-source=testDS] :write-attribute(name=password,value=sa)
{"outcome" => "success"}
- 설정 확인
[standalone@localhost:9999 data-source=testDS] data-source read-resource --name=testDS
allocation-retry=n/a
allocation-retry-wait-millis=n/a
allow-multiple-users=false
background-validation=n/a
background-validation-millis=n/a
blocking-timeout-wait-millis=n/a
check-valid-connection-sql=n/a
connection-properties=n/a
connection-url=jdbc:h2:mem:test;DB_CLOSE_DELAY=-1
datasource-class=n/a
password=sa
user-name=sa
… 생략 …
- 자원 삭제
[standalone@localhost:9999 /] data-source remove --name=testDS
도메인 모드에서 CLI 사용법
도메인 환경에서 사용되는 몇 가지 CLI 오퍼레이션에 대해 설명한다.
도메인 환경에서 어떤 자원에 대한 오퍼레이션 실행 방법이 다른 경우가 있으니 주의해야 한다.
- 서버 재시작
도메인 모드에서는 CLI를 사용하여 서버 인스턴스를 재 시작할 수 있다. CLI로 루트 자원에 이동 후 모든 서버를 재 시작한다.
[domain@localhost:9999 /] :restart-servers
{
  "outcome" => "success",
  "result" => undefined,
  "server-groups" => undefined
}
[domain@localhost:9999 /]
-
호스트 오퍼레이션
CLI로 host으로 이동하면 해당 호스트에 적용되는 오퍼레이션을 실행할 수 있다. 호스트를 shutdown하는 방법은 아래와 같다.
[domain@localhost:9999 /] cd host=master[domain@localhost:9999 host=master] :shutdown{"outcome" => "success"}[domain@localhost:9999 host=master]The connection to the controller has been closed as the result of the shutdown operation.(Although the command prompt will wrongly indicate connection until the next line is entered) -
서버 그룹의 오퍼레이션 CLI로 server-group에 이동한 후, 오퍼레이션을 실행하여 해당 서버 그룹의 서버를 시작하거나 정지할 수 있다.
[domain@localhost:9999 /] cd /server-group=main-server-group[domain@localhost:9999 server-group=main-server-group] :start-servers{"outcome" => "success","result" => undefined,"server-groups" => undefined}
배치 모드 사용법
배치모드 명령어
배치 모드를 시작하도록 batch 명령을 실행
[standalone@localhost:9999 data-source=PostgreDS] batch
[standalone@localhost:9999 data-source=PostgreDS #]
데이터소스를 enable에 배치 등록
[standalone@localhost:9999 data-source=PostgreDS #] /subsystem=datasources/data-source="java\:\jboss\/datasource\/PostgreDS":enable
#1 /subsystem=datasources/data-source=java:jboss/datasource/PostgreDS:\jboss\/ datasource\/PostgreDS": enable
배치 실행
[standalone @ localhost : 9999 data-source = PostgreDS #] run-batch
배치 목록을 표시한다.
[standalone@localhost:9999 data-source=PostgreDS #] list-batch
# 1 /subsystem=datasources/data-source=java:jboss/datasource/PostgreDS:jboss\/datasource\/PostgreDS": enable
배치 행을 삭제한다
[standalone@localhost:9999 data-source=PostgreDS #] remove-batch-line 1
[standalone@localhost:9999 data-source=PostgreDS #] remove-batch-line 2
일괄 처리를 실행한다.
[standalone@localhost:9999 data-source=PostgreDS #] run-batch
The batch executed successfully.
등록 된 일괄 처리를 취소한다
[standalone@localhost:9999 data-source=PostgreDS #] clear-batch
[standalone@localhost:9999 data-source=PostgreDS #]
배치 파일 모드
test.cli라는 명령 파일을 준비한다. 대화식 모드에서 사용하는 기본 명령을 사용한다.
connect
ls
[EOF]
다음과 같이 test.cli 파일을 파라미터로 명령을 실행한다.
$ jboss-cli.sh --file=test.cli
core-service
deployment
deployment-overlay
extension
interface
path
socket-binding-group
subsystem
system-property
… 생략…
매개 변수로 명령을 실행하는 방법
다음과 같이 --commands 파라미터에 명령을 컴마로 구분하여 작성하면 순서대로 실행된다.
$ jboss-cli.sh -c --commands="cd subsystem=web, ls"
configuration
connector
virtual-server
default-virtual-server = default-host
instance-id = undefined
native = false
자주 쓰는 기능들
다음의 몇가지 CLI 명령들은 서버 운영시 자주 사용되는 명령어들이다. 아래 CLI 명령을 쉘 스크립트로 작성해 놓으면 편리하게 사용할 수 있다.
- 서버 중지
$JBOSS_HOME/bin/jboss-cli.sh -c --command=":shutdown"
- 배포
$JBOSS_HOME/bin/jboss-cli.sh -c --command="deploy postgresql-8.4-703.jdbc4.jar"
- Undeploy
$JBOSS_HOME/bin/jboss-cli.sh -c --command="undeploy postgresql-8.4-703.jdbc4.jar"
- 커넥션 풀의 상태 얻기
$JBOSS_HOME/bin/jboss-cli.sh -c --command="connect /subsystem=datasources/data-source=PostgreDS/statistics=pool:read-resource(include-runtime=true)"
CLI GUI 모드
CLI를 GUI화면에서 사용할 수 있다. --gui 파라미터를 사용하여 실행하면 다음과 같은 화면이 표시된다.
$JBOSS_HOME/bin/jboss-cli.sh --gui
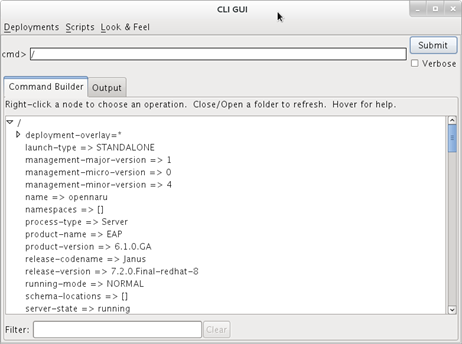
그림 7. JBoss CLI GUI 모드 화면
속성들이 트리 형태로 표시되어 마치 파일 시스템을 탐색하는 것처럼 마우스를 클릭하여 원하는 노드로 찾아갈 수 있다. 또, 원하는 노드를 선택 후 마우스 오른쪽 버튼을 클릭하면 해당 노드에서 사용할 수 있는 오퍼레이션들이 메뉴로 출력된다. 오퍼레이션을 선택하면 ‘cmd>’에 명령이 자동으로 입력된다. 즉, GUI에서 CLI 명령을 손쉽게 만들 수 있다. CLI에 익숙하지 않은 초심자에게는 CLI 명령을 익히는 데 도움이 될 것이다.