시스템 에이전트 설치
시스템 에이전트 다운로드
클라우드 전용 Cloud APM > 에이전트 설치 안내 > SYS AGENT 탭
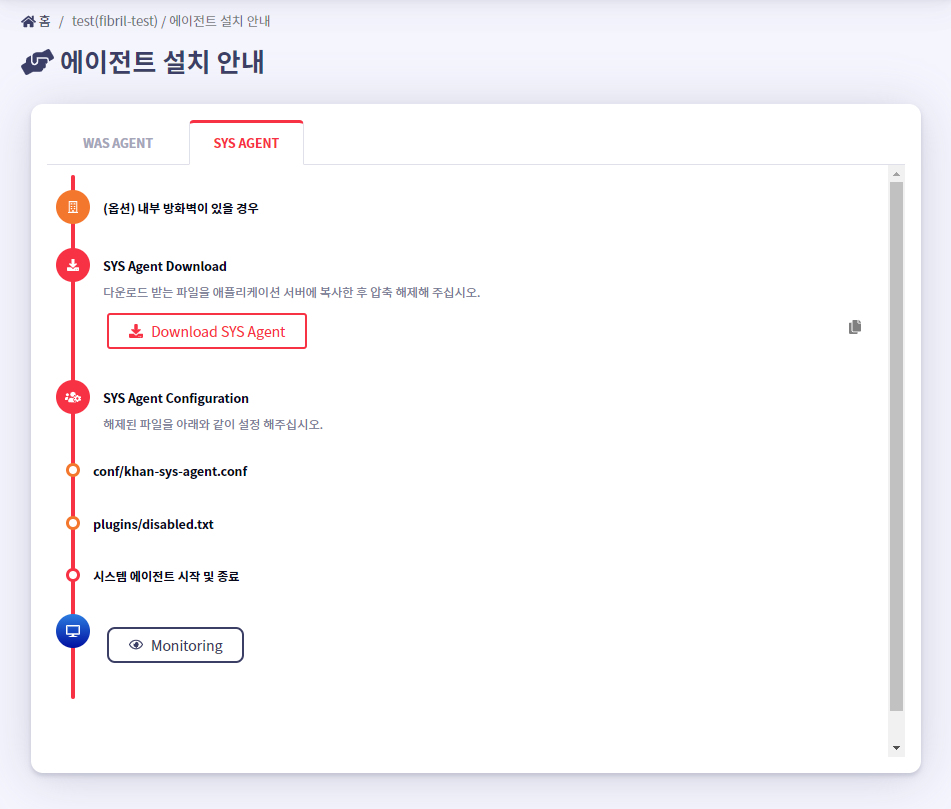
에이전트 설치 안내 > SYS AGENT를 선택하면 아래와 같이, Download SYS Agent를 클릭 할 수 있는 페이지가 출력된다.
설치형 전용 설정 > 리소스
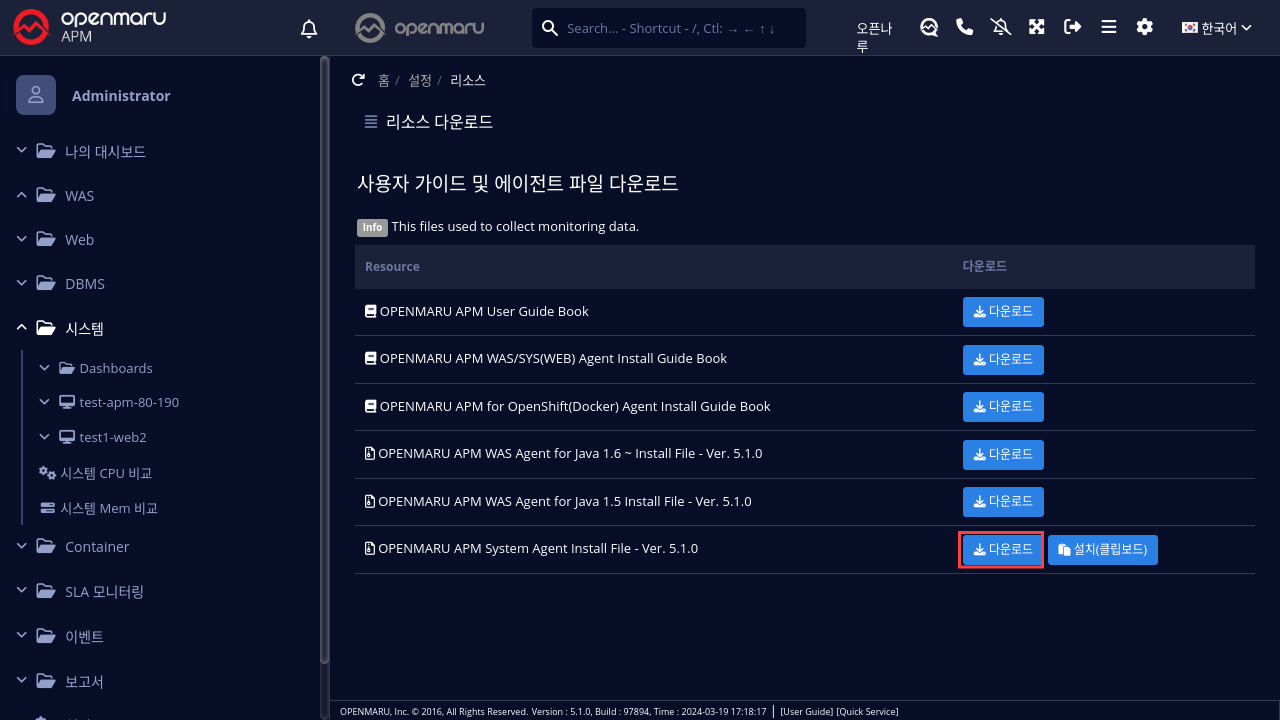
시스템 에이전트를 설치하기 위한 파일을 다운로드 한다.
"다운로드" 버튼에 오른쪽 마우스 버튼을 이용해 "링크 주소 복사"를 클릭한다.
Linux 운영체제를 사용하는 경우 아래와 같이 wget 명령을 사용하여 직접 다운로드 할 수 있다.
- 시스템 에이전트 다운로드
$ wget https://cloud.openmaru.io/api/v1/projects/[Project-ID]/download/sys-agent.zip
시스템 에이전트 설치
- 파일 압축해제
$ unzip sys-agent.zip
- 에이전트 설정 변경
$ cd khan-sys-agent
$ vi conf/khan-sys-agent.conf
- khan-sys-agent.conf
khan.host=cDIwMjEwODAwMDYuYXBtLmEtYXBuZTIub3Blbm1hcnUuaW8=
khan.port=443

# specify this machine's ip address, only valid ip address of this machine can be used.
#khan.agent.ip=192.168.10.11

# agent's compression algorithm : snappy(default), lzw
#agent.compress.type=lzw

# Gathering netstat info : true(default)
#khan.netstat=false

# include network interface
# configuration sample for openshift
#khan.network.interfaces=eth0,eth1,ens192,lo,tun0,vxlan_sys_4789
# configuration sample for kubernetes
#khan.network.interfaces=eth0,eth1,ens192,lo,tun0,kube-ipvs0,vxlan.calico,nodelocaldns

# include disk mount
# configuration sample for openshift
#khan.disk.mounts=/,/home,/data,/var/lib/docker/containers,C,D

# Allow command list
#khan.allow.commands=service,systemctl

# Memory sigar supported OS vendor version : Enterprise Linux 5,5,Enterprise Linux 6,6(default) startsWith
#khan.memory.sigar.supported.os.vendor.versions=Enterprise Linux 5,5,Enterprise Linux 6,6
khan-sys-agent.conf 파일의 설정
khan-sys-agent.conf 파일의 설정값들은 다음과 같다.
| 설정항목(환경 변수) | 설명 | 기본값 |
|---|---|---|
khan.host (OMAPM_HOST) | OPENMARU APM 서버의 IP 를 입력한다. 또는 도메인을 입력 하는 경우 http:// or ws:// (tls 의 경우 https:// or wss://) | |
| khan.port (OMAPM_PORT) | OPENMARU APM 서버의 포트 번호를 입력합니다. | |
| khan.tls (OMAPM_TLS) | TLS 활성화 여부 | false |
| khan.default.network.name (OMAPM_DEFAULT_NETWORK_NAME) | 기본 네트워크 카드 지정 ex) eth0 | |
| agent.compress.type (OMAPM_AGENT_COMPRESS_TYPE) | 암호화 알고리즘 | snappy |
| khan.netstat (OMAPM_NETSTAT) | 네트워크 모니터링 여부(netstat) | true |
| khan.network.interfaces (OMAPM_NETWORK_INTERFACES) | 설정된 네트워크 인터페이스만 모니터링 ex) eth0,eth1,ens192,lo,tun0,vxlan_sys_4789 | 모든 인터페이스 |
| khan.disk.mounts (OMAPM_DISK_MOUNTS) | 설정된 마운트 디스크만 모니터링 ex) /,/home,/data,/var/lib/docker/containers,C,D | |
| khan.allow.commands (OMAPM_ALLOW_COMMANDS) | 에이전트에서 실행 명어를 제한 ex) service,systemctl | |
| OMAPM_NAME | SYS 에이전트 이름 한 머신에 2개 이상의 에이전트를 설치 할 경우 구분 (Openmaru SYS Container 이미지에만 해당) |
시스템 에이전트의 플러그인 설정
시스템 에이전트는 플러그인을 사용하여 기능을 확장할 수 있다.
현재 APM에서 제공하는 플러그인은 Apache 모니터링 플러그인, nginx 모니터링 플러그인, cubrid 모니터링 플러그인, Docker 컨테이너 모니터링 플러그인, CRI-O 컨테이너 모니터링 플러그인이 있다.
plugins 디렉토리에 disabled.txt 설정 후 시스템 에이전트를 시작하면 플러그인 모듈이 구동된다.
플러그인 Enable 설정
플러그인을 사용하도록 설정하려면 plugins/disabled.txt 파일에 아래와 같이 설정하여 사용할 플러그인을 설정할 수 있다.
- plugins/disabled.txt 파일
#
# name to disable plugin
#

khan-plugin-apache
khan-plugin-nginx
khan-plugin-docker
khan-plugin-crio
khan-plugin-containerd
khan-plugin-cubrid
khan-plugin-mysql
- khan-plugin-apache와 khan-plugin-docker 플러그인을 사용하도록 설정
#
# name to disable plugin
#

#khan-plugin-apache
khan-plugin-nginx
#khan-plugin-docker
khan-plugin-crio
khan-plugin-containerd
khan-plugin-cubrid
khan-plugin-mysql
plugins 디렉토리에 플러그인 zip 파일을 복사해 놓고, 시스템 에이전트를 시작하면 플러그인 모듈이 구동됩니다. 이때, zip 파일의 압축을 풀어 디렉토리가 만들어 진다.
Apache 플러그인 설정
Apache 플러그인의 설정은 plugins/khan-plugin-apache-5.1.0/conf 아래에 있는 config.properties파일을 사용하게 된다.
플러그인 Upgrade등으로 설정파일이 변경될 수 있기 때문에, plugins/khan-plugin-apache.conf 디렉토리에 config.properties 파일에 설정하면 플러그인 파일과 설정파일을 분리하여 사용할 수 있다.
- config.properties 설정파일 내용
instance=apache
host=localhost
port=80
username=
password=
infoUrlPath=/server-info?server
statusUrlPath=/status?auto
jkStatusUrlPath=/jkstatus
modClusterManagerUrlPath=/mod_cluster_manager

maxConnections=1
maxConnectionsPerHost=1
maxConnectionsPerRoute=1
waitIdleCheck=60000
waitIdleClose=120
requestTimeout=1000
sessionTimeout=1000

## "key":"log directory path":"http status code index" - split with whitespaces, ex) homepage:/data/logs/homepage:8
#http.status.code.log.dir=homepage:/data/logs/homepage:8,admin:/data/logs/admin:8
#http.status.code.log.exclude.url.patterns=\\*/,/status,/server-info,/jkstatus,/mod_cluster_manager
#http.status.code.log.exclude.file.patterns=^httpd.log$,.*mod_jk.*,.*modjk.*,.*error_log.*,.*modcluster.*
| 설정항목 | 설명 | 기본값 |
|---|---|---|
| instance | OPENMARU APM에 표시될 아파치 인스턴스 이름 | apache |
| host | 정보를 수집할 Apache 서버의 Host명, localhost를 사용하는 것이 유리함 | localhost |
| port | 정보를 수집할 Apache 서버의 포트번호 | 80 |
| username | 현재 사용안함 | |
| password | 현재 사용안함 | |
| infoUrlPath | Apache의 mod_info가 설정된 URL localhost에서 접속할 수 있도록 설정한다. https://httpd.apache.org/docs/2.4/ko/mod/mod_info.html | |
| statusUrlPath | Apache의 mod_status가 설정된 URL localhost에서 접속할 수 있도록 설정한다. https://httpd.apache.org/docs/2.4/ko/mod/mod_status.html | |
| jkStatusUrlPath | Apache jkstatus 페이지 URL을 입력한다. | /jkstatus |
| modClusterManagerUrlPath | Apache mod cluster manager 접속 페이지 URL을 입력한다. | /mod_cluster_manager |
| maxConnections | 아파치 정보를 수집하기 위한 최대 연결 수, 1개면 충분함 | |
| maxConnectionsPerHost | 아파치 정보를 수집하기 위한 연결 수 | |
| maxConnectionsPerRoute | 아파치 정보를 수집하기 위한 연결 수 | |
| waitIdleCheck | Idle 체크 대기 시간 | |
| waitIdleClose | Idle Close 대기 시간 | |
| requestTimeout | 요청에 응답이 없을 경우 Timeout | |
| sessionTimeout | 세션 Timeout | |
| http.status.code.log.dir | HTTP 응답코드 모니��터링 설정 | homepage:/data/logs/homepage:8 console에 표시될 서비스명:Web 서버 log디렉터리 경로:응답코드 위치(공백 기준) |
| http.status.code.log.exclude.url.patterns | 응답코드 모니터링에서 제외할 URL 패턴 지정 | |
| http.status.code.log.exclude.file.patterns | 응답코드 모니터링에서 제외할 log 파일 패턴 지정 |
APM 모니터링을 위한 Apache 설정 방법
httpd.conf 파일에 아래와 같이 /status, /server-info URL을 localhost에서 읽을 수 있도록 권한을 설정한다. 이때, ExtendedStatus를 On으로 설정하여 server-status에서 많은 정보를 얻을 수 있도록 한다.
#
# ExtendedStatus controls whether Apache will generate "full" status
# information (ExtendedStatus On) or just basic information (ExtendedStatus
# Off) when the "server-status" handler is called. The default is Off.
#
ExtendedStatus On

#
# Allow server status reports generated by mod_status,
# with the URL of http://servername/server-status
# Change the ".example.com" to match your domain to enable.
#
<Location /status>
  SetHandler server-status
  Order deny,allow
  Deny from all
  Allow from localhost
</Location>

#
# Allow remote server configuration reports, with the URL of
# http://servername/server-info (requires that mod_info.c be loaded).
# Change the ".example.com" to match your domain to enable.
#
<Location /server-info>
  SetHandler server-info
  Order deny,allow
  Deny from all
  Allow from localhost
</Location>
NGINX 플러그인 설정
nginx 플러그인 설정은 plugins/khan-plugin-nginx-5.1.0/conf 아래에 있는 config.properties 파일을 사용한다. 플러그인 Upgrade등으�로 설정파일이 변경될 수 있기 때문에, plugins/khan-plugin-nginx.conf 디렉토리에 config.properties 파일에 설정하면 플러그인 파일과 설정파일을 분리하여 사용할 수 있다.
config.properties 설정파일 내용
#
# Nginx status monitoring
#

instance=nginx
host=localhost
port=80
username=
password=
statusUrlPath=/nginx_status

maxConnections=1
maxConnectionsPerHost=1
maxConnectionsPerRoute=1
waitIdleCheck=60000
waitIdleClose=120
requestTimeout=1000
sessionTimeout=1000
| 설정항목 | 설명 | 기본값 |
|---|---|---|
| instance | OPENMARU APM에 표시될 nginx 인스턴스 이름 | nginx |
| host | 정보를 수집할 nginx 서버의 Host명, localhost를 사용하는 것이 유리함 | localhost |
| port | 정보를 수집할 nginx 서버의 포트번호 | 80 |
| username | 현재 사용안함 | |
| password | 현재 사용안함 | |
| statusUrlPath | nginx의 http_stub_status_module이 설정된 URL localhost에서 접속할 수 있도록 설정한다. http://nginx.org/en/docs/http/ngx_http_stub_status_module.html | |
| maxConnections | nginx 정보를 수집하기 위한 최대 연결 수, 1개면 충분함 | 1 |
| maxConnectionsPerHost | nginx 정보를 수집하기 위한 연결 수 | |
| maxConnectionsPerRoute | nginx 정보를 수집하기 위한 연결 수 | |
| waitIdleCheck | Idle 체크 대기 시간 | |
| waitIdleClose | Idle Close 대기 시간 | |
| requestTimeout | 요청에 응답이 없을 경우 Timeout | |
| sessionTimeout | 세션 Timeout |
APM 모니터링을 위한 nginx 설정 방법
ngx_http_stub_status_module 은 기본적으로 빌드되지 않기 때문에 nginx/conf.d/default.conf 파일을 아래 내용을 추가한다.
    location /nginx_status {
    stub_status;
    allow 127.0.0.1;
    deny all;
}
HAproxy 플러그인 설정
HAproxy 플러그인 설정은 plugins/khan-plugin-haproxy-5.1.0/conf 아래에 있는 config.properties파일을 사용한다. 플러그인 Upgrade등으로 설정파일이 변경될 수 있기 때문에, plugins/khan-plugin-haproxy.conf 디렉토리에 config.properties 파일에 설정하면 플러그인 파일과 설정파일을 분리하여 사용할 수 있다.
config.properties 설정파일 내용
#
# HAProxy status monitoring
#

instance=haproxy11
host=localhost
port=9000
username=admin
password=opennaru!2
infoUrlPath=/haproxy_stats
statusUrlPath=/haproxy_stats;csv

maxConnections=1
maxConnectionsPerHost=1
maxConnectionsPerRoute=1
waitIdleCheck=60000
waitIdleClose=120
requestTimeout=1000
sessionTimeout=1000
APM 모니터링을 위한 HAProxy 설정 방법
HAProxy를 모니터링하려면, HAProxy에 statistics 페이지가 설정되어 있어야 한다.
-
중략 ... listen stats #Listen on all IP’s on port 9000 bind 0.0.0.0:9000 mode http balance timeout client 5000 timeout connect 4000 timeout server 30000
#This is the virtual URL to access the stats page stats uri /haproxy_stats
#Authentication realm. This can be set to anything. Escape space characters with a backslash. stats realm HAProxy\ Statistics
#The user/pass you want to use. Change this password! stats auth admin:openmaru
#This allows you to take down and bring up back end servers. #This will produce an error on older versions of HAProxy. stats admin if TRUE
Cubrid 플러그인 설정
cubrid 플러그인의 설정은 plugins/khan-plugin-cubrid-5.1.0/conf 아래에 있는 config.properties 파일을 사용하게 된다. 플러그인 Upgrade등으로 설정파일이 변경될 수 있기 때문에, plugins/khan-plugin-cubrid.conf 디렉토리에 config.properties 파일에 설정하면 플러그인 파일과 설정파일을 분리하여 사용할 수 있다.
config.properties 설정파일 내용
#
# Cubrid status monitoring
#

# cubrid server home directory
# if cubridHome is empty then check environment variable 'CUBRID'
cubridHome=

# comma separated broker names to exclude gather stats
excludedBrokers=query_editor
| 설정항목 | 설명 | 기본값 |
|---|---|---|
| cubridHome | cubrid의 홈 디렉토리 경로를 입력한다. | |
| excludeBrokers | 상태 수집에서 제외하고자 하는 Broker의 이름을 입력한다. |
APM 모니터링을 위한 Cubrid 설정 방법
cubrid 홈 디렉토리에 conf/cm.conf support_mon_statistic를 YES로 수정하여 데이터 베이스의 리소스 모니터링을 활성화 한다.
~
# support monitoring statistic (YES/NO), default NO
# If you want to use the advanced monitoring feature on CUBRID Manager,
# you should set this value to YES.

support_mon_statistic=YES
~
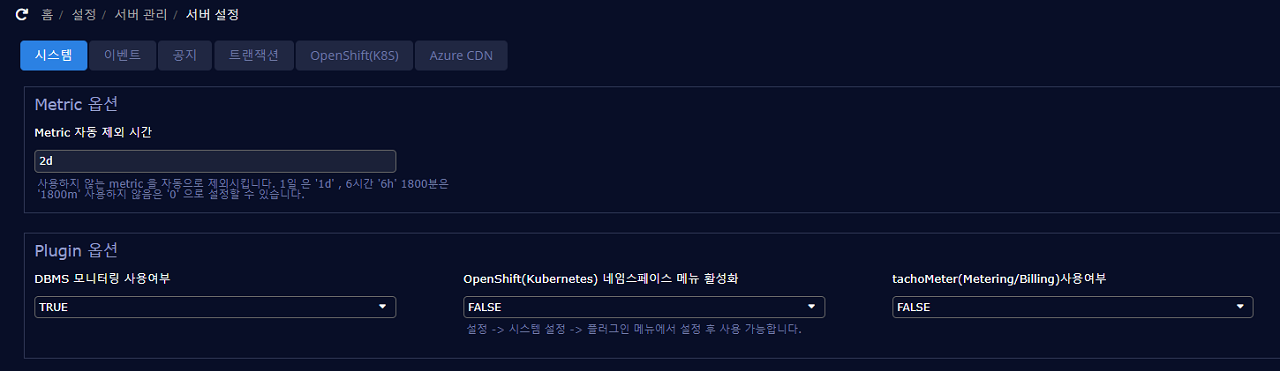
APM DASHBOARD 설정
APM dashborad 홈 설정 > 서버 관리 > 서버 설정 > 시스템 에서 Plugin 옵션에 DBMS 모니터링 사용여부를 TRUE로 설정 후 SAVE 한다.
Docker 플러그인 설정
Docker 플러그인의 설정은 plugins/khan-plugin-docker-5.1.0/conf 아래에 있는 config.properties파일을 사용하게 된다.
플러그인 Upgrade등으로 설정파일이 변경될 수 있기 때문에, plugins/khan-plugin-docker.conf 디렉토리에 config.properties 파일에 설정하면 플러그�인 파일과 설정파일을 분리하여 사용할 수 있다.
config.properties 설정파일 내용
#
# Docker status monitoring
#

# Add docker remote api options in /etc/sysconfig/docker file.
# OPTIONS='...', -H tcp://0.0.0.0:4243 or -H tcp://127.0.0.1:4243
#docker.host=localhost
#docker.port=4243

# docker daemon connect type : sock or net
# Must use sock in Openshift
docker.connect.type=sock

docker.sock=/var/run/docker.sock

# docker's cgroup driver type : cgroup or systemd
# Openshift 3.6 use systemd type, below Openshift 3.5 use cgroup type
docker.cgroup.driver.type=systemd
#docker.cgroup.driver.type=cgroup


# connect timeout in millisecond
docker.connectTimeout=5000

# read timeout in millisecond
docker.readTimeout=2000
| 설정항목 | 설명 | 기본값 |
|---|---|---|
| docker.host | docker 데몬의 호스트이름이나 IP를 입력한다. | localhost |
| docker.port | docker 데몬의 포트 번호를 입력한다. | 4342 |
| docker.connect.type | Docker Engine이 생성하는 Socket File을 사용할 것인지, HTTP를 이용하여 Docker Engine에 접근할 것인지를 지정한다. sock, net을 사용할 수 있다. Openshift에서는 반드시 sock을 사용하여야 한다. | sock |
| docker.sock | Docker Engine이 생성하는 Socket File을 지정한다. Red Hat 계열 리눅스에서는 /var/run/docker.sock 파일을 사용한다. | /var/run/docker.sock |
| docker.cgroup.driver.type | cgroup driver type을 지정한다. Openshift 3.6은 systemd 를 사용하고 Openshift 3.5는 cgroup 을 사용한다. |
CRI-O 플러그인 설정
CRI-O 플러그인의 설정은 plugins/khan-plugin-crio-5.1.0/conf 아래에 있는 config.properties파일을 사용하게 된다.
플러그인 Upgrade등으로 설정파일이 변경될 수 있기 때문에, plugins/khan-plugin-crio.conf 디렉토리에 config.properties 파일에 설정하면 플러그인 파일과 설정파일을 분리하여 사용할 수 있다.
- config.properties 설정파일 내용
#
# CRI-O Container status monitoring
#

# crio sock file location
crio.sock=/var/run/crio/crio.sock

# connect timeout in millisecond
crio.connectTimeout=5000

# read timeout in millisecond
crio.readTimeout=2000
| 설정항목 | 설명 | 기본값 |
|---|---|---|
| crio.sock | CRI-O가 생성하는 Socket File을 지정한다. Red Hat 계열 리눅스에서는 /var/run/crio.sock 파일을 사용한다. | /var/run/crio/crio.sock |
CONTAINERD 플러그인 설정
Containerd 플러그인의 설정은 plugins/khan-plugin-containerd-5.1.0/conf 아래에 있는 config.properties파일을 사용하게 된다.
플러그인 Upgrade등으로 설정파일이 변경될 수 있기 때문에, plugins/khan-plugin-crio.conf 디렉토리에 config.properties 파일에 설정하면 플러그인 파일과 설정파일을 분리하여 사용할 수 있다.
- config.properties 설정파일 내용
#
# khan-plugin-containerd
#

# containerd sock file location
containerd.sock=/var/run/containerd/containerd.sock
# connect timeout in millisecond
containerd.connectTimeout=5000
# read timeout in millisecond
containerd.readTimeout=2000
| 설정항목 | 설명 | 기본값 |
|---|---|---|
| containerd.sock | CONTAINERD가 생성하는 Socket File을 지정한다. Red Hat 계열 리눅스에서는 /var/run/containerd/containerd.sock 파일을 사용한다. | /var/run/containerd/containerd.sock |
MySQL 플러그인 설정
Containerd 플러그��인의 설정은 plugins/khan-plugin-mysql.conf 아래에 있는 config.properties파일을 사용하게 된다.
플러그인 Upgrade등으로 설정파일이 변경될 수 있기 때문에, plugins/khan-plugin-mysql.conf 디렉토리에 config.properties 파일에 설정하면 플러그인 파일과 설정파일을 분리하여 사용할 수 있다.
MySQL 플러그인에서는 Mysql, Mariadb, Percona 를 지원한다.
설정하기 전 MySQL 의 계정 생성 및 권한 할당이 필요합니다.
MySQL 5.6 또는 MySQL 5.7 경우 다음 명령을 사용하여 사용자를 만듭니다.
## 계정 생성
mysql> CREATE USER 'openmaru'@'localhost' IDENTIFIED BY '[PASSWORD]';
MySQL 8.0 이상의 경우 비밀번호 암호화 방식을 사용하여 사용자를 만듭니다.
mysql> CREATE USER 'openmaru'@'localhost' IDENTIFIED WITH mysql_native_password by '[PASSWORD]';
권한을 등록합니다.
## 실행중인 세션 리스트 조회
mysql> GRANT PROCESS,SELECT,EXECUTE ON **.** TO 'openmaru'@'localhost';
## 실행중인 세션에 대한 ��쿼리 강제 종료
mysql> grant super on **.** to 'openmaru'@'localhost';
performance_schema 가 활성화된 되지 않은 경우
mysql> SHOW VARIABLES LIKE 'performance_schema';
+--------------------+-------+
| Variable_name      | Value |
+--------------------+-------+
| performance_schema | ON    |
+--------------------+-------+

mysql> GRANT SELECT ON performance_schema.* TO 'openmaru'@'localhost';
- Slow Log 모니터링 활성화
📌 NOTE
log_output 이 TABLE 일때만 사용 가능
mysql> show global variables where VARIABLE_NAME in ('slow_query_log', 'log_output');
+--------------------+-------+
| Variable_name      | Value |
+--------------------+-------+
| slow_query_log     | ON    |
| log_output         | TABLE |
+--------------------+-------+

my.conf
[mysqld]
general_log=on
log_output='TABLE'
- config.properties 설정파일 내용
#
# khan-plugin-mysql
#

# Enable remote monitoring (default: false)
#0.remote.enabled=false
0.cluster.name=
0.instance.id=om-mariadb
#  - ex) jdbc:mariadb://localhost:3306/mysql, jdbc:mysql://localhost:3306/mysql
0.jdbc.jdbcUrl=jdbc:mariadb://192.168.23.23:3306/mysql
#  - ex) org.mariadb.jdbc.Driver, com.mysql.jdbc.Driver, com.mysql.cj.jdbc.Driver
0.jdbc.driverClassName=org.mariadb.jdbc.Driver
0.jdbc.username=root
0.jdbc.password=opennaru
0.jdbc.maximumPoolSize=10
0.jdbc.minimumIdle=0
0.jdbc.validationTimeout=5000
0.jdbc.connectionTimeout=5000
0.path.my.cnf=/etc/my.cnf
- jdbc 설정은 HikariCP 옵션을 따른다.
-
- 과 같이 숫자 접두어의 경우 N개의 MYSQL 을 모니터링 할경우 활용한다.(로컬뿐만 아니라 원격지 MYSQL 모니터링 가능)
- 0.instance.id=db1
- 0....
- 1.instance.id=db2
- 1....
| 설정항목 | 설명 | 기본값 |
|---|---|---|
| 0.cluster.name | HA 가 구성된 경우 같은 명일 경우 그룹으로 인식 | |
| 0.instance.id | 수집서버에서 구분 할 수 있는 이름 | 필수 |
| 0.jdbc.jdbcUrl | 접속 JDBC URL | 필수 |
| 0.jdbc.driverClassName | Driver Class | 필수, org.mariadb.jdbc.Driver, com.mysql.cj.jdbc.Driver |
| 0.jdbc.username | 사용자명 | 필수 |
| 0.jdbc.password | 비밀번호 | 필수 |
| 0.jdbc.maximumPoolSize | Pool 최대 사이즈 | 10 |
| 0.jdbc.minimumIdle | Pool 최소 사이즈 | 0 |
| 0.jdbc.validationTimeout | 유효성 체크 타임아웃 | 5000 |
| 0.jdbc.connectionTimeout | Pool 얻어오기전까지 기다리는 시간 | |
| 0.path.my.cnf | my.conf 설정 파일 위치 (로컬 모니터링일 경우) | /etc/my.cnf |
- JDBC 드라이버
아래 디렉토리의 드라이버 파일이 호환되지 않는 경우 교체한다.
- plugins/khan-plugin-mysql-5.1.0/lib/
- mysql-connector-java-8.0.30.jar
- mariadb-java-client-1.8.0.jar
시스템 에이전트 시작 및 종료
- 시스템 에이전트 시작
$ cd khan-sys-agent/bin
$ ./start.sh
- 시스템 에이전트 종료
$ ./kill.sh
- 시스템 에이전트 로그확인
$ ./tail.sh
2021-08-18 13:43:03 [INFO ] KhanAgentConfig.java::setPluginsStatus:371 - plugin khan-plugin-apache = status: enable
2021-08-18 13:43:03 [INFO ] KhanAgentConfig.java::setPluginsStatus:371 - plugin khan-plugin-docker = status: disable
2021-08-18 13:43:03 [INFO ] KhanAgentConfig.java::setPluginsStatus:371 - plugin khan-plugin-cubrid = status: enable
2021-08-18 13:43:03 [INFO ] KhanAgentConfig.java::setPluginsStatus:371 - plugin khan-plugin-service-checker = status: enable
2021-08-18 13:43:03 [INFO ] KhanAgentConfig.java::setPluginsStatus:371 - plugin khan-plugin-nginx = status: disable
2021-08-18 13:43:03 [INFO ] KhanAgentConfig.java::setPluginsStatus:371 - plugin khan-plugin-crio = status: disable
2021-08-18 13:43:03 [INFO ] ApacheStatusPlugin.java::start:64 - Starting Apache Plugin
2021-08-18 13:43:03 [INFO ] CubridStatusPlugin.java::start:37 - Starting Cubrid Plugin
2021-08-18 13:43:03 [INFO ] ServiceCheckerPlugin.java::start:44 - Starting Service Checker Plugin
2021-08-18 13:43:03 [INFO ] WebSocketService.java::startService:70 - Server URL : wss://p2021080005.apm.a-apne2.openmaru.io:443/monitoring/websocket
2021-08-18 13:43:03 [INFO ] WebSocketClient.java::createBootstrap:129 - Trying to connect : wss://p2021080005.apm.a-apne2.openmaru.io:443/monitoring/websocket
2021-08-18 13:43:04 [INFO ] WebSocketClient.java::operationComplete:140 - Connected.
2021-08-18 13:43:08 [INFO ] WebSocketClientHandler.java::channelRead0:115 - Successfully Connected.
시스템 에이전트 인라인 설치
여러대의 서버에 System Agent를 설치하는 경우 인라인 명령어를 통해 편리하게 설�치할 수 있다.
설정 -> 리소스 -> APM System Agent Install File - Ver.5.1.0 : "설치(클립보드)"를 클릭한다.

설치 요약
| 구분 | 설명 |
|---|---|
| 수집서버 IP | 192.168.30.6 |
| 관리 Linux 사용자 정보 | khansys(1106) / khan(1105) |
| System Agent 서버 IP | 192.168.2.9 |
| 설치 디렉토리 | /svc/test/khan-agent |
| Plugin 사용 여부 | n,n,n,n,n,n,nApache,Nginx,Docker,Crio,Containerd,Cubrid,MySQL |
## 클립보드에 복사된 텍스트 붙여 넣기
$ bash <(curl -s http://192.168.30.6/monitoring/api/agent/download/sysInstall) \
  khansys 1106 \
  khan 1105 \
  192.168.2.9 \
  192.168.30.6 \
  /svc/test/khan-agent \
  n,n,n,n,n,n,n \
  http://192.168.30.6/monitoring/resources/khan-sys-agent-5.1.0.zip

Starting installation.
########################
User : khansys
UID : 1106
Group : khan
GID : 1105
BIND IP : 192.168.2.9
TARGET IP : 192.168.30.6
Installed Path : /tmp/khan-agent/khan-sys-agent
Eabled Plugins |
  Apache	: n
  Nginx		: n
  Docker	: n
  Crio		: n
  Containerd	: n
  Cubrid	: n
  MySQL		: n
Start Install? (y/n) [n] :